-
Today we will discuss another common case, how to create a progress bar to notify our web users about the state of their long running tasks. For this discussion we will work with DevExpress XAF Business Application Framework. We will develop ONE SMALL CLASS, we can then copy paste to any XAF project.
It is a good idea before starting any work to search the Support Center for ideas and ask the DevExpress support guys. Doing so we found many tickets with ready to work solutions. Some of them are good candidates e.g How to start a long running operation in ASP.NET application using the ThreadPool.QueueUserWorkItem method and show its progress in a browser using a WebService method.
The problem with the previous sample , is that uses a WebService to periodically call back in a Controller. I wanted to create a reusable implementation inside a library and a WebService cannot live in a library.
But I got the idea on how to proceed. I just need to create a ViewItem to host a ASPxProgressBar and with periodic call-backs I will inject JavaScript code to SetPosition on the client side ASPxClientProgressbar
Step 1
First we need a sample project so let’s use the XAF New Solution Wizard to create a new Web Project. We do not need any extra modules or security, just create it as simple as possible. After the solution is created add a very simple Domain Object so XAF can generate a web View for it.
    [DefaultClassOptions]
    public class MyObject : BaseObject {
        public MyObject(Session session) : base(session) { }
    }
Step 2
In addition we need create a sequence of Tasks that will return the state of our work. You can use any technology you prefer e.g. webservices, TPL tasksetc. as long as it returns asynchronously it fits our case. For this discussion I will use the System.Reactive library. To create the sequence the next line will be enough.
Observable
    .Interval(TimeSpan.FromMilliseconds(1000))
    .Subscribe(l =>  Console.WriteLine($"Task {l} completed on Thread:Environment.CurrentManagedThreadId}"));
If you want to test how it behaves add it in a console app and you should see the following output.
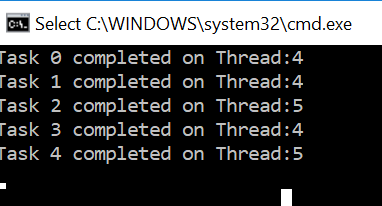
Step 3
In XAF we use Controllers to communicate with our Views so let’s create a very simple Controller and add our sequence and later connect the progress bar.
    public class MyController : ViewController<DetailView> {
        public MyController() {
            var action = new SimpleAction(this, "StartLongOperation", PredefinedCategory.Tools);
            action.Execute += action_Execute;
        }

        void action_Execute(object sender, SimpleActionExecuteEventArgs e) {
            Observable.Interval(TimeSpan.FromMilliseconds(1000)).Subscribe();
        }
    }
This controller declares an StartLongOperation Action and starts our sequence, exactly as described on XAF docs.
Currently XAF already generated the web UI and actions. Here how the DetailView of MyObject looks like.

Step 4
Now its time to create the progress bar container. For this scenario we do not need to alter the state of MyObject so we will follow the XAF docs on how to create a ViewItem rather than a PropertyEditor. (How to implement a ViewItem). Our starting ViewItem comes next:
    public interface IModelProgressViewItem : IModelViewItem {
    }

    [ViewItem(typeof(IModelProgressViewItem))]
    public class ProgresViewItem : ViewItem {
        public ASPxProgressBar ProgressBar{ get; private set; }

        public ProgresViewItem(IModelProgressViewItem info, Type classType)
            : base(classType, info.Id){
        }

        protected override object CreateControlCore() {
            ProgressBar = new ASPxProgressBar();
            return ProgressBar;
        }

    }
We override the CreateControlCore method and just return an ASPxProgressBar component included in DevExpress suite.
Step 5
As I mentioned before this sample (How to start a long running operation in ASP.NET application using the ThreadPool.QueueUserWorkItem method and show its progress in a browser using a WebService method) use a Javascript Timer to periodically call a WebService which communicates with a XAF Controller.
Our scenario is very similar but we need to remove the dependency to the WebService because we need to push the implementation to our ExcelImporter module that is part of the eXpandFramework and is very hard to host a WebService in a library so it can be reusable and with friction-less installation.
So let’s introduce the Javascript timer in our ProgressViewItem and use Callbacks to notify the server instead of the WebService used in the SC sample. This is as always well document in the XAF docs (How to: Raise XAF Callbacks from Client-Side Events and Process these Callbacks on Server).
        private XafCallbackManager CallbackManager => ((ICallbackManagerHolder)WebWindow.CurrentRequestPage).CallbackManager;
        public int PollingInterval{ get; set; }
        public void Start(int maximum){
            var script = CallbackManager.GetScript(_handlerId, $"'{ProgressBar.ClientInstanceName}'","",false);
            ProgressBar.ClientSideEvents.Init =
                $@"function(s,e) {{
                        if(window.timer) window.clearInterval(window.timer);
                        var controlToUpdate = s;
                        window.timer = window.setInterval(function(){{
                        var previous = startProgress;startProgress = function () {{ }}; //this line disables the Loading Panel see Q427477 in SC
                        {script}startProgress = previous;}},
            {PollingInterval});}}";
        }
In short the Start method use the build-in XAF CallBackManager to generate a script with one parameter the ProgressBar.ClientInstance name. We pass this parameter because we may want to use multiple progress-bars in the same view. Next the timer calls this script every PollingInterval.
Whats left is to implement the IXafCallbackHandler as shown.
        public long Position{ get; set; }
        public void ProcessAction(string parameter){
            var script = $"{parameter}.SetPosition('{Position}')";
            WebWindow.CurrentRequestWindow.RegisterStartupScript(_handlerId,script,true);
        }
Here we just created a script that uses the client side ASPxProgressBar API to SetPosition based on the new ProgressViewItem Position property.
Step 6
To consume the ProgressViewItem we modify the MyController defined in Step 3 like:
        void action_Execute(object sender, SimpleActionExecuteEventArgs e) {
            var progresViewItem = View.GetItems<ProgresViewItem>().First();
            progresViewItem.Start(maximum:100);//Start the timer
            Observable
                .Interval(TimeSpan.FromMilliseconds(1000))
                .Subscribe(l => progresViewItem.Position=l );//Update the position for each Task
        }
Step 7
Finally let's add our ProgressViewItem to the a View. We will use the Model editor to create it and drag & drop to the Layout.
Below you can see how the ProgressViewItem works in runtime in our sample solution.
I wrote this post as a proof of concept rather than a complete implementation, so I am not posting any samples. However you can download the the complete ProgressViewItem used if you wish from this gist.
Below you can verify that it works fine in a real world complex module like the ExcelImporter.
XAF can do Mobile and Windows as well, a Mobile implementation for this scenario does not make much sense but have a look how it looks in the Windows platform.

-
Today I will detail about implementing Scheduled Long running tasks in an abstract and reusable way.
The Requirement
Usually, I have a business objects that store time depended data e.g. Exceptions, Logs etc. There is a need to periodically clean up those tables.
The parameters
First we need to identify the problem parameters so we can create a model interface. Parameterizing the problem in a model interface is very useful, because the end user can switch it off if something goes wrong.
Parameters will be: the business object type which we want to clear its records, the criterion to filter the objects and the time to execute this action. The interface along with its registration for this is bellow.
using System;
using System.ComponentModel;
using DevExpress.ExpressApp;
using DevExpress.ExpressApp.Model;
using DevExpress.ExpressApp.Model.Core;

namespace PurgingRule.Module.Controllers{
    //rules container
    public interface IModelClassPurgingRules:IModelClass{
        IModelPurgingRules PurgingRules{ get; }
    }

    [ModelNodesGenerator(typeof (PurgingRulesModelNodesGenerator))]
    public interface IModelPurgingRules : IModelNode, IModelList<IModelPurgingRule>{
    }

    public interface IModelPurgingRule:IModelNode{
        string Criteria{ get; set; }
        bool ExecuteOnApplicationStart{ get; set; }
        TimeSpan TimeSpan{ get; set; }
        [DefaultValue(500)]
        int ChunkSize{ get; set; }
    }

    //will help us generated more rules if needed
    public class PurgingRulesModelNodesGenerator:ModelNodesGeneratorBase{
        protected override void GenerateNodesCore(ModelNode node){

        }
    }

    public class PurgingController:Controller,IModelExtender{

        //model interface registration
        public void ExtendModelInterfaces(ModelInterfaceExtenders extenders){
            extenders.Add<IModelClass,IModelClassPurgingRules>();
        }
    }
}
Now, it is possible to use the Model Editor to configure in which object we want to apply our rules.

That's nice!
but I like to use an Editor to write the Criteria and need to add a few more bits for this to happen. For this we need to use the CriteriaOptions and Editor attributes as shown:
    public interface IModelPurgingRule:IModelNode{
        [Editor("DevExpress.ExpressApp.Win.Core.ModelEditor.CriteriaModelEditorControl, DevExpress.ExpressApp.Win" + XafAssemblyInfo.VersionSuffix + XafAssemblyInfo.AssemblyNamePostfix, typeof(UITypeEditor))]
        [CriteriaOptions("TypeInfo")]
        string Criteria{ get; set; }
        [Browsable(false)]
        [ModelValueCalculator("((IModelClass) Parent.Parent).TypeInfo")]
        ITypeInfo TypeInfo { get; }
Now it should be straight forward to construct any criterion with the help of this build-in editor.
Making Thread Safe Database calls
Working in a multi threaded environment (long running tasks) is build-in in XAF's XPO ORM so we go for it. Just make sure you enable the switch as bellow.
        protected override void CreateDefaultObjectSpaceProvider(CreateCustomObjectSpaceProviderEventArgs args) {
            var threadSafe = true //enable threadsafe;
            args.ObjectSpaceProviders.Add(new XPObjectSpaceProvider(XPObjectSpaceProvider.GetDataStoreProvider(args.ConnectionString, args.Connection, true), threadSafe));
            args.ObjectSpaceProviders.Add(new NonPersistentObjectSpaceProvider(TypesInfo, null));
        }
Scheduling the long running tasks
We will use the StartNewPeriodic extension method and will follow the next steps in our code.
- Execute once at application startup .
- Collect the model rules to execute.
- Calculate the next execution time. For this we need to store the last execution time so I used the RuleScheduleStorage BO class found at the end of the next snippet
- Periodically schedule parallel calls to the PurgeObjects method for each rule.
    public class PurgingController:Controller,IModelExtender{
        protected override void OnFrameAssigned(){
            base.OnFrameAssigned();
            //1.execute once at application startup .
            if (Frame.Context == TemplateContext.ApplicationWindow){
                //2.collect the model rules to execute.
                var purgingRules = Application.Model.BOModel.Cast<IModelClassPurgingRules>().SelectMany(rules => rules.PurgingRules ).ToArray();
                IEnumerable<(IModelPurgingRule rule, DateTime executed)> ruleExecutionTimes;
                //create an objectspace to query the last execution time from the database
                using (var objectSpace = Application.CreateObjectSpace(typeof(RuleScheduleStorage))){

                    DeleteObsoleteRules(objectSpace, purgingRules);
                    var rulesToSchedule = purgingRules.Where(rule =>rule.Interval!=TimeSpan.MinValue);
                    //get an enumerable of (IModelPurgingRule rule, DateTime executed)
                    ruleExecutionTimes = CalculateExecutionTimes(rulesToSchedule, objectSpace);
                }

                foreach (var ruleExecutionTime in ruleExecutionTimes){
                    var timeSinceLastExecution = DateTime.Now.Subtract(ruleExecutionTime.executed);
                    //calculate if periodic task should start with a delay based time passed since last execution
                    int delay=timeSinceLastExecution<ruleExecutionTime.rule.Interval?(int) ruleExecutionTime.rule.Interval.Subtract(timeSinceLastExecution).TotalMilliseconds:0;
                    //starts the task periodically
                    Task.Factory.StartNewPeriodic(() => PurgeObjects(ruleExecutionTime.rule),
                        interval: (int) ruleExecutionTime.rule.Interval.TotalMilliseconds, delay: delay);
                }
            }
        }

        private static IEnumerable<(IModelPurgingRule rule, DateTime executed)> CalculateExecutionTimes(IEnumerable<IModelPurgingRule> rulesToSchedule, IObjectSpace objectSpace){
            return rulesToSchedule.Select(rule => {
                var ruleScheduleStorage = objectSpace.GetObjectsQuery<RuleScheduleStorage>()
                                              .FirstOrDefault(storage =>storage.RuleScheduleType == RuleScheduleType.Purging && storage.RuleId ==((ModelNode) rule).Id);
                return (rule:rule,executed:ruleScheduleStorage?.Executed ?? DateTime.MinValue);
            });
        }

        private void DeleteObsoleteRules(IObjectSpace objectSpace, IModelPurgingRule[] purgingRules){
            var ids = purgingRules.Cast<ModelNode>().Select(node => node.Id).ToArray();
            var rulesToDelete = objectSpace.GetObjectsQuery<RuleScheduleStorage>().Where(storage =>
                storage.RuleScheduleType == RuleScheduleType.Purging && !ids.Contains(storage.RuleId)).ToArray();
            objectSpace.Delete(rulesToDelete);
            objectSpace.CommitChanges();
        }
You might wonder why I inherit from a controller and used the OnFrameAssigned method as start signal and not simply write my code at Application.SetupComplete.Event. The reason for this is that I like to keep my implementation in separate files and not pollute the Module.cs.
The Long Running PurgeObjects method:
- Stores last execution time in the database.
- Deletes filtered objects in chunks.
        private void PurgeObjects(IModelPurgingRule purgingRule){
            try{
                Tracing.Tracer.LogVerboseText($"Purging {purgingRule}");
                var objectsCount = 0;
                using (var objectSpace = Application.CreateObjectSpace(purgingRule.TypeInfo.Type)){
                    StoreExecutionTime(purgingRule, objectSpace);
                    var criteriaOperator = objectSpace.ParseCriteria(purgingRule.Criteria);
                    var objects = objectSpace.GetObjects(purgingRule.TypeInfo.Type, criteriaOperator);
                    objectSpace.SetTopReturnedObjectsCount(objects, purgingRule.ChunkSize);
                    while (objects.Count > 0){
                        objectsCount += objects.Count;
                        objectSpace.Delete(objects);
                        objectSpace.CommitChanges();
                        objectSpace.ReloadCollection(objects);
                    }
                }
                Tracing.Tracer.LogVerboseText($"Purged {purgingRule}-{objectsCount}");
            }
            catch (Exception e){
                Tracing.Tracer.LogError(e);
            }
        }
        private static void StoreExecutionTime(IModelPurgingRule purgingRule, IObjectSpace objectSpace){
            var ruleId = ((ModelNode) purgingRule).Id;
            var ruleScheduleStorage =objectSpace.GetObjectsQuery<RuleScheduleStorage>().FirstOrDefault(storage =>
                    storage.RuleScheduleType == RuleScheduleType.Purging && storage.RuleId == ruleId) ?? objectSpace.CreateObject<RuleScheduleStorage>();
            ruleScheduleStorage.RuleScheduleType = RuleScheduleType.Purging;
            ruleScheduleStorage.RuleId = ((ModelNode) purgingRule).Id;
            ruleScheduleStorage.Executed = DateTime.Now;
            objectSpace.CommitChanges();
        }
Last minute feature
I am happy with the PurgingRules, but I would be more happy if I could invalidate them based on a CSharp expression. For example I want to have some rules on my dev machine only.
The PurgingRules already have a criterion so we could create a Custom Function to evaluate CSharp expressions.
I want to use this code in eXpandFramework which there is a <=.NET4 dependency so for evaluating CSharp expressions I chose compile on the fly + caching the from ExpressionEvaluator.Eval method.
    public class EvaluateExpressionOperator:ICustomFunctionOperator{
        public List<string> Usings=new List<string>();

        public const string OperatorName = "EvaluateExpression";

        public static EvaluateExpressionOperator Instance{ get; } = new EvaluateExpressionOperator();

        public Type ResultType(params Type[] operands){
            return typeof(object);
        }

        public object Evaluate(params object[] operands){
            var csCode = string.Join("",operands);
            var usings = string.Join(Environment.NewLine,Usings);
            var eval = ExpressionEvaluator.Eval(csCode, usings);
            return eval;
        }

        public string Name => OperatorName;
    }

Working with such rich libraries like DevExpress XAF suite you make serious stuff in no time!

-
A few months ago eXpandFramework released the first version of View inheritance(see http://goo.gl/3YhTa9). In the latest version of the framework (13.1.8.12) it is possible filter the nodes that participate in the inheritance strategy.
The MergedDifference Strategy
To inherit a model view configuration from another view you can use the Model Editor and add a new record in the MergedDifferences collection as illustrated below.

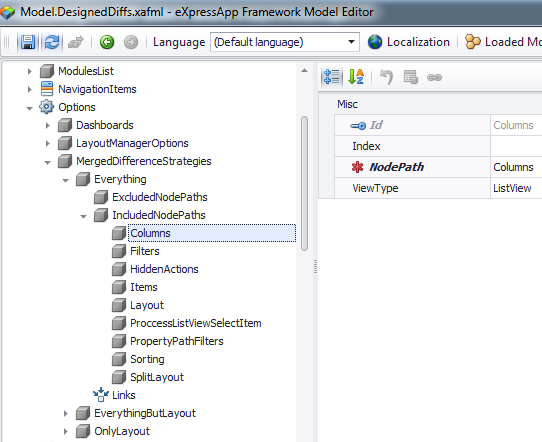
Now the great thing is that the Strategy attribute if fully configurable from Application/Options/MergedDifferencesStrategies. By default there are three common strategies Everything, EverythingButLayout, OnlyLayout.
In the above image we see how the Everything strategy is defined. It contains all root nodes of both DetailView and ListView nodes.
As you might have guessed the inheritance scenarios are limited only from your imagination. For example in the next image we see the OnlyLayout strategy however what defines the layout may vary so it is possible to inherit from the GridViewOptions node by simply adding a new record in the OnlyLayout strategy (bold).
Are there any working examples?
Yes in eXpandFramework source code there are many examples and yes eXpandFramework eats its own food.
The LogicOperationPermissionData
From the LogicOperationPermissionData class starts a deep inheritance tree that defines the Permissions used from all Logic Module depended modules as shown in the next image.

Below we see the layout of the base view (LogicRuleOperationPermissionData class).

In the next image the next class in the inheritance tree where we note that everything is the same as the base view and we also added the AdditionalViewControls extra tab.

The ModelDifferenceObject
In the ModelDifference module you can find the next inheritance tree.

The base view.

Next is the Role descendant layout, where everything is the same as the base view and we also added the Roles extra tab.

The XpandLogonParameters
XpandLogonParameters lives in the Xpand Security module and inherits from the AuthenticationStandardLogonParameters which is an XAF class and lives in the XAF Security module.
Bellow we see the layout of the AuthenticationStandardLogonParameters inside the XAF Security module.

Now inside the Xpand Security module we have modified the previous layout of the AuthenticationStandardLogonParameters as in next image.

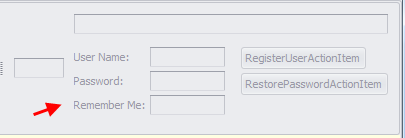
Next, we inherited that layout from the XpandLogonParameters class and added the extra Remember Me item as illustrated below.
A cross view custom Merged Strategy
In both model DetailView and ListView nodes you can find the HiddenActions node which can be used to hide actions for a view.
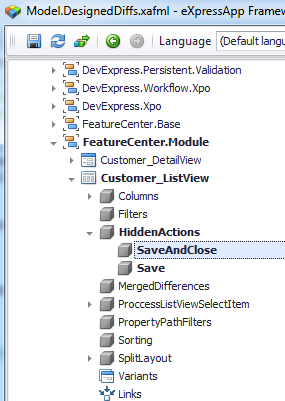
Let’s say we want to create a custom merged strategy to distribute the above list of hidden actions (Save, SaveAndClose).
Step 1: Create a View container
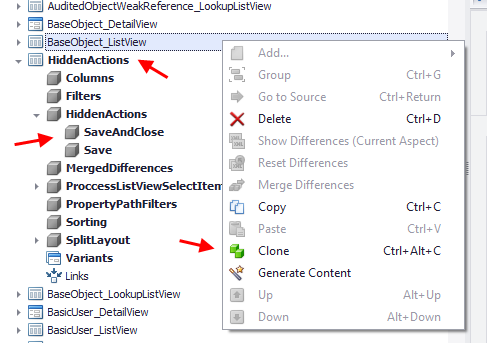
We first create a clone of the BaseObject_ListView, name it HiddenActions and add the actions we want to distribute in the HiddenActions collection. I chose the BaseObject_ListView because it can be inherited from all objects.
Step 2: Create a Merged Strategy
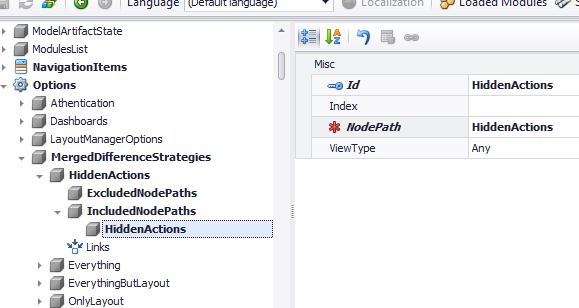
For this we have to set the NodePath to the HiddenActions node and the ViewType to Any so we can distribute to both DetailViews and ListViews.
Step 3: Inherit from the HiddenActions view
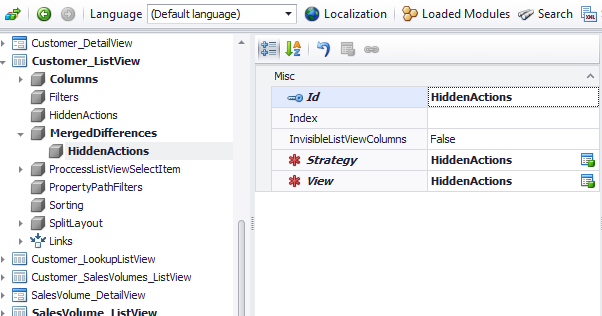
Go to the view that you want to inherit the HiddenActions view differences and create a MergedDifference record as the one below.
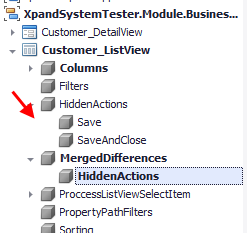
Step 4: Close and open again the Model Editor in order to see the inherited HiddenActions
Big thanks to everybody that helped making this feature so powerful and even bigger thanks to the XAF developers that work hard to create that wonderful Application Model API.

-
Using the next version 13.1.7.3 of eXpandFramework consider designing your shortcuts in a platform agnostic module because it will be possible to be used in your web apps as is!
To enable the web shortcuts you need to install the XpandSystemAspNetModule. If you want to disable them you can use the model setting you see below.

For this implementation I used the jwerty javascript library, however this library cannot detect successfully a few shortcuts used by the browser such as the Ctrl+N and the Ctrl+T. Therefore I added the CtrlNReplacement, CtrlTReplacement attributes you see in the image above. If you know a better library than jwerty that works better I can replace it at once.
Let me know your feedback in eXpand forums please
Happy XAF’ing to all!

-
Right now in XAF it is possible to Clone an Application Model node by simply right click on it and choose Clone from the context menu. What will happen is that an identical node will be created. However by design, further modifications are not synchronized between mother-child nodes. I am going to demonstrate a different approach that does synchronize child nodes and you can find it in eXpandFramework 13.1.6.9 or later when using any module.
In the next image we see two Application Model views, first the MDO_DetailView -the base node- and then the RDO_DetailView which its ModelClass.Type descents from the MDO_DetailView ModelClass.Type.

In any Object View it is now possible to add MergeDifference items like the “Everything MDO” we see in the above picture. The Lookup datasource of the View attribute enumerates all views of the hierarchy chain of the current View.ModelClass.Type. For now, there are two Strategies (Everything and Only Layout). The merging algorithm will create a model node out of the differences of all loaded modules. For example the RDO_DetailView will have the modified/bold Layout of the MDO_DetailView layout as startup layout.
For any questions, feel free to use the eXpandFramework forums.
Happy XAF’ing to all!

-
XAF has a build-in mechanism for customizing the layout’s. However nothing can be compared with the power of native CSS styles. In this post I will discuss eXpand’s implementation of CSS styles in the XAF application model.
How XAF renders a layout
To render a web layout XAF uses the WebLayoutManager class. This class queries all the IModelViewLayoutElements of a DetailView.Model.Layout and renders WebControls accordingly. For example for an IModelLayoutViewItem which is an interface that links the layout element with a property editor, the WebLayoutManager will render two controls. The first one will hold the caption/label and the second one will be the actual control depending on the type of the property editor. Take a look how an looks IModelLayoutViewItem in the Model Editor.

As you can see XAF supports a lot of attributes by default! Due to the large number of attributes WebLayoutManager introduces a table to hold and position our controls and a div above it to allow more flexibility in configuration.
It is also possible to use more more interfaces to design a layout. In the next image we see what is supported by default. However WebLayoutManager behavior is the same.

What we need to style?
Of course everything fast-flexible and without introducing complexities and XAF application model is the perfect tool for this. To summurize the previous paragraph we may wish to style
- The actual WebControl
- The label of the WebControl
- The container table
- The container div
- The whole view
How we get control instances
All XAF controls are rendered by property editors. For the web there is an abstract WebPropertyEditor (see a simplistic inheritance view).

It is enough to create a Controller then query all WebPropertyEditor ViewItems and subscribe to ControlCreated event. When the event raised we can do webPropertyEditor.Control and get the instance we need. Let’s see this a pseudo code snippet.
public class LayoutStyleController:ViewController<DetailView>,IModelExtender {
protected override void OnActivated() {
base.OnActivated();
foreach (var item in View.GetItems<WebPropertyEditor>()) {
item.ControlCreated+=ItemOnControlCreated;
}
}
void ItemOnControlCreated(object sender, EventArgs eventArgs) {
var webPropertyEditor = ((WebPropertyEditor) sender);
webPropertyEditor.ControlCreated-=ItemOnControlCreated;
//here we have our webcontrol instance
var control = webPropertyEditor.Control;
}
How to get the layout container
WebLayoutManager is designed with the highest standards, so it is as easy as subscribing to its LayoutCreated event and getting the value of the Container property
protected override void OnActivated() {
base.OnActivated();
View.LayoutManager.LayoutCreated += LayoutManager_LayoutCreated;
}
void LayoutManager_LayoutCreated(object sender, EventArgs e) {
View.LayoutManager.LayoutCreated-=LayoutManager_LayoutCreated;
//here we have our webcontrol instance
WebControl container = (WebControl) View.LayoutManager.Container;
}
How to get the rest of the objects we need to style
All the rest are only known from the WebLayoutManager which renders them using an advanced template mechanism. It is of course possible to override it however I want to continue working with pluggable controllers. So I will create an interface to help me parse those templates from a Controller.
public interface IWebLayoutManager {
event EventHandler<TemplateInstantiatedEventArgs> Instantiated;
}
public class XpandLayoutManager : WebLayoutManager, IWebLayoutManager {
ViewItemsCollection _detailViewItems;
public event EventHandler<TemplateInstantiatedEventArgs> Instantiated;
protected virtual void OnInstantiated(TemplateInstantiatedEventArgs e) {
var handler = Instantiated;
if (handler != null) handler(this, e);
}
protected override LayoutBaseTemplate CreateLayoutItemTemplate() {
var layoutBaseTemplate = base.CreateLayoutItemTemplate();
layoutBaseTemplate.Instantiated += LayoutBaseTemplateOnInstantiated;
return layoutBaseTemplate;
}
protected override LayoutBaseTemplate CreateLayoutGroupTemplate() {
var layoutBaseTemplate = base.CreateLayoutGroupTemplate();
layoutBaseTemplate.Instantiated += LayoutBaseTemplateOnInstantiated;
return layoutBaseTemplate;
}
void LayoutBaseTemplateOnInstantiated(object sender, TemplateInstantiatedEventArgs templateInstantiatedEventArgs) {
OnInstantiated(templateInstantiatedEventArgs);
}
Also I need to plug this custom XpandLayoutManager to my WebApplication descendant as below.
public class XpandWebApplication : WebApplication {
protected override LayoutManager CreateLayoutManagerCore(bool simple) {
return new XpandLayoutManager();
}
Now it is possible to subscribe to to XpandLayoutManager Instanciated event from a controller and parse the templates to discover the label, the container table and the container div.
Extending the model
Having all the WebControls instances we want to style it is time to extend the model with a few interfaces so to control the styling from there. Bellow is the interface we need
public interface IModelLayoutStyle : IModelNode {
FontStyle FontStyle { get; set; }
Color FontColor { get; set; }
Color BackColor { get; set; }
string CssClass { get; set; }
string Style { get; set; }
}
This interface can be used to extend IModelDetailView and IModelLayoutGroup to control the style of the whole view and of a grouped layout element as illustrated below.
public class LayoutStyleController:ViewController<DetailView>,IModelExtender {
public void ExtendModelInterfaces(ModelInterfaceExtenders extenders) {
extenders.Add<IModelDetailView, IModelLayoutStyle>();
extenders.Add<IModelLayoutGroup, IModelLayoutStyle>();
}
Now for the IModelLayoutViewItem as we discussed in the beginning there are three controls we need to style (actual, label and container). So we need to introduce another interface and to extend the IModelLayoutViewItem like the next one.
public interface IModelLayoutViewItemStyle {
ILayoutStyle LayoutStyle { get; }
}
public interface ILayoutStyle:IModelNode {
IModelLayoutStyle Container { get; }
IModelLayoutStyle Control { get; }
IModelLayoutStyle Caption { get; }
}
After extending the IModelLayoutViewItem the Model Editor now will display the next structure.

Finally it’s time to write the StyleProvider class and put them all in a reusable controller. However I will skip adding so much code in a post and I will redirect you to eXpandFramework GitHub repository (just grab the LayoutStyleController.cs and extend the WebLayoutManager as discussed above).
Demo
Bellow you can see a cool view a designed with the CSS in Application Model and as always with zero code lines.

Those of you that come often to eXpand forums will recognize for sure that this is a replicate of the Kunena forums (see for your self  )!
)!

This functionality is available with eXpandFramework 13.1.5.19.
Until next time,
Happy XAF’ing to all!

-
In next version 13.1.5.2 of eXpandframework there is a new Security module for web (Xpand.ExpressApp.Security.Web.dll) that can automatically logon using forms authentication. It is based on the CanAutomaticallyLogonWithStoredLogonParameters functionality of XAF web apps.
Installation
To use it simply install the Xpand.ExpressApp.Security and use the XpandLogonParameters object in your authentication type

To enable this functionality as usual we need to use XAF’s Application Model editor.

As you can see in the image above it is possible to control the ticket expiration as well.
By default XpandLogonParameters will render a RememberMe checkbox

However again using Model Editor we can simply remove the RememberMe PropertyEditor and the auto authentication will work for any user logged in last!

Happy XAFing to everyone! and do not forget your input in our forums http://www.expandframework.com/forum/11-news/3452-auto-authenticate-and-remember-me.html#4007
P.S.: Here is the related code in our github repo http://goo.gl/XfIPC

-
Recently I had the need to display a complex layout as a preview row in my AspxGridView. Instead of adding a nonpersistent property where I will construct the html I though it would be easier to simply use XAF’s ModelEditor to design a DetailView and then assign that in my preview row.
After one hour or less I ended up with this controller.
[ModelAbstractClass] public interface IModelListViewPreviewRowDetailView : IModelListView {
[DataSourceProperty(ModelViewsDomainLogic.DataSourcePropertyPath)]
[DataSourceCriteria(ModelObjectViewDomainLogic.ModelViewsByClassCriteria)]
[Category("eXpand")]
IModelDetailView PreviewRowDetailView { get; set; }
}
public class PreviewRowDetailViewController:ViewController<ListView>,IModelExtender {
protected override void OnViewControlsCreated() {
base.OnViewControlsCreated();
var previewRowDetailView = ((IModelListViewPreviewRowDetailView) View.Model).PreviewRowDetailView;
if (previewRowDetailView!=null) {
var gridView = ((ASPxGridListEditor) View.Editor).Grid;
gridView.Templates.PreviewRow = new PreviewRowTemplate(Application,ObjectSpace,previewRowDetailView.Id);
gridView.Settings.ShowPreview = true;
}
}
class PreviewRowTemplate : ITemplate {
readonly XafApplication _xafApplication;
readonly IObjectSpace _objectSpace;
readonly string _viewId;
public PreviewRowTemplate(XafApplication xafApplication, IObjectSpace objectSpace, string viewId) {
_xafApplication = xafApplication;
_objectSpace = objectSpace;
_viewId = viewId;
}
void ITemplate.InstantiateIn(Control container) {
var templateContainer = (GridViewPreviewRowTemplateContainer) container;
object obj = templateContainer.Grid.GetRow(templateContainer.VisibleIndex);
var detailView = ViewFactory.CreateDetailView(_xafApplication, _viewId, _objectSpace, obj, false);
detailView.CreateControls();
templateContainer.Controls.Add((Control) detailView.Control);
}
}
public void ExtendModelInterfaces(ModelInterfaceExtenders extenders) {
extenders.Add<IModelListView, IModelListViewPreviewRowDetailView>();
}
}
In the image bellow you can see a ListView of DetailViews 

In next image you can see how simple is to configure this all thanks to XAF Application Model.

The controller of course now lives in www.expandframework.com and you can follow its history in our online repository.
http://goo.gl/oCJ1J
This is not a perfect solution, however it does its job. I also posted in eXpand forums where we can all discuss further improvements
http://www.expandframework.com/forum/11-news/3443-detailview-as-previewrow.html#3988

-
jCarousel is a well known carousel build using JQuery by Jan Sorgalla. I have port the Carousel with dynamic content loading via JavaScript to .Net and created NCarousel which is basically a classic asp.net server control that a developer can configure using c# .
A list editor and added to eXpand (NCarouselListEdior) and all NCarousel control properties are also in the model so you can configure it from there.
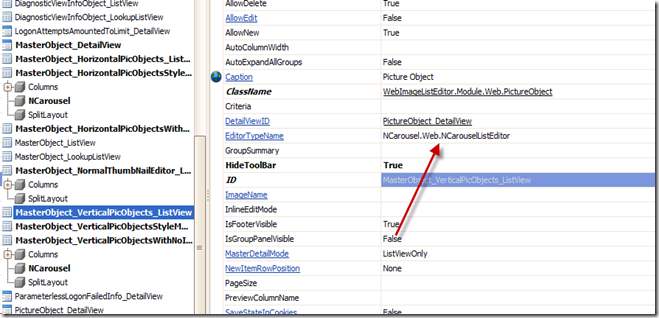

A special interface IPictureItem should be implemented by your BO object in order editor to work.
public interface IPictureItem
{
string ID { get; }
Image Image { get; }
string ImagePath { get; }
}
At least one of Image, ImagePath peoperties should have values
To make the design of NCarousel skin design fast without having to go back to the model many times I have added the AllowOverride attribute at model, which basically does not inject any specific to view css, thus allowing the skin to be overridden by adding a ling to a css file in your default.aspx.
You can get the default skin css either from eXpand feature center application or from JCarousel original files

That way you modify only the css with dimensions, colors what ever you fill like and then set the attribute back to false and copy your css modifications back to the model so they can be inject as specific to view css.
A normal thumbnail list editor that will display all images in one go similar to the one available at DevExpress Extend demo has been added as well

The image bellow demo the use of multiple editors as nested listview editors,
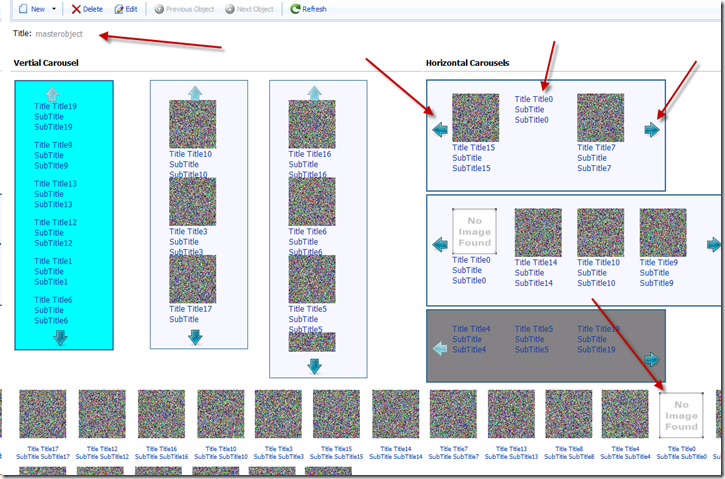
ps:as text bellow image will concatenate all visible properties of the listview. Samples of those editors can be found at Xpand Feacturecenter web application
http://expandframework.com/downloads/download.html


-
What Locking is all about
Transactional isolation is usually implemented by locking whatever is accessed in a transaction. There are two different approaches to transactional locking: Pessimistic locking and optimistic locking.
The disadvantage of pessimistic locking is that a resource is locked from the time it is first accessed in a transaction until the transaction is finished, making it inaccessible to other transactions during that time. If most transactions simply look at the resource and never change it, an exclusive lock may be overkill as it may cause lock contention, and optimistic locking may be a better approach. With pessimistic locking, locks are applied in a fail-safe way. In the banking application example, an account is locked as soon as it is accessed in a transaction. Attempts to use the account in other transactions while it is locked will either result in the other process being delayed until the account lock is released, or that the process transaction will be rolled back. The lock exists until the transaction has either been committed or rolled back.
With optimistic locking, a resource is not actually locked when it is first is accessed by a transaction. Instead, the state of the resource at the time when it would have been locked with the pessimistic locking approach is saved. Other transactions are able to concurrently access to the resource and the possibility of conflicting changes is possible. At commit time, when the resource is about to be updated in persistent storage, the state of the resource is read from storage again and compared to the state that was saved when the resource was first accessed in the transaction. If the two states differ, a conflicting update was made, and the transaction will be rolled back.
In the banking application example, the amount of an account is saved when the account is first accessed in a transaction. If the transaction changes the account amount, the amount is read from the store again just before the amount is about to be updated. If the amount has changed since the transaction began, the transaction will fail itself, otherwise the new amount is written to persistent storage.
XAF Build in locking mechanism
XAF’s datalayer is based on XPO , which already has an optimistic locking implementation on its core. It is enabled by default for all objects that inherit XPBaseObjet and can be disabled by using the OptimisticLocking attribute .
[OptimisticLocking(false)]
public class Client:XPBaseObject {
public Client(Session session) : base(session) {
}
}
For objects that have that attribute XPO is going to create an extra service field, the OptimisticLockingField to store that state of the object.
To see the locking mechanism in action you can perform the following steps
| User 1 | User 2 |
| 1. Run application | 1. Run application |
| 2. Go to Client object detail view | 2. Go to Client object detail view |
| 3. XPO reads the value from the optimistic field value (initial value is zero) and stores it to memory | 3. XPO reads the value from the optimistic field value (initial value is zero) and stores it to memory |
| 4. User is making a change and tries to save the object - XPO queries the the optimisticfield value and compares it with the one in memory
- 2 values are equal so transaction is commited and optimisticlocking fields is raized by one
| 4. User is making a change and tries to save the object - XPO queries the the optimisticfield value (now its one cause user 1 has save the record) and compares it with the one in memory
- 2 values are not equal so a locking exception is thrown by XPO giving information about the locked object
|
| | 5. User reloads the object from the database, new optimisticlocking field value is store in memory (one), user makes changes and is able to save the record |
eXpand Pessimistic locking
XPO has no means to determine any information about users, but we are in XAF context and XAF has a build in security system and we know the current user. Lets try to implement a pessimistic locking feature for our XAF applications.
By carefully looking at “3. XPO reads the value from the optimistic field value (initial value is zero) and stores it to memory “ , we can see that there is a place to minimize the locking conflicts. What if we display the detailview in “ViewMode” and add an “Edit” action? And when the Edit action is executed the object will be reloaded from the db, also when is saved the DetailView will return is View mode.
I think we are going to gain something from that even if we use the default Xpo optimistic locking. Lucky us eXpand has already the ViewEditMode attribute that can do that job for us.
Now from the Pessimistic locking definition (when it is first is accessed by a transaction). We have to decide what that means in our case. A good idea would be to lock the object at the time that is changed by a user. Of course we can enhance that in the future upon your requests. We also need a special field that will store the user that locked the record and a special attribute to mark the object for using our pessimistic locking attribute. Finally its a good idea to disable default OptimisticLocking mechanism.
All the above should be transparent to the user of our feature, we need to spent zero time when using it in future projects
Customizing XAF types is very easy as you know , just some lines of code and can do the trick.
public override void CustomizeTypesInfo(DevExpress.ExpressApp.DC.ITypesInfo typesInfo) {
base.CustomizeTypesInfo(typesInfo);
var typeInfos = typesInfo.PersistentTypes.Where(info => info.FindAttribute<PessimisticLockingAttribute>() != null);
foreach (var typeInfo in typeInfos) {
typeInfo.AddAttribute(new OptimisticLockingAttribute(false));
var memberInfo = typeInfo.FindMember(LockedUser);
if (memberInfo == null) {
memberInfo = typeInfo.CreateMember(LockedUser, SecuritySystem.UserType);
memberInfo.AddAttribute(new BrowsableAttribute(false));
}
}
}
Great! Now we need to define our specifications. Remember we are dealing with data now and with a complex feature that may evolve from fellow developers request. For those cases at eXpand we use a BDD approach, and MSpec as our BDD framework.
Here are some specs
PessimisticLockingViewController, When Object Change
» should lock the object
PessimisticLockingViewController, When objectspace rollback
» should unlock object
PessimisticLockingViewController, When ospace commited
» should unlock object
PessimisticLockingViewController, When View CurrentObject Changing
» should unlock object
PessimisticLockingViewController, When View Is closing
» should unlock object
PessimisticLocker, When object is about to be unlocked
» should not unlock if current user does not match locked user
PessimisticLockingViewController, When a locked object is open by a second user
» should not allowedit on view
PessimisticLockingViewController, When 2 users open the same object and both try to change it
» should mark as readonly last user view
PessimisticLockingViewController, When editing a locked detailview
» should allow edit for the pessimistic locking context
PessimisticLocker, When unlocking new object
» should do nothing
PessimisticLocker, When locking new object
» should do nothing
PessimisticLocker, When new object locking state is queried
» should return unlocked
and in this file you can see the implementation of them
https://github.com/expand/eXpand/blob/master/Xpand/Xpand.Tests/Xpand.Tests/Xpand.ExpressApp/PessimisticLockingSpecs.cs
As you see from the specifications when an object is locked the detailview will be read only for a PessimisticLocking context. But real world is strange we have to cover exceptions as well. What will happen if an object was locked and our application was terminated abnormally? We need an action that will force unlock the object.

Maybe there is a need for some timeout implementation there but I do not have strong ideas on this, better wait for some feedback from out there first before spending any more resources. Anyway we are very close now. What we are missing is a message that will tell which user has locked an object when it is locked.
To display the message I think we can utilize our AdditionalViewControlsProvider module. That module allows to conditionally display (When our LockingUser field is different for the current user) a message. Also allows us to conditionalize/localize the message it self. Lets see how
First step will be to use the AdditionalViewControlsRule to display the message as bellow
[PessimisticLocking]
[Custom("ViewEditMode","View")]
[AdditionalViewControlsRule("teee", "LockedUser!='@CurrentUserID' AND LockedUser Is Not Null", "1=0", "Record is locked by user {0}", Position.Top, MessageProperty = "LockedUserMessage")]
public class Client : BaseObject {
public Client(Session session)
: base(session) {
}
private string _lockedUserMessage;
[NonPersistent][Browsable(false)]
public string LockedUserMessage {
get {
var memberValue = GetMemberValue("LockedUser");
if (_lockedUserMessage != null) {
return memberValue != null ? string.Format(_lockedUserMessage, memberValue) : null;
}
return null;
}
set { _lockedUserMessage = value; }
}
}
that will create a rule at our model like the following.

and will display the message

2nd step is to refactor the attribute to something easier to use like
public class PessimisticLockingMessageAttribute : AdditionalViewControlsRuleAttribute {
public PessimisticLockingMessageAttribute(string id)
: base(id, "LockedUser!='@CurrentUserID' AND LockedUser Is Not Null", "1=0", "Record is locked by user {0}", Position.Top) {
MessageProperty = "LockedUserMessage";
}
}
and 3rd step is to refactor the LockedUserMessage property. We have seen already that dynamically adding a property is a piece of cake, but how can we dynamically add a property that has behavior such as the LockedUserMessage property?
Easy as always :), we just have to create our Custom memberinfo like
public class LockedUserMessageXpMemberInfo : XPCustomMemberInfo {
string _theValue;
public LockedUserMessageXpMemberInfo(XPClassInfo owner)
: base(owner, "LockedUserMessage", typeof(string), null, true, false) {
}
public override object GetValue(object theObject) {
var typeInfo = XafTypesInfo.Instance.FindTypeInfo(theObject.GetType());
var memberValue = typeInfo.FindMember("LockedUser").GetValue(theObject);
if (_theValue != null) {
return memberValue != null ? string.Format(_theValue, memberValue) : null;
}
return null;
}
public override void SetValue(object theObject, object theValue) {
_theValue = theValue as string;
base.SetValue(theObject, theValue);
}
}
and register it on the system.
public override void CustomizeTypesInfo(DevExpress.ExpressApp.DC.ITypesInfo typesInfo) {
base.CustomizeTypesInfo(typesInfo);
var typeInfos = typesInfo.PersistentTypes.Where(info => info.FindAttribute<PessimisticLockingMessageAttribute>() != null);
foreach (var typeInfo in typeInfos) {
var memberInfo = typeInfo.FindMember("LockedUserMessage");
if (memberInfo == null) {
var xpClassInfo = XafTypesInfo.XpoTypeInfoSource.XPDictionary.GetClassInfo(typeInfo.Type);
var lockedUserMessageXpMemberInfo = new LockedUserMessageXpMemberInfo(xpClassInfo);
lockedUserMessageXpMemberInfo.AddAttribute(new BrowsableAttribute(false));
XafTypesInfo.Instance.RefreshInfo(typeInfo);
}
}
}
Conclusion
That was a long post but the result i believe is great. All the above are implemented in eXpand framework. Next time you want to use the pessimistic lock approach presented in this blog you only have to decorate your class with 3 attributes
[PessimisticLocking]
[Custom("ViewEditMode","View")]
[PessimisticLockingMessageAttribute("AnId")]
public class Client : BaseObject {
public Client(Session session)
: base(session) {
}
private string _name;
public string Name {
get {
return _name;
}
set {
SetPropertyValue("Name", ref _name, value);
}
}
}
Download expand from http://expandframework.com/downloads/download.html and sent use your feedback or report any problems you find at our forums http://expandframework.com/forum.html
eXpand FeatureCenter implementation contains a demo of this bolg under the Miscallenous/Pessimistic locking navigation menu


-
DevExpress XPO as all modern ORM supports object querying using linq and lamda expressions. A sample query can be written as var xpQuery = new XPQuery < Customer >( Session . DefaultSession ); IQueryable < Customer > customers = xpQuery. Where (customer => customer. Age == 25); From the above query we can get a list of customers that are 25 years old . As you can see the code is very simple. The problem When working with modularized applications you may be in context that you have access to the Customer type only at runtime or you may want to apply that query to different object types that all have an Age property. How that can be done? 1st attempt Lets register the customer to our module and use reflection to create the XPQuery. ModuleXXX moduleXxx = new ModuleXXX ();
Διαβάστε περισσότερα »
-
Continuning the Controlling XtraGrid Control series.. Contolling DevExpress XtraGrid Part-2 (Master Detail) Controlling DevExpress AspxGridControl at runtime Controlling DevExpress XtraGrid Control at runtime With the great help of DevExpress Support Guys eXpand now has an engine that can push any class property to your model and then using the power of modeldifference module allow you to change its value at runtime. See for example how simple we have define all the the options of a GridColumn and push them to the model public interface IModelColumnOptions : IModelColumnOptionsBase { IModelGridColumnOptions GridColumnOptions { get ; set ; } } public interface IModelGridColumnOptions : IModelNode { IModelGridColumnOptionsColumn
Διαβάστε περισσότερα »
-
There are many times that we want to control the searchable fields of the full text of a list view. eXpand can take care of that always using a declaritive approach Also there could be for maximizing user input one may choose to search directly in detailview then after setting the same attribute of at least one of detailview items a search action will be activated for you for that view and when you execute it if more than one records found an ordersourceprovider will be assign in order to navigate through records
Διαβάστε περισσότερα »
-
Using the same approach we did for controlling DevExpress XtraGrid at runtime .
Διαβάστε περισσότερα »
-
When working with Xaf and MVC pattern in order to create actions we are using controllers and initialize them upon them. The default behavior of Xaf is to place our actions in the default toolbar of our view. What if we want to position our actions somewhere else in the view? Then we need to create a custom detailviewItem and write our code against the interface exposed by the detailviewitem. I really did not like the idea , I really wanted to continue to design my actions behavior against the controller interface so i have added an ActionButtonDetailItem for both win and web platforms that can be installed declaratively using the model like bind it to the action we want like and position it anywhere we want using Dx layout component to create our views like
Διαβάστε περισσότερα »