-
A few weeks ago, the eXpandFramework released registration support as discussed in How to manage users (register a new user, restore a password, etc.) from the logon form. While users could register, the implementation process was still incomplete it was missing email notification. Thus, this post will discuss the new EmailModule which was made available beginning version 13.1.8.2.
The module was designed following the workflow discussed in Declarative data auditing. In this post I will demonstrate how to install the module along with the registration functionality discussed in How to manage users (register a new user, restore a password, etc.) from the logon form in order to create three mail rules (
1) When new user is registered.
2) When the password is forgotten.
3) When a new customer is created.
In addition I will discuss how to restrict the EmailModue to sending emails only when a specific user role is logged in.
1) Installation
To complete installation, drag & drop the EmailModule from the toolbox into the module designer.

2) Enabling Registration
To use the registration process, the XpandSecurityWinModule & XpandSecurityWebModule must be installed just as we did with the EmailModule in step 1. Drag & drop these two modules from the toolbox into the module desinger. In addition, use the XpandLogonParemeters as the LogonParametersType of our authentication as illustrated in the following image.

The final step is to configure the model as shown below.

When the application starts, the logon form will have two extra actions. See below.

When the end user executes the top action, the XpandSecurity module will create a new view from the non-persistent RegisterUserParameters class.

Let’s stop here and configure the rule that will actually send an email..
4) Sending an email when a user is registered
The EmailModule will extend the Application model with an extra node

The first step towards sending an email is to setup the SmtpClient. See below.

Next we need to create an EmailContext that will instruct the EmailModule on how to locate the email template used for this type of notification.

Now it’s time to create the actual EmailTemplate. The EmailModule uses the Razor engine and provides an EmailTemplate persistent object for this. Thus, the code snippet inside a ModuleUpdater bellow can do the job!

And of course, XAF can do its usual magic in terms of the UI, allowing the end user to fully design the template at runtime in both windows and web!
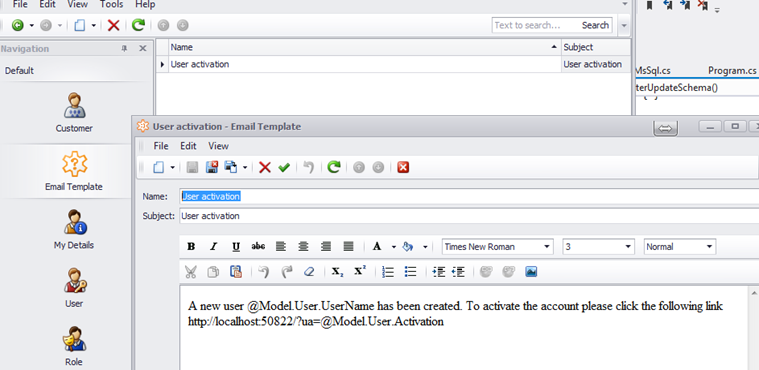
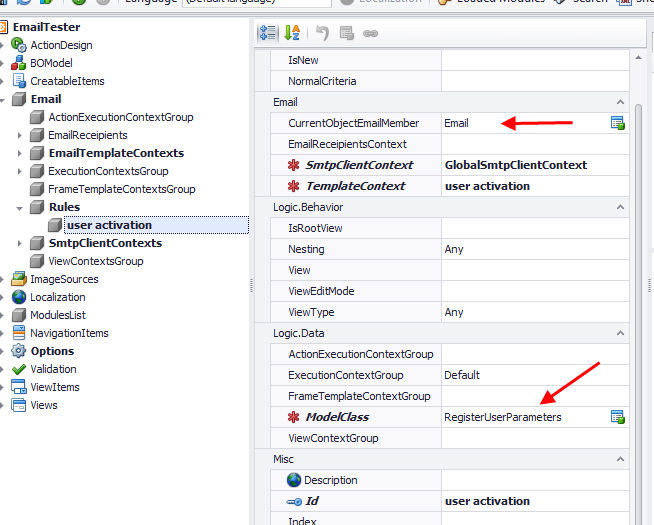
The next stop is to create the rule that will send an email based on the template created when a new user registers. This is illustrated below.
and the mail is send!
5) Sending an email for a forgotten password
As you might have guessed, the process is awfully similar here. We create a different EmailTemplate persistent object for this type of a notification and then create a new model EmailTemplateContent.
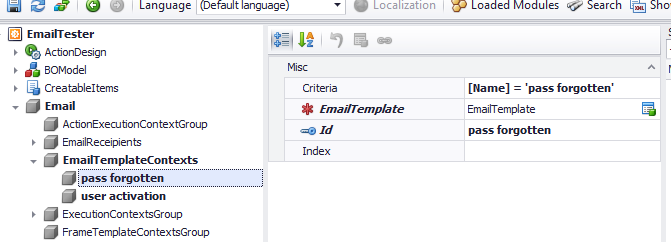
Then we form a rule, which instead of using the RegisterUserParameters class will use the RestorePasswordParameter and the “pass forgotten Template” context.
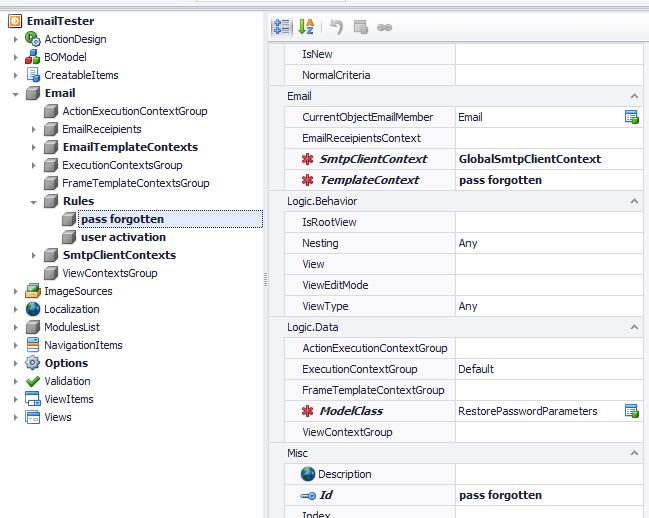
6) Sending an email to all admins when a new customer is created
The procedure is pretty similar to the steps in the previous section. The difference is that in this case we will not set the CurrentObjectEmailMember attribute, since we want to send the email to all the admins and not to the customer. This is why we will need to create an EmailRecipient context as the image below illustrates.
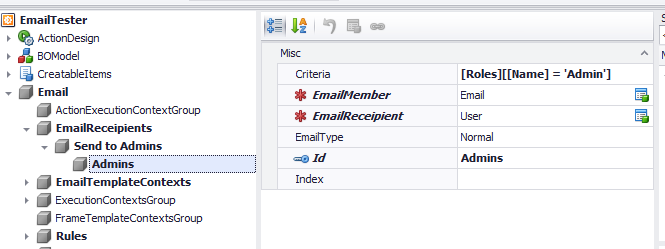
After, we must create the actual rule where we will set the EmailReceipientContext attribute..
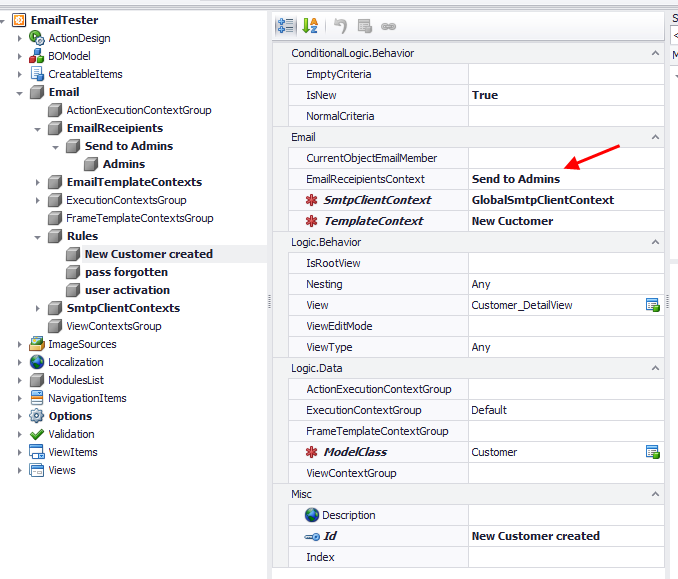
7) Sending emails only when a specific user role is logged in
If you already read the Declarative data auditing post you probably know that all modules that use the Logic module can create rules using three different ways.Code Attributes decorating a class, using the Application Model or using permissions as you see bellow.

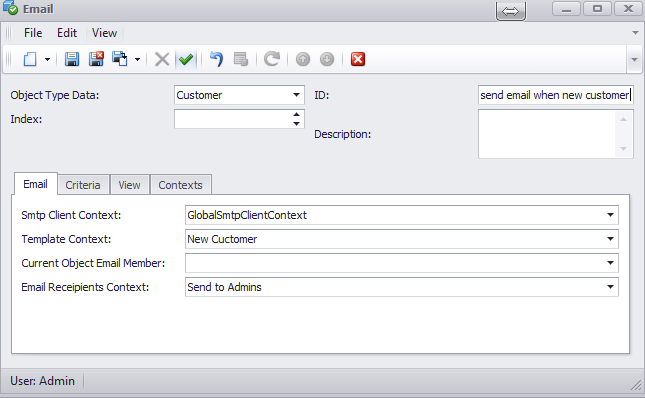
Note that the above layout is inherited from the Logic module using the technique discussed in the Model View inheritance version post.
An alternative approach is to use the Model Application modifications discussed in this post and using the ModelDifference module apply them to a Role Model and assign that model to the roles you want. For more information on this approach, see Changing your web Model at runtime with Model Editor and no IIS reset.
Feel free to explore what I discussed in this post in the eXpand source code under Demos/Modules/Email/EmailTester.sln
As always feel free to use the eXpand forums for your feedback and questions.
Happy XAF’ing to all!

-
I am happy to announce one more contribution from the known to you Stephen Manderson the creator of Dashboard module and not only!
Installation
The reminders can be found in eXpand Scheduler module in version 13.1.7.12 and currently is available only for the windows platform (Stephen is working on the Web version as well!). So you only need to drag & drop the XpandSchedulerWindowsFormsModule into the module designer.

Usage
To enable reminders decorate a business object that implements IEVent with the Xpand.ExpressApp.Scheduler.Reminders.SupportsReminderAttribute. For example in the snippet we enable reminders for the TestEvent and only when the criteria match.
[SupportsReminder(Criteria = "Customer is not null")]
public class TestEvent : Event {
public TestEvent(Session session) : base(session) {
}
// Fields...
Customer _customer;
[Association("Customer-TestEvents")]
public Customer Customer {
get { return _customer; }
set { SetPropertyValue("Customer", ref _customer, value); }
}
}
The SupportsReminderAttribute will extend your Application Model with an extra member.

It is also possible to use directly the model to create this extra member.

The end user to enable reminder for the TestEvent he has to check the enable reminder and setup an interval as shown below.

Then he can continue work with his XAF application and when the interval pass a reminder will popup!

You can test this functionality using the SchedulerTester solution found with eXpand sources unders Demos/Modules/Scheduler folder!
Thanks again to Stephen for this one and we all wait for the web version!
As always feel free to post your feedback question at eXpand forums.
Happy XAF’ing to all!

-
I will provide a short discussion on how to extend XAF StateMachine module as per subject.
By design when creating a new State the it is possible to restrict the transition to that State using Criteria. For example in the below image we see that the transition to the Completed state is allowed only to Administrators.

When you try to make the transition to the Completed state a handled exception will be raised however our goal is to hide all transitions that criteria do not fit.
So given the above requirement we need to write a controller that will go though all data hosted in the ChangeStateAction expose an event that will provide the state from external sources.
You can explore the controller that describes this requirement at
https://github.com/expand/eXpand/blob/master/Xpand/Xpand.ExpressApp.Modules/StateMachine/Controllers/ChangeStateActionController.cs
The next step is to subscribe to RequestActiveState event of the above ChangeStateActionController and provide the Active state logic. Below is illustrated a possible implementation.
public class CriteriaActionStateController:ViewController<ObjectView> {
private const string HideIfCriteriaDoNotFit = "HideIfCriteriaDoNotFit";
ChangeStateActionController _changeStateActionController;
protected override void OnActivated() {
base.OnActivated();
_changeStateActionController = Frame.GetController<ChangeStateActionController>();
_changeStateActionController.RequestActiveState+=ChangeStateActionControllerOnRequestActiveStateAction;
}
public override void CustomizeTypesInfo(DevExpress.ExpressApp.DC.ITypesInfo typesInfo) {
base.CustomizeTypesInfo(typesInfo);
var typeInfo = typesInfo.FindTypeInfo(typeof (XpoState));
typeInfo.CreateMember(HideIfCriteriaDoNotFit, typeof (bool));
}
protected override void OnDeactivated() {
base.OnDeactivated();
_changeStateActionController.RequestActiveState-=ChangeStateActionControllerOnRequestActiveStateAction;
}
void ChangeStateActionControllerOnRequestActiveStateAction(object sender, ChoiceActionItemArgs choiceActionItemArgs) {
var key = typeof(CriteriaActionStateController).Name;
choiceActionItemArgs.Active[key] = IsActive(choiceActionItemArgs.Transition);
}
bool IsActive(XpoTransition xpoTransition) {
var hideIfCriteriaDoNotFit = xpoTransition.TargetState.GetMemberValue(HideIfCriteriaDoNotFit) as bool?;
if (hideIfCriteriaDoNotFit.HasValue&&hideIfCriteriaDoNotFit.Value) {
var stateMachineLogic = new StateMachineLogic(ObjectSpace);
var ruleSetValidationResult = RuleSetValidationResult(xpoTransition, stateMachineLogic);
return ruleSetValidationResult.State != ValidationState.Invalid;
}
return true;
}
[Obsolete("in 13.2 the ValidateTransition will be public")]
RuleSetValidationResult RuleSetValidationResult(XpoTransition xpoTransition, StateMachineLogic stateMachineLogic) {
var methodInfo = stateMachineLogic.GetType().GetMethod("ValidateTransition");
return (RuleSetValidationResult) methodInfo.Invoke(stateMachineLogic, new[]{xpoTransition.TargetState, View.CurrentObject});
}
}
In the above controller (also available in eXpandFramework online repo) we also see that override the CustomisedTypesInfo to create a new member that will allow the end user to decide if he wants to hide the transition or use the by design behavior.

As always let us know your feedback using eXpand forums or for this functionality only you can post your feedback at this issue at DevExpress Support Center.
P.S. This implementation is available with the StateMachine module of eXpandFramework 13.1.7.10 and is also possible to do the same with permissions (see http://goo.gl/T0ZinL)! Also note that is totally possible to just grab the discussed controllers and add them in your projects without the eXpandFramework.

-
Last week I had the privilege to join many of our customers at Oliver’s XAF Training Class in Germany. I wanted to take the time and share with you what happened at the event – as it was an amazing week and highly recommend it to all XAF users.
The location
The hotel is located high in the mountains and the above an amazing landscape…a simply beautiful location.

The agenda
Day 1:
The organizers (Oliver and John) did a great job with course content. You can see all the XAF courseware below.

Day 1 started with XPO and how it works independent of XAF. Oliver is an XPO legend so the introduction was amazing and even I learned some new stuff. Oliver then took the time to describe XAF Domain Components and other data layer related subjects.
The day continued with a number of hands on labs so everyone can learn by actually doing.
To help get relaxed after a busy day of learning, we spent some time on the golf course.

Day 2:
The day started with instruction on editing and maintaining the model as well as standard functionality available through it. Actions, controller extensions binding business logic was also on the menu.
Oliver is an experienced instructor and did great job in this topic area as well. Like day 1, hands on labs were on day 2’s agenda.
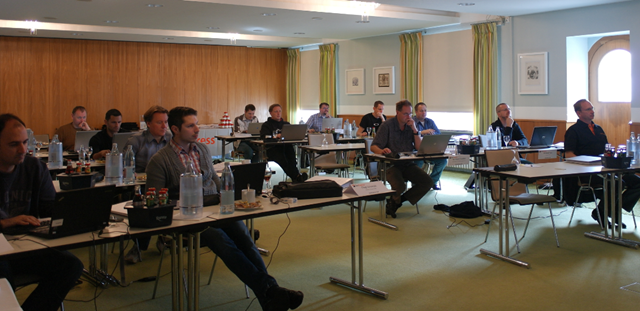
The day ended with time at the spa and a great dinner.
Day 3:
This day involved learning about the built-in modules in XAF and so Oliver spoke to us about Security, Validation, Printing, Reporting, Auditing, State Machines. We covered all simple modules with a few hours of hands on labs.
To blow off steam, John and Oliver organized an evening at the mini-car race track. Many of us gave it our best shot to win….

Unfortunately only one person can win…  .
.

Day 4
With spirits high, Oliver moved onto more advanced modules like XAF’s Scheduler, KPI, WorkFlow and of course a few hours of hands on labs. He also took the time to go further into more difficult topics such as extending and working outside the XAF framework.
The class insisted so I also did a presentation on eXpandFramework where I described how you can use all that extended functionality in our community project.
Day 4’s final event involved alcohol, so I’m not going to post any pictures here  .
.
Day 5
Unfortunately I had a early flight on the last day and couldn’t attend however I can share the daily agenda.
• Modularizing your own functionality
• Testing
• Deployment / Update / ALM / Security Considerations
• Q&A
Way to go to John, Oliver and DevExpress for this amazing XAF training week!
Until next time, Happy XAF’ing to all!

-
If you need to customize the default templates consider going through the instructions posted by Michael Lang in our Support center.
The issue I am talking about can be found at B234907. Just download the pdf and follow the very detailed instructions.
Big thanks to Michael! for this sharing this, let us know your questions/feedback by replying on the same issue.

-
I am happy to announce web support for the module discussed in Dashboards in the real world – A Scotland strike! Big thanks to Stephen Manderson for this additional contribution!.
Installation
Drag & drop from the VS toolbox.

End Result

Please use eXpand forums for your feedback and questions!
p.s. : the module is released with eXpandFrameowork v13.1.7.6.
