A few weeks ago, the eXpandFramework released registration support as discussed in How to manage users (register a new user, restore a password, etc.) from the logon form. While users could register, the implementation process was still incomplete it was missing email notification. Thus, this post will discuss the new EmailModule which was made available beginning version 13.1.8.2.
The module was designed following the workflow discussed in Declarative data auditing. In this post I will demonstrate how to install the module along with the registration functionality discussed in How to manage users (register a new user, restore a password, etc.) from the logon form in order to create three mail rules (
1) When new user is registered.
2) When the password is forgotten.
3) When a new customer is created.
In addition I will discuss how to restrict the EmailModue to sending emails only when a specific user role is logged in.
1) Installation
To complete installation, drag & drop the EmailModule from the toolbox into the module designer.

2) Enabling Registration
To use the registration process, the XpandSecurityWinModule & XpandSecurityWebModule must be installed just as we did with the EmailModule in step 1. Drag & drop these two modules from the toolbox into the module desinger. In addition, use the XpandLogonParemeters as the LogonParametersType of our authentication as illustrated in the following image.

The final step is to configure the model as shown below.

When the application starts, the logon form will have two extra actions. See below.

When the end user executes the top action, the XpandSecurity module will create a new view from the non-persistent RegisterUserParameters class.

Let’s stop here and configure the rule that will actually send an email..
4) Sending an email when a user is registered
The EmailModule will extend the Application model with an extra node

The first step towards sending an email is to setup the SmtpClient. See below.

Next we need to create an EmailContext that will instruct the EmailModule on how to locate the email template used for this type of notification.

Now it’s time to create the actual EmailTemplate. The EmailModule uses the Razor engine and provides an EmailTemplate persistent object for this. Thus, the code snippet inside a ModuleUpdater bellow can do the job!

And of course, XAF can do its usual magic in terms of the UI, allowing the end user to fully design the template at runtime in both windows and web!
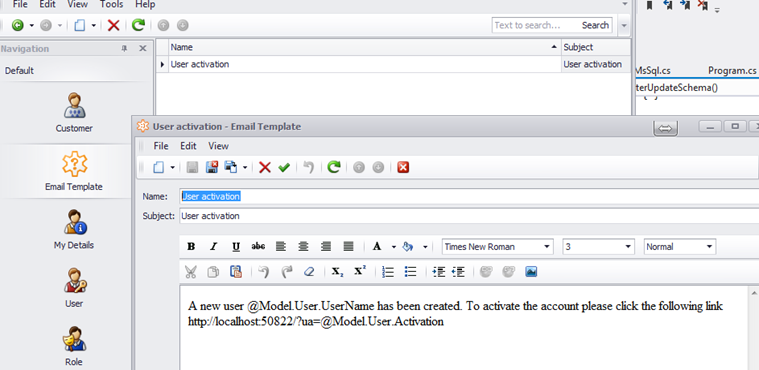
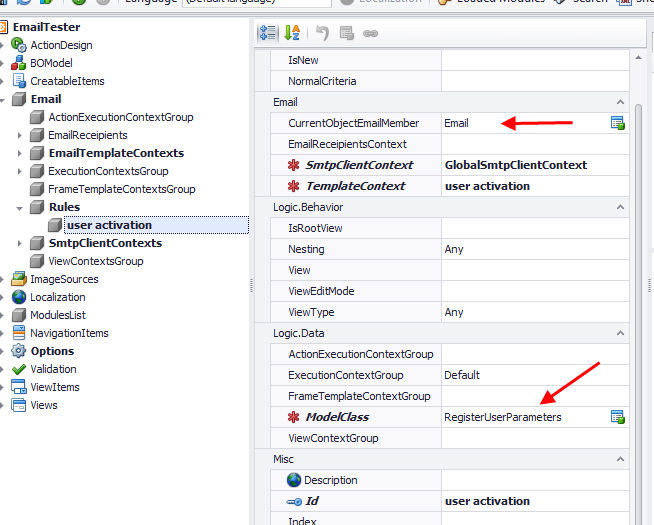
The next stop is to create the rule that will send an email based on the template created when a new user registers. This is illustrated below.
and the mail is send!
5) Sending an email for a forgotten password
As you might have guessed, the process is awfully similar here. We create a different EmailTemplate persistent object for this type of a notification and then create a new model EmailTemplateContent.
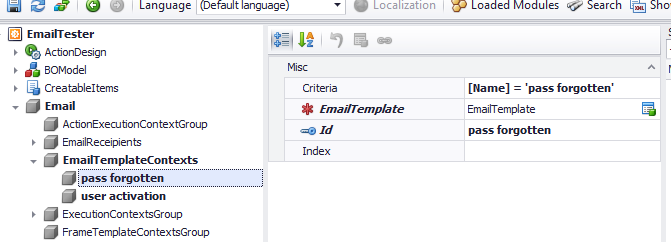
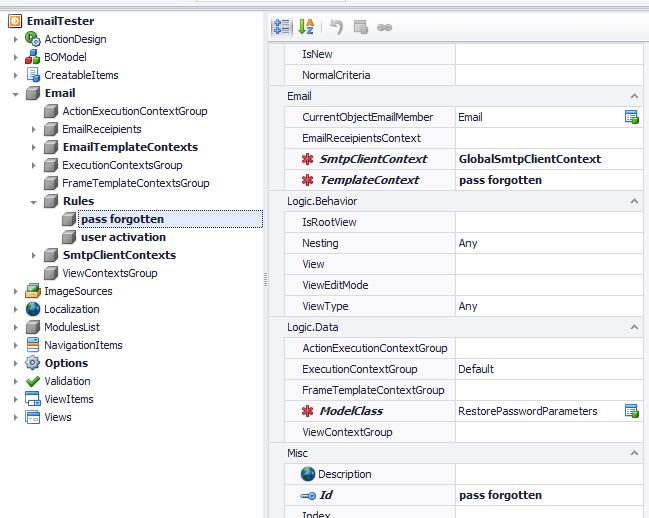
Then we form a rule, which instead of using the RegisterUserParameters class will use the RestorePasswordParameter and the “pass forgotten Template” context.
6) Sending an email to all admins when a new customer is created
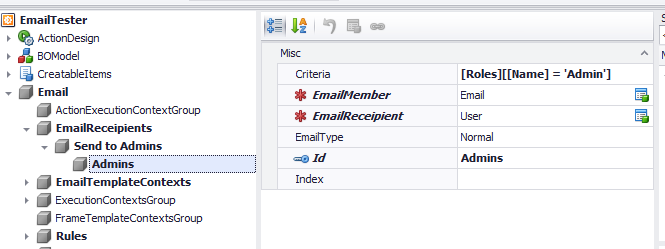
The procedure is pretty similar to the steps in the previous section. The difference is that in this case we will not set the CurrentObjectEmailMember attribute, since we want to send the email to all the admins and not to the customer. This is why we will need to create an EmailRecipient context as the image below illustrates.
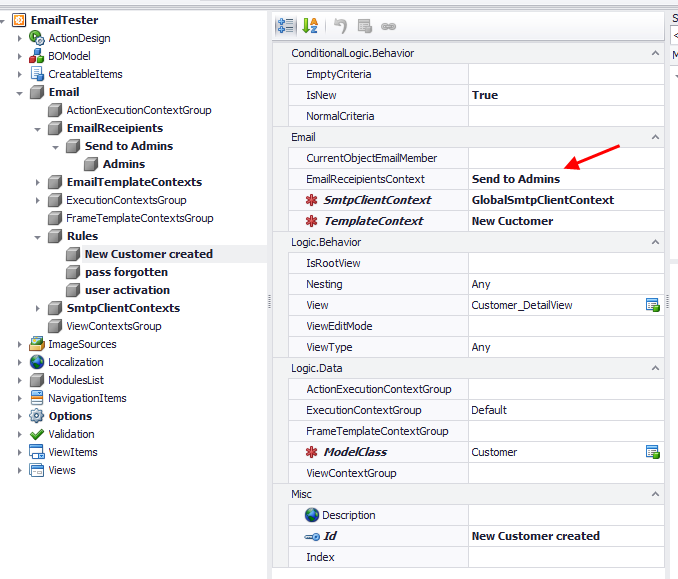
After, we must create the actual rule where we will set the EmailReceipientContext attribute..
7) Sending emails only when a specific user role is logged in
If you already read the Declarative data auditing post you probably know that all modules that use the Logic module can create rules using three different ways.Code Attributes decorating a class, using the Application Model or using permissions as you see bellow.

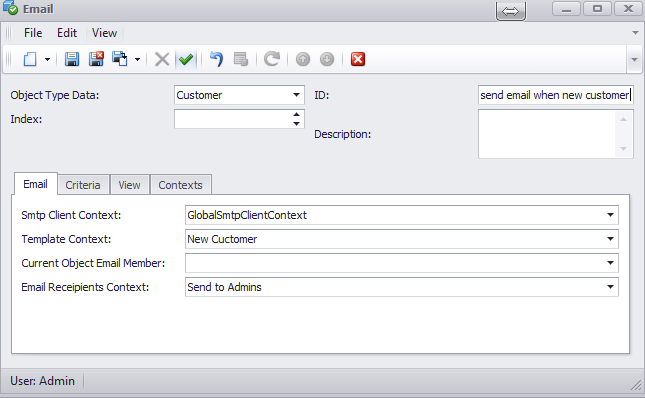
Note that the above layout is inherited from the Logic module using the technique discussed in the Model View inheritance version post.
An alternative approach is to use the Model Application modifications discussed in this post and using the ModelDifference module apply them to a Role Model and assign that model to the roles you want. For more information on this approach, see Changing your web Model at runtime with Model Editor and no IIS reset.
Feel free to explore what I discussed in this post in the eXpand source code under Demos/Modules/Email/EmailTester.sln
As always feel free to use the eXpand forums for your feedback and questions.
Happy XAF’ing to all!

In this post I will provide a discussion on how to apply auditing configurations to your XAF applications, I will use the build-in XAF Audit Trail module and the eXpand Logic module for extending the XAF Application Model.
Goal
Our goal is to be able to declaratively configure auditing for different scenarios. For example apply an auditing configuration to a group of objects that fit in a criterion on a predefined group of views only when these views are shown in the main window.
Background -The logic module
The logic module provides the API we will use to extend the Application Model. In eXpand there are a few modules which use this API. For example three of them live in the ModeArtifactState module. In the next image we can see the structure of two of them the ConditionalAction and the ConditionalController.

Bellow there is the third child of the ModelArtifactState module ObjectView structure. I want to draw your attention to the common attributes we see in both images. All they come from the Logic Module which has the engine to evaluate them. Moreover the Logic module allows us to define permissions and class attributes using the same common attributes.

(AdditionalViewControls, MasterDetail and ModelAdaptor also attach them selves to the Logic Module)
Building a new Audit Trail Module
Using the Logic module is quite easy and the benefits too many. We will go through all the steps for creating an new AuditTrail module. Make a note that we discuss a workflow that can be applied to almost any scenario.
1) The startup interface
First off we need an interface that will be the AuditTrail Rule needed from the Logic Module. Let’s go to XAF Audit Trail documentation to read what we can use to design that interface. In order to attach to the Logic Module this interface needs to derive from ILogicRule interface. Bellow we see the IAuditTrailRule interface with one property the which we can use later to configure the AuditMode from the model or by using Role permissions.
public interface IAuditTrailRule:ILogicRule {
ObjectAuditingMode? AuditingMode { get; set; }
}
2) The Rule context interface
public interface IContextAuditTrailRule : IAuditTrailRule, IContextLogicRule {
The IContextAuditTrailRule provides information about contexts such as Execution, Action, View, Frame. In the top most images of this post you see that our model already has this information. However I mentioned before that the Logic Module supports permissions and class attributes. So the IContextAuditTrailRule will be implemented by the AuditTrailAttribute, and the permission classes which they need to know about context but not about model.
3) The model interfaces
[ModelInterfaceImplementor(typeof(IContextAuditTrailRule), "Attribute")]
public interface IModelAuditTrailRule : IContextAuditTrailRule, IModelConditionalLogicRule<IAuditTrailRule> {
}
The Logic module will extend the Application Model with the IModelAuditTrailRule and will give a structure similar to the one you saw in the top most images of this post. The IModelConditionalLogicRule comes from the Logic module so we only need to use here.
In addition to IModelAuditTrailRule interface we need to feed the Logic module with a list of IModelAuditTrailRules, so let’s design them.
[ModelNodesGenerator(typeof(LogicRulesNodesGenerator))]
public interface IModelAuditTrailLogicRules : IModelNode, IModelList<IModelAuditTrailRule> {
}
The LogicRulesGenerator is a class already implemented in the Logic Module and is needed only in the case we design a LogicRuleAttribute (see step 5)
Next, we need a container interface for the IModelAudiTrailLogicRules like the next one.
public interface IModelLogicAuditTrail : IModelLogicContexts {
IModelAuditTrailLogicRules Rules { get; }
}
The IModelLogicContexts interface comes from the Logic module and it will provide all the context information that the IModelAuditTrail needs.
Finally, we need the root interface to extend the application model, as below.
public interface IModelApplicationAudiTrail:IModelNode {
IModelLogicAuditTrail AudiTrail { get; }
}
public sealed class XpandAuditTrailModule :XpandModuleBase {
public override void ExtendModelInterfaces(ModelInterfaceExtenders extenders) {
base.ExtendModelInterfaces(extenders);
extenders.Add<IModelApplication, IModelApplicationAudiTrail>();
}
4) The Rule Object class
All rules from all sources (model, attributes, permissions) ultimately are converted to LogicRule object instances. The LogicRule abstract class lives in the Logic module. So, we need to design a concrete LogicRule class for the Audit Trail module like the one bellow.
public class AuditTrailRule:LogicRule,IAuditTrailRule {
public AuditTrailRule(IContextAuditTrailRule auditTrailRule)
: base(auditTrailRule) {
AuditingMode=auditTrailRule.AuditingMode;
}
public ObjectAuditingMode? AuditingMode { get; set; }
The AuditTrailRule class must also implement the common IAuditTrailRule interface as the rest of the classes. Note that we also have to initialize any Audit Trail specific properties in the constrictor.
5) The class attribute (Optional)
Below is the AuditTrailRuleAttribute which must derive from the LogicRuleAttribute. The LogicRuleAttribute comes from the Logic module so we do not need to implement anything.
public sealed class AuditTrailRuleAttribute:LogicRuleAttribute,IContextAuditTrailRule {
public AuditTrailRuleAttribute(string id) : base(id) {
}
public ObjectAuditingMode? AuditingMode { get; set; }
To map the AuditTrailRuleAttribute to the Application Model we need to derive from the LogicRuleNodeUpdater as below. The LogicRuleNodeUpdater is implemented in the Logic Module.
public class AuditTrailRulesNodeUpdater : LogicRulesNodeUpdater<IAuditTrailRule, IModelAuditTrailRule> {
protected override void SetAttribute(IModelAuditTrailRule rule, IAuditTrailRule attribute) {
rule.Attribute = attribute;
}
}
6) The permission classes (Optional)
The design of the permission classes is equally simple. For example the permission must derive from LogicRulePermission and implement the IContextRule interface. Here the same as step 4 there is an extra step we need to initialize the properties in the ctor as you see below.
public class AuditTrailRulePermission:LogicRulePermission,IContextAuditTrailRule {
public const string OperationName = "AuditTrail";
public AuditTrailRulePermission(AuditTrailOperationPermissionData contextLogicRule)
: base(OperationName, contextLogicRule) {
AuditingMode=contextLogicRule.AuditingMode;
}
public override IList<string> GetSupportedOperations() {
return new[] { OperationName };
}
public ObjectAuditingMode? AuditingMode { get; set; }
To finish the permission support, we need a concrete implementation of the LogicRuleOperationPermissionData which comes from the Logic module.
public class AuditTrailOperationPermissionData : LogicRuleOperationPermissionData,IContextAuditTrailRule {
public AuditTrailOperationPermissionData(Session session) : base(session) {
}
public override IList<IOperationPermission> GetPermissions() {
return new IOperationPermission[] { new AuditTrailRulePermission(this) };
}
public ObjectAuditingMode? AuditingMode { get; set; }
7) The Logic Installer
To finish with the structure of our custom Audit Trail module we need a concrete implementation of the LogicInstaller class like the next one.
public class AuditTrailLogicInstaller : LogicInstaller<IAuditTrailRule, IModelAuditTrailRule> {
public AuditTrailLogicInstaller(IXpandModuleBase xpandModuleBase)
: base(xpandModuleBase) {
}
public override List<ExecutionContext> ExecutionContexts {
get { return new List<ExecutionContext> {ExecutionContext.ViewChanging}; }
}
public override LogicRulesNodeUpdater<IAuditTrailRule, IModelAuditTrailRule> LogicRulesNodeUpdater {
get { return new AuditTrailRulesNodeUpdater(); }
}
protected override IModelLogicWrapper GetModelLogicCore(IModelApplication applicationModel) {
var auditTrail = ((IModelApplicationAudiTrail)applicationModel).AudiTrail;
return new ModelLogicWrapper(auditTrail.Rules, auditTrail);
}
}
ExecutionContexts:
There I used an ExecutionContext.ViewChanging as my default context. You free to use any context its appropriate for your task. The logic engine will evaluate the IAuditTrailLogicRule only when ViewChaning.
LogicRulesNodeUpdater:
If you implement the optional AuditTrailLogicRuleAttribute you need to pass its model updater at this point.
GetModelLogicCore:
There we need to return a ModelLogicWrapper class with the IModelAuditTrailRules and the rest of the context. It is possible to share rules and contexts from any model path using a different contructor overload. For example we may design the IModelLogicAuditTrail interface like below.
public interface IModelLogicAuditTrail : IModelNode {
IModelAuditTrailLogicRules Rules { get; }
IModelExecutionContextsGroup ExecutionContextsGroup { get; }
}
So now the IModelLogicAuditTrail knows only about ExecutionContexts (no FrameTemplateContext, no Actions, no Views). For this configuration the appropriate ModelLogicWrapper instantiation is shown below.
protected override IModelLogicWrapper GetModelLogicCore(IModelApplication applicationModel) {
var auditTrail = ((IModelApplicationAudiTrail)applicationModel).AudiTrail;
return new ModelLogicWrapper(auditTrail.Rules, auditTrail.ExecutionContextsGroup);
}
Finally we need to register the installer in the contructor of our new module as shown below.
public sealed class XpandAuditTrailModule :XpandModuleBase {
public XpandAuditTrailModule() {
LogicInstallerManager.RegisterInstaller(new AuditTrailLogicInstaller(this));
}
The Audit Trail structure is ready! Bellow we see the model for an AuditTrailRule similar to the one of the top most images of this post.

The Logic module knows what to do with all the attributes except the AuditingMode. Next we discuss how to write logic for this attribute.
The Audit Trail Logic
To write logic for the AuditTrailRule, we have to subscribe to LogicRuleViewController RuleExecture event. The LogicRuleViewController lives of course in the Logic module and we do not need to implement it.
public class AuditTrailRuleViewController:ViewController {
LogicRuleViewController _logicRuleViewController;
ObjectAuditingMode _oldObjectAuditingMode;
protected override void OnFrameAssigned() {
base.OnFrameAssigned();
Frame.Disposing+=FrameOnDisposing;
_logicRuleViewController = Frame.GetController<LogicRuleViewController>();
_logicRuleViewController.LogicRuleExecutor.LogicRuleExecute+=LogicRuleExecutorOnLogicRuleExecute;
}
void FrameOnDisposing(object sender, EventArgs eventArgs) {
Frame.Disposing-=FrameOnDisposing;
_logicRuleViewController.LogicRuleExecutor.LogicRuleExecute -= LogicRuleExecutorOnLogicRuleExecute;
}
void LogicRuleExecutorOnLogicRuleExecute(object sender, LogicRuleExecuteEventArgs logicRuleExecuteEventArgs) {
var logicRuleInfo = logicRuleExecuteEventArgs.LogicRuleInfo;
var auditTrailRule = logicRuleInfo.Rule as IAuditTrailRule;
if (auditTrailRule != null) {
if (!logicRuleInfo.InvertCustomization) {
ApplyCustomization(auditTrailRule);
} else {
InvertCustomization(auditTrailRule);
}
}
}
void InvertCustomization(IAuditTrailRule auditTrailRule) {
var auditTrailService = AuditTrailService.Instance;
if (auditTrailRule.AuditingMode.HasValue)
auditTrailService.ObjectAuditingMode = _oldObjectAuditingMode;
}
void ApplyCustomization(IAuditTrailRule auditTrailRule) {
var auditTrailService = AuditTrailService.Instance;
if (auditTrailRule.AuditingMode.HasValue) {
_oldObjectAuditingMode = auditTrailService.ObjectAuditingMode;
auditTrailService.ObjectAuditingMode = auditTrailRule.AuditingMode.Value;
}
}
LogicRuleExecutorOnLogicRuleExecute method:
This method will be called for all ILogicRule interfaces, for example the new IAuditTrailRule and if you use the MasterDetail module the IMasterDetailRule. So first thing is to cast the returned Rule to IAuditTrailRule and if not it’s the right place to write our logic. In step 7 in the AuditTrailInstaller we used only ExecutionContext.ViewChaning so this method will be called only when ViewChanging and rule is IAuditTrailRule. In addition the LogicRuleInfo provides information about inverting any customization.
Audit Trail Rules in Action
In next eXpandFramework version 13.1.6.3 the Audit Trail is fully functional. More attributes are included and also an IModelMemberAuditTrail to allow creation of the collection needed to monitor auditing from the UI.
In the next image we see a rule that will force the Auditing service to use LightWeght mode for all objects.

Next is a rule applied directly to the Customer class that will audit the members included in the Customer_LastName_Age_Group in all Customer DetailViews
[AuditTrailRule("Audit_Customer", AuditTrailMembersContext = "Customer_LastName_Age_Group",ViewType = ViewType.DetailView)]
public class Customer : Person {
here is the rule that the Logic module will generate for the above AuditTrailAttribute.

and finally using permissions a rule that will audit Employee members under the “Emplyee_Members” context.
var permissionData = ObjectSpace.CreateObject<AuditTrailOperationPermissionData>();
permissionData.ObjectTypeData = typeof (Employee);
permissionData.ID = "audit_emplyee";
permissionData.AuditTrailMembersContext = "Employee_Members";
((XpandRole) userRole).Permissions.Add(permissionData);
You can explore how this module works in Demos/Modules/AuditTrail/AuditTrailTester.sln
Until next time,
Happy XAF’ing!
