In this post I will introduce you to Code First Migrations, an Entity Framework feature introduced in version 4.3 back in February of 2012.
I have extensively covered Entity Framework in this blog. Please find my other Entity Framework posts here .
Before the addition of Code First Migrations (4.1,4.2 versions), Code First database initialisation meant that Code First would create the database if it does not exist (the default behaviour - CreateDatabaseIfNotExists).
The other pattern we could use is DropCreateDatabaseIfModelChanges which means that Entity Framework, will drop the database if it realises that model has changes since the last time it created the database.
The final pattern is DropCreateDatabaseAlways which means that Code First will recreate the database every time one runs the application.
That is of course fine for the development database but totally unacceptable and catastrophic when you have a production database. We cannot lose our data because of the work that Code First works.
Migrations solve this problem.With migrations we can modify the database without completely dropping it.We can modify the database schema to reflect the changes to the model without losing data.
In version EF 5.0 migrations are fully included and supported. I will demonstrate migrations with a hands-on example.
Let me say a few words first about Entity Framework first. The .Net framework provides support for Object Relational Mappingthrough EF. So EF is a an ORM tool and it is now the main data access technology that microsoft works on. I use it quite extensively in my projects. Through EF we have many things out of the box provided for us. We have the automatic generation of SQL code.It maps relational data to strongly types objects.All the changes made to the objects in the memory are persisted in a transactional way back to the data store.
You can find in this post an example on how to use the Entity Framework to retrieve data from an SQL Server Database using the "Database/Schema First" approach.
In this approach we make all the changes at the database level and then we update the model with those changes.
In this post you can see an example on how to use the "Model First" approach when working with ASP.Net and the Entity Framework.
This model was firstly introduced in EF version 4.0 and we could start with a blank model and then create a database from that model.When we made changes to the model , we could recreate the database from the new model.
The Code First approach is the more code-centric than the other two. Basically we write POCO classes and then we persist to a database using something called DBContext.
Code First relies on DbContext. We create 2,3 classes (e.g Person,Product) with properties and then these classes interact with the DbContext class we can create a new database based upon our POCOS classes and have tables generated from those classes.We do not have an .edmx file in this approach.By using this approach we can write much easier unit tests.
DbContext is a new context class and is smaller,lightweight wrapper for the main context class which is ObjectContext (Schema First and Model First).
Let's move on to our hands-on example.
I have installed VS 2012 Ultimate edition in my Windows 8 machine.
1) Create an empty asp.net web application. Give your application a suitable name. Choose C# as the development language
2) Add a new web form item in your application. Leave the default name.
3) Create a new folder. Name it CodeFirst .
4) Add a new item in your application, a class file. Name it Footballer.cs. This is going to be a simple POCO class.Place this class file in the CodeFirst folder.
The code follows
public class Footballer
{
public int FootballerID { get; set; }
public string FirstName { get; set; }
public string LastName { get; set; }
public double Weight { get; set; }
public double Height { get; set; }
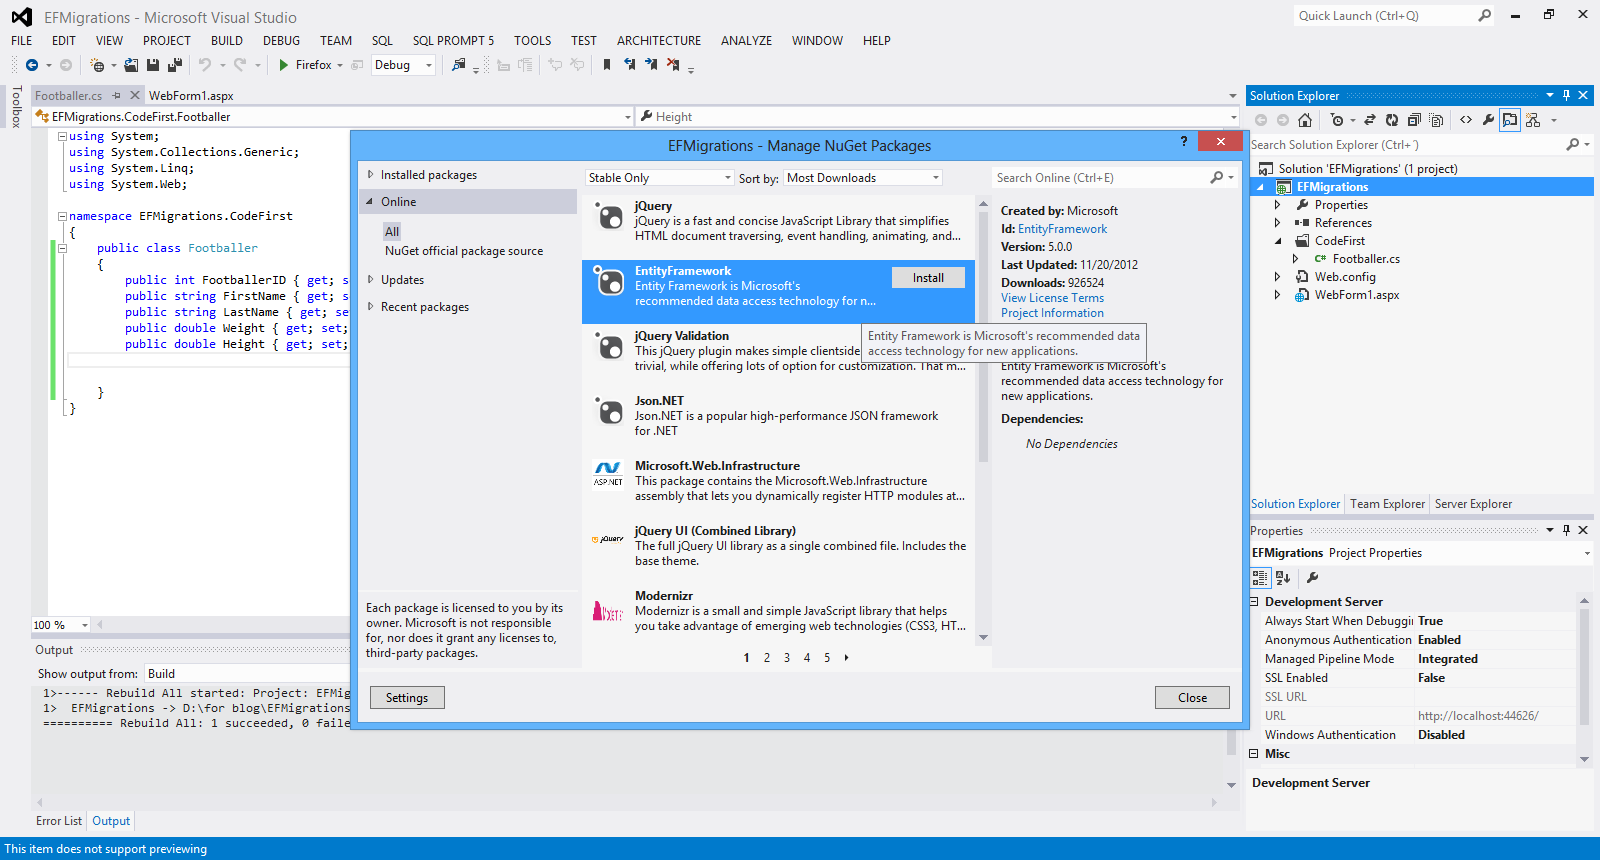
}5) We will have to add EF 5.0 to our project. Right-click on the project in the Solution Explorer and select Manage NuGet Packages... for it.In the window that will pop up search for Entity Framework and install it.
Have a look at the picture below
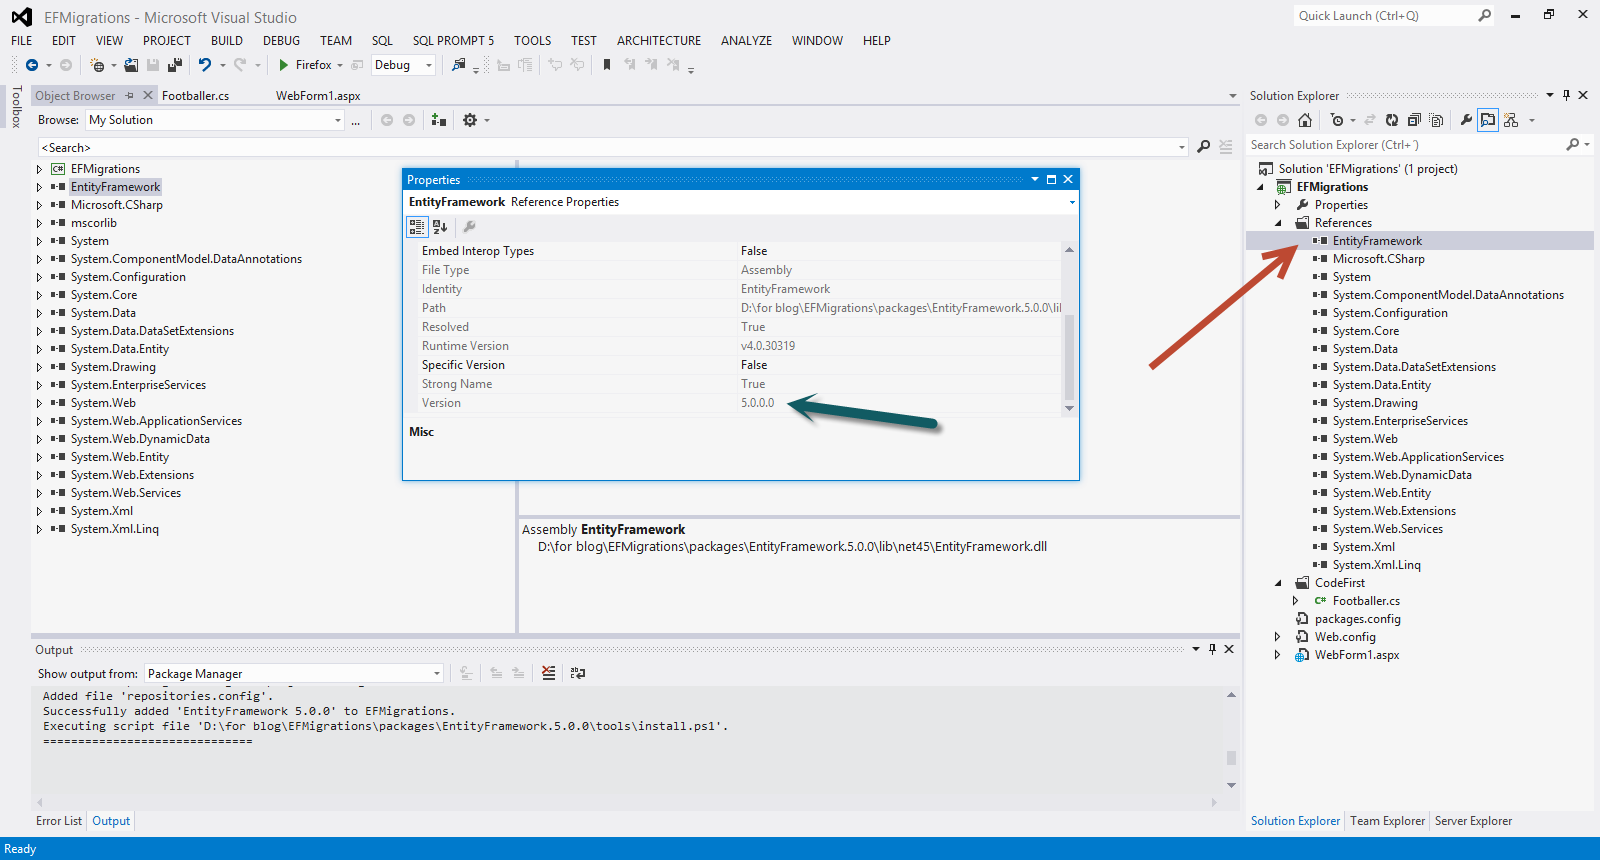
If you want to find out if indeed EF version is 5.0 version is installed have a look at the References. Have a look at the picture below to see what you will see if you have installed everything correctly.
Have a look at the picture below
6) Then we need to create a context class that inherits from DbContext.Add a new class to the CodeFirst folder.Name it FootballerDBContext.Now that we have the entity classes created, we must let the model know.I will have to use the DbSet<T> property.The code for this class follows
    public class FootballerDBContext:DbContext
    {
        public DbSet<Footballer> Footballers { get; set; }


    }
Do not forget to add (using System.Data.Entity;) in the beginning of the class file
7) We must take care of the connection string. It is very easy to create one in the web.config.It does not matter that we do not have a database yet.When we run the DbContext and query against it , it will use a connection string in the web.config and will create the database based on the classes.I will use the name "FootballTraining" for the database.
In my case the connection string inside the web.config, looks like this
   <connectionStrings>

   <add name="CodeFirstDBContext"
connectionString="server=.;integrated security=true;
  database=FootballTraining" providerName="System.Data.SqlClient"/>


    </connectionStrings>
8) Now it is time to create Linq to Entities queries to retrieve data from the database . Add a new class to your application in the CodeFirst folder.Name the file DALfootballer.cs
We will create a simple public method to retrieve the footballers. The code for the class follows
public class DALfootballer
    {


        FootballerDBContext ctx = new FootballerDBContext();

        public List<Footballer> GetFootballers()
        {

            var query = from player in ctx.Footballers select player;

            return query.ToList();


        }

    }
9) Place a GridView control on the Default.aspx page and leave the default name.Add an ObjectDataSource control on the Default.aspx page and leave the default name. Set the DatasourceID property of the GridView control to the ID of the ObjectDataSource control.(DataSourceID="ObjectDataSource1" ). Let's configure the ObjectDataSource control. Click on the smart tag item of the ObjectDataSource control and select Configure Data Source. In the Wizzard that pops up select the DALFootballer class and then in the next step choose the GetFootballers() method.Click Finish to complete the steps of the wizzard.
Build and Run your application.
10) Obviously you will not see any records coming back from your database, because we have not inserted anything. The database is created, though.
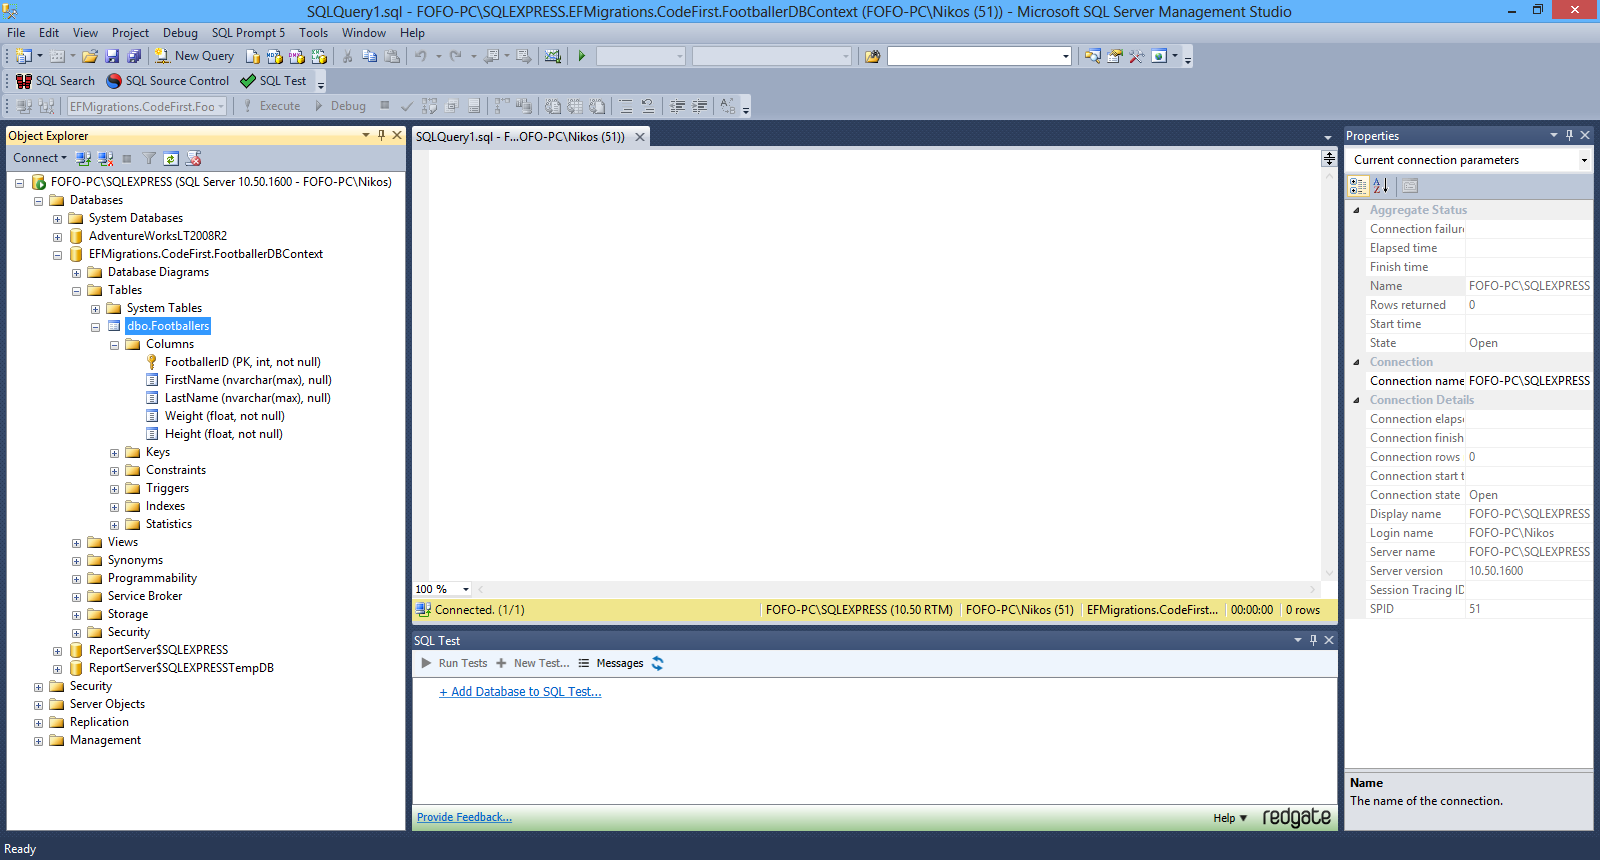
Have a look at the picture below.
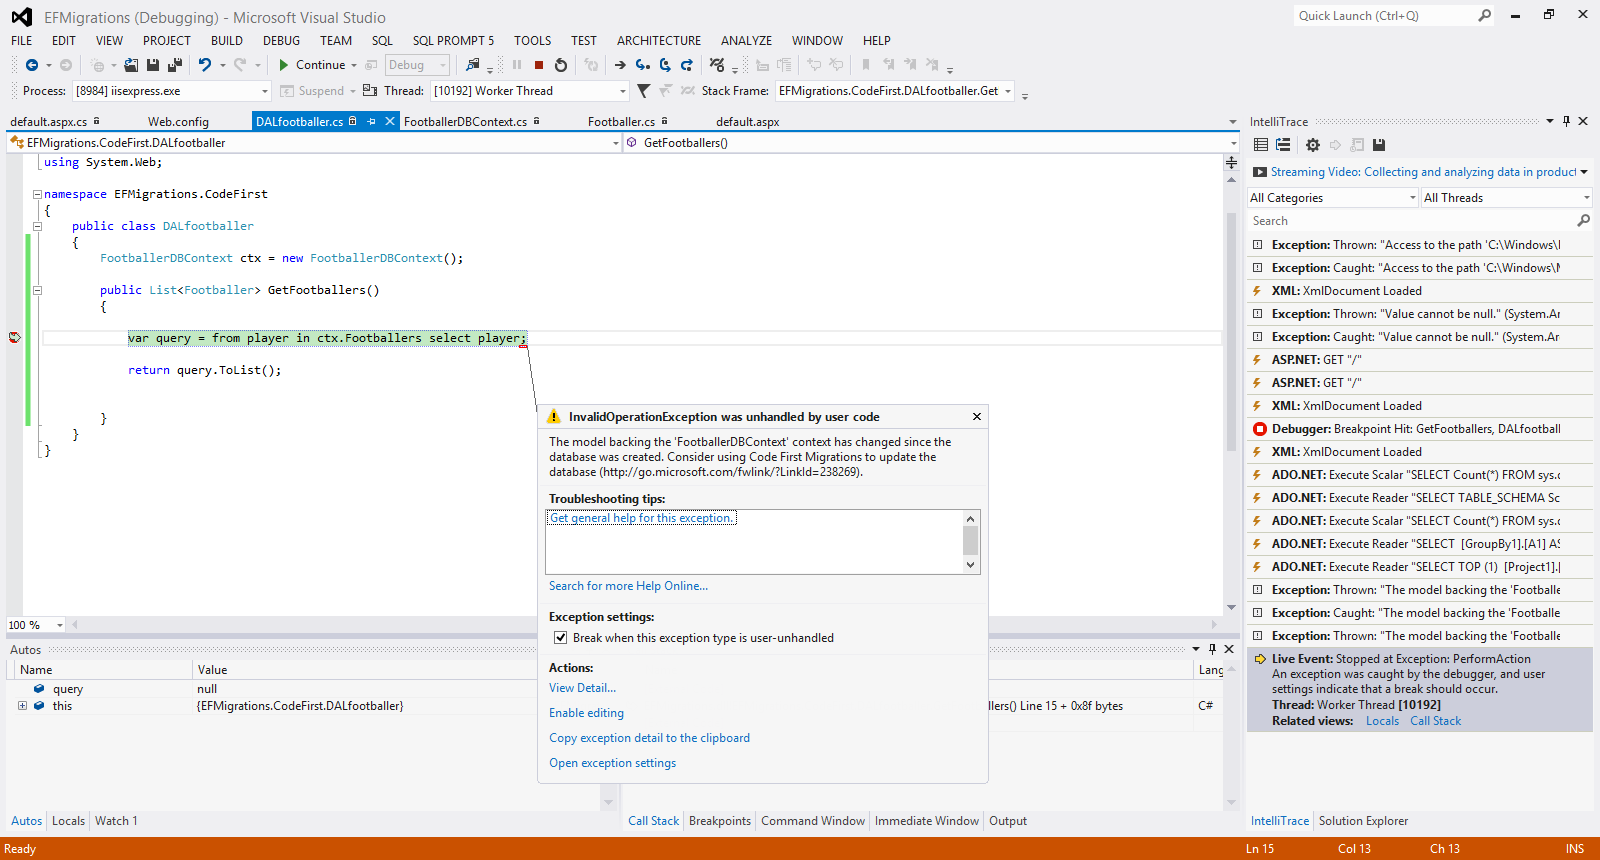
11) Now let's change the POCO class. Let's add a new property to the Footballer.cs class.
public int Age { get; set; }
Build and run your application again. You will receive an error. Have a look at the picture below
12) That was to be expected.EF Code First Migrations is not activated by default. We have to activate them
manually and configure them according to your needs.
We will open the Package Manager Console from the Tools menu within Visual
Studio 2012.Then we will activate the EF Code First Migration Features by writing the command “Enable-Migrations”.
Have a look at the picture below.

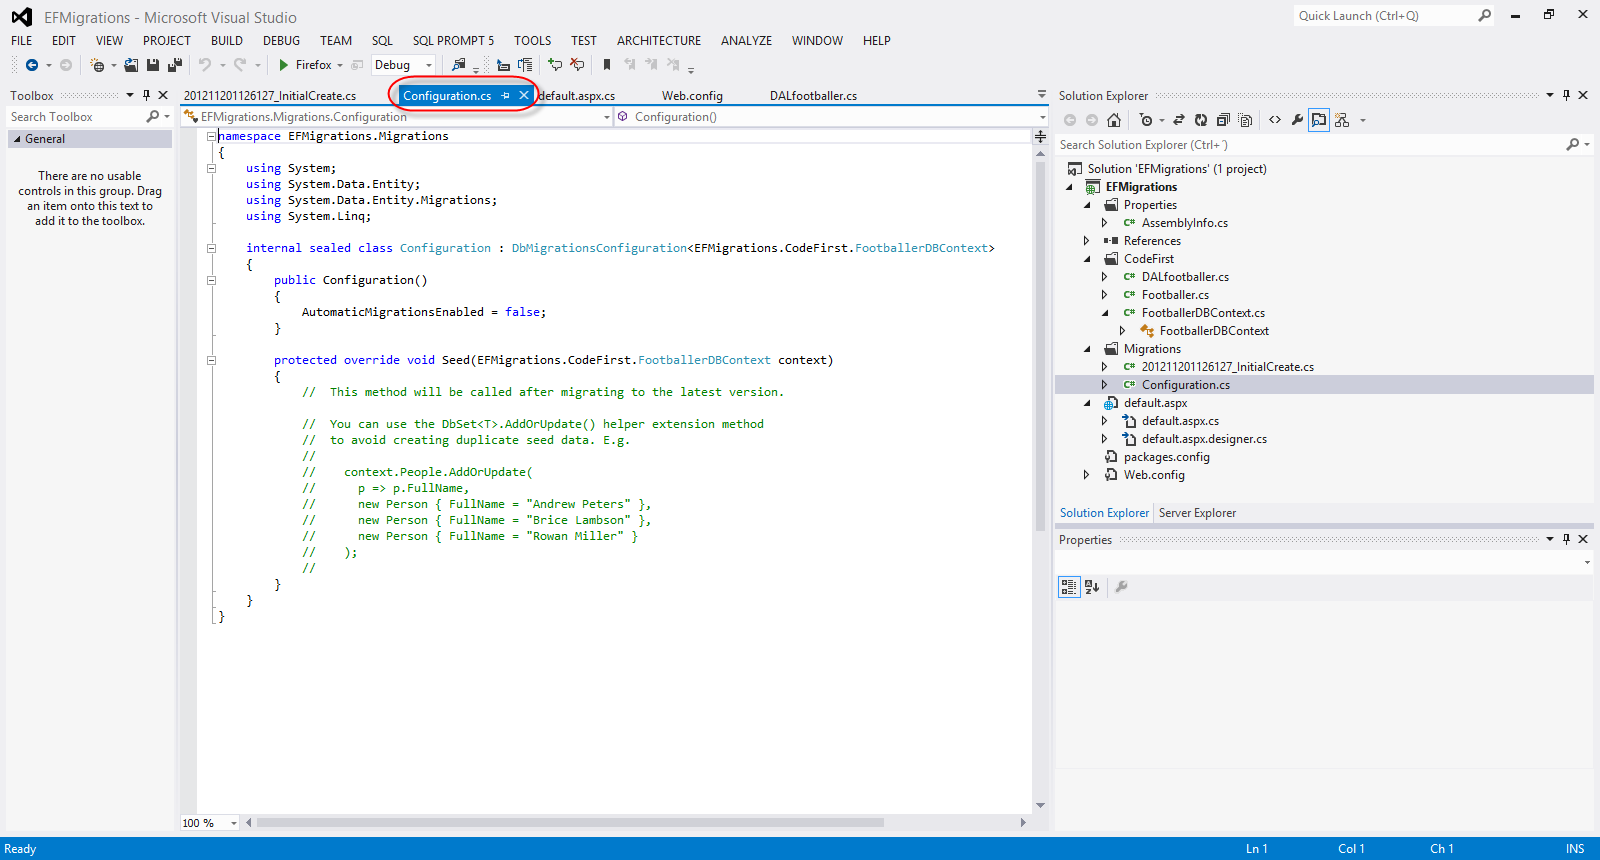
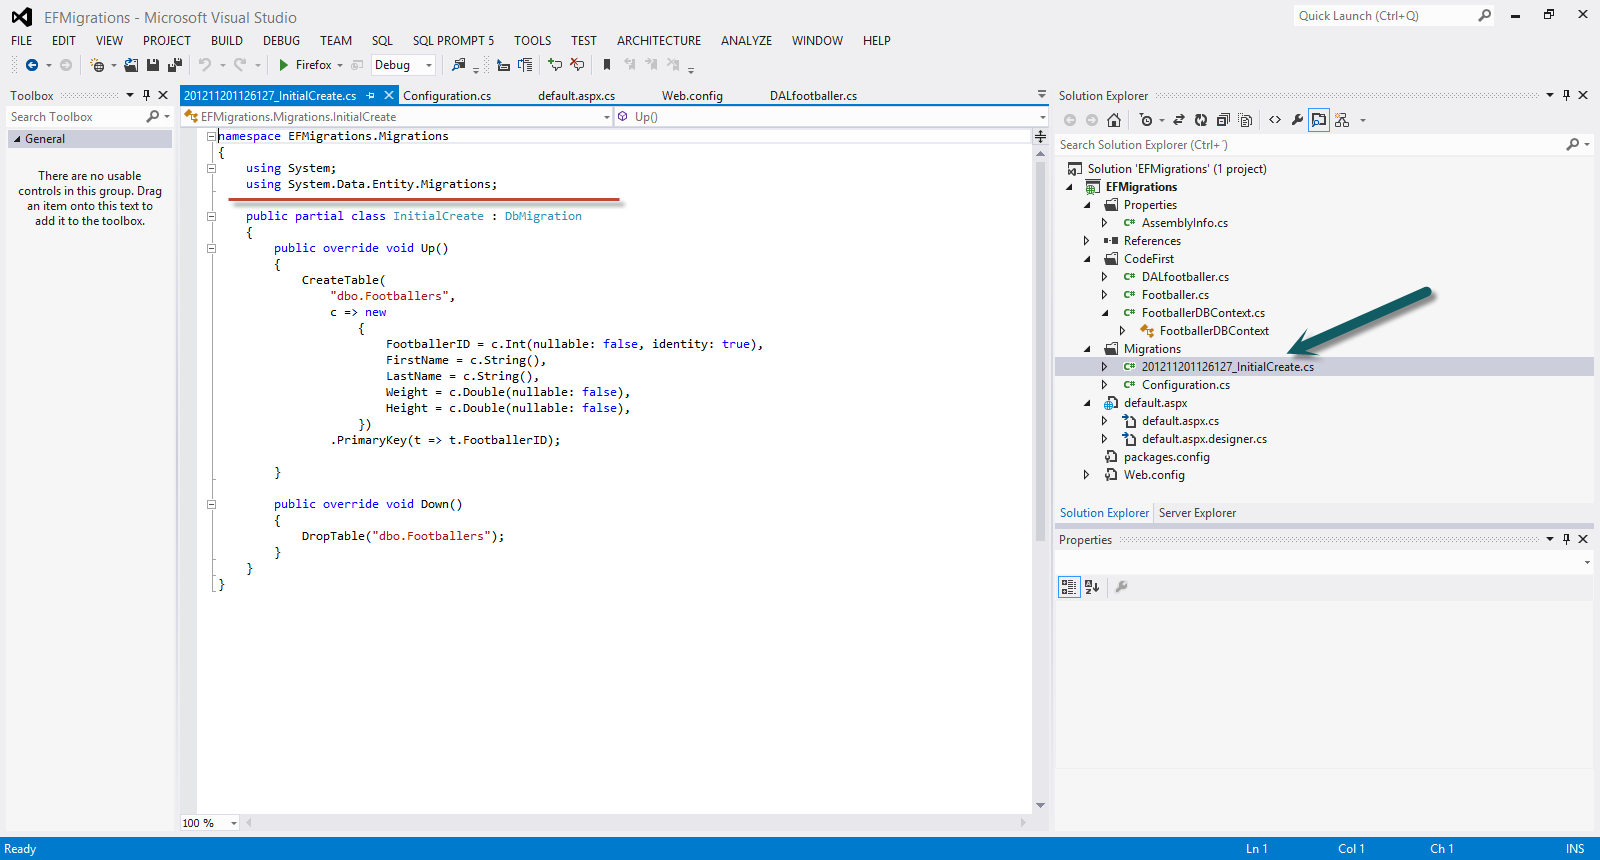
This adds a new folder Migrations in our project. A new auto-generated class
Configuration.cs is created.Another class is also created [CURRENTDATE]_InitialCreate.cs and added to our project.
The
Configuration.cs is shown in the picture below.
The [CURRENTDATE]_InitialCreate.cs is shown in the picture below
13) Νοw we are ready to migrate the changes in the database. We need to run the Add-Migration Age command in Package Manager Console
Add-Migration will scaffold the next migration based on changes you have made to your model since the last migration was created.
In the Migrations folder, the file 201211201231066_Age.cs is created.
Have a look at the picture below to see the newly generated file and its contents.
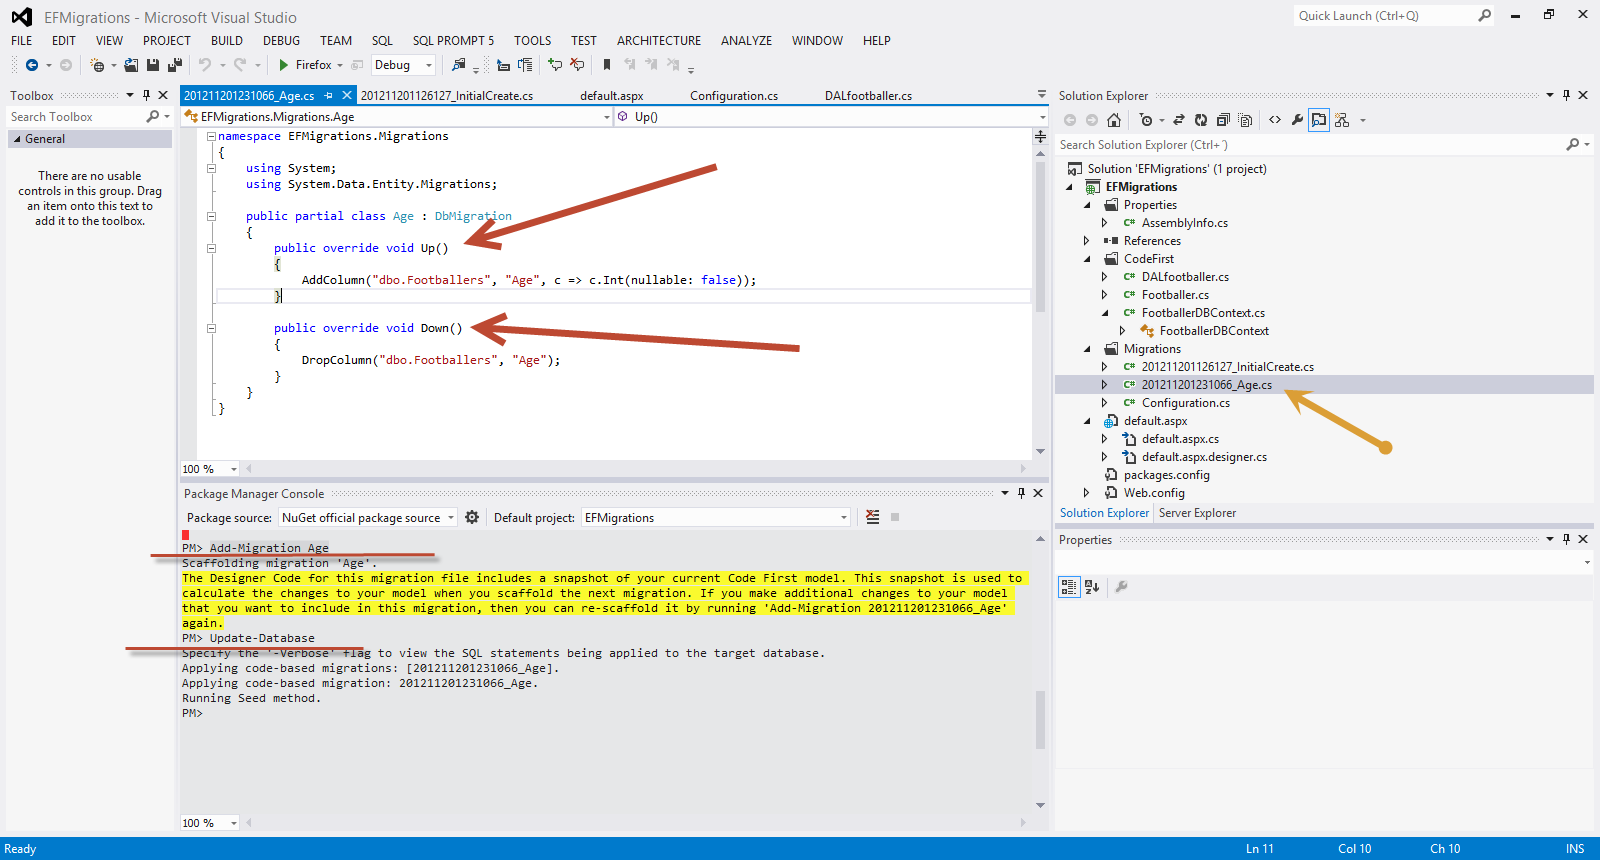
Now we can run the Update-Database command in Package Manager Console .See the picture above.
Code First Migrations will compare the migrations in our Migrations folder with the ones that have been applied to the database. It will see that the Age migration needs to be applied, and run it.
The EFMigrations.CodeFirst.FootballeDBContext database is now updated to include the Age column in the Footballers table.
Build and run your application.Everything will work fine now.
Have a look at the picture below to see the migrations applied to our table.

14) We may want it to automatically
upgrade the database (by applying any pending migrations) when the
application launches.Let's add another property to our Poco class.
public string TShirtNo { get; set; }
We want this change to migrate automatically to the database.
We go to the Configuration.cs we enable automatic migrations.
public Configuration()
{
AutomaticMigrationsEnabled = true;
}
In the Page_Load event handling routine we have to register the MigrateDatabaseToLatestVersion database
initializer.
A database initializer simply contains some logic that is
used to make sure the database is setup correctly.
protected void Page_Load(object sender, EventArgs e)
{
Database.SetInitializer(new MigrateDatabaseToLatestVersion<FootballerDBContext, Configuration>());
}
Build and run your application. It will work fine.
Have a look at the picture below to see the migrations applied to our table in the database.

Hope it helps!!!

In this post I will be continuing my discussion on ASP.Net MVC 4.0 mobile development.
You can have a look at my first post on the subject here . Make sure you read it and understand it well before you move one reading the remaining of this post.
I will not be writing any code in this post. I will try to explain a few concepts related to the MVC 4.0 mobile functionality.
In this post I will be looking into the Browser Overriding feature in ASP.Net MVC 4.0. By that I mean that we override the user agent for a given user session.
This is very useful feature for people who visit a site through a device and they experience the mobile version of the site, but what they really want is the option to be able to switch to the desktop view.
"Why they might want to do that?", you might wonder.Well first of all the users of our ASP.Net MVC 4.0 application will appreciate that they have the option to switch views while some others will think that they will enjoy more the contents of our website with the "desktop view" since the mobile device they view our site has a quite large display.
Obviously this is only one site. These are just different views that are rendered.To put it simply, browser overriding lets our application treat requests as if they were coming from a different browser rather than the one they are actually from.
In order to do that programmatically we must have a look at the System.Web.WebPages namespace and the classes in it. Most specifically the class BrowserHelpers.
Have a look at the picture below

In this class we see some extension methods for HttpContext class.These methods are called extensions-helpers methods and we use them to switch to one browser from another thus overriding the current/actual browser.
These APIs have effect on layout,views and partial views and will not affect any other ASP.Net Request.Browser related functionality.The overridden browser is stored in a cookie.
Let me explain what some of these methods do.
SetOverriddenBrowser() - let us set the user agent string to specific value
GetOverriddenBrowser() - let us get the overridden value
ClearOverriddenBrowser() - let us remove any overridden user agent for the current request
To recap, in our ASP.Net MVC 4.0 applications when our application is viewed in our mobile devices, we can have a link like "Desktop View" for all those who desperately want to see the site with in full desktop-browser version.We then can specify a browser type override.
My controller class (snippet of code) that is responsible for handling the switching could be something like that.
public class SwitchViewController : Controller
{

 public RedirectResult SwitchView(bool mobile, string returnUrl)

{

if (Request.Browser.IsMobileDevice == mobile)

HttpContext.ClearOverriddenBrowser();

else

HttpContext.SetOverriddenBrowser(mobile ? BrowserOverride.Mobile : BrowserOverride.Desktop);

return Redirect(returnUrl);

}

}
Hope it helps!!!!

In this post I will be looking how ASP.Net MVC 4.0 helps us to create web solutions that target mobile devices.
We all experience the magic that is the World Wide Web through mobile devices. Millions of people around the world, use tablets and smartphones to view the contents of websites,e-shops and portals.
ASP.Net MVC 4.0 includes a new mobile project template and the ability to render a different set of views for different types of devices.There is a new feature that is called browser overriding which allows us to control exactly what a user is going to see from your web application regardless of what type of device he is using.
In order to follow along this post you must have Visual Studio 2012 and .Net Framework 4.5 installed in your machine.Download and install VS 2012 using this link.
My machine runs on Windows 8 and Visual Studio 2012 works just fine.It will work fine in Windows 7 as well so do not worry if you do not have the latest Microsoft operating system.
1) Launch VS 2012 and create a new Web Forms application by going to File - >New Project - > ASP.Net MVC 4 Web Application and then click OK
Have a look at the picture below

2) From the available templates select Mobile Application and then click OK.
Have a look at the picture below

3) When I run the application I get the mobile view of the page.
I would like to show you what a typical ASP.Net MVC 4.0 application looks like. So I will create a new simple ASP.Net MVC 4.0 Web Application. When I run the application I get the normal page view.
Have a look at the picture below.On the left is the mobile view and on the right the normal view.

As you can see we have more or less the same content in our mobile application (log in,register) compared with the normal ASP.Net MVC 4.0 application but it is optimised for mobile devices.
4) Let me explain how and when the mobile view is selected and finally rendered.There is a feature in MVC 4.0 that is called Display Modes and with this feature the runtime will select a view.
If we have 2 views e.g contact.mobile.cshtml and contact.cshtml in our application the Controller at some point will instruct the runtime to select and render a view named contact.
The runtime will look at the browser making the request and will determine if it is a mobile browser or a desktop browser. So if there is a request from my IPhone Safari browser for a particular site, if there is a mobile view the MVC 4.0 will select it and render it. If there is not a mobile view, the normal view will be rendered.
5) In the ASP.Net MVC 4.0 (Internet application) I created earlier (not the first project which was a mobile one) I can run it once more and see how it looks on the browser. If I want to view it with a mobile browser I must download one emulator like Opera Mobile.You can download Opera Mobile here
When I run the application I get the same view in both the desktop and the mobile browser. That was to be expected. Have a look at the picture below

6) Then I create another version of the _Layout.mobile.cshtml view in the Shared folder.I simply copy and paste the _Layout.cshtml into the same folder and then rename it to _Layout.mobile.cshtml and then just alter the contents of the _Layout.mobile.cshtml.
When I run again the application I get a different view on the desktop browser and a different one on the Opera mobile browser.
Have a look at the picture below

Τhe Controller will instruct the ASP.Net runtime to select and render a view named _Layout.mobile.cshtml when the request will come from a mobile browser.
Τhe runtime knows that a browser is a mobile one through the ASP.Net browser capability provider.
Hope it helps!!!
