Παρουσίαση με Ετικέτες
Όλες οι Ετικέτε... »
LocalDB (RSS)
Τhis is the fifth post in a series of posts on how to design and implement an ASP.Net 4.5 Web Forms store that sells posters on line.
There are 4 more posts in this series of posts.Please make sure you read them first.You can find the first post here. You can find the second post here. You can find the third post here.You can find the fourth here.
In this new post we will build on the previous posts and we will demonstrate how to display the details of a poster when the user clicks on an individual poster photo/link.
We will add a FormView control on a web form and will bind data from the database. FormView is a great web server control for displaying the details of a single record.
1) Launch Visual Studio and open your solution where your project lives
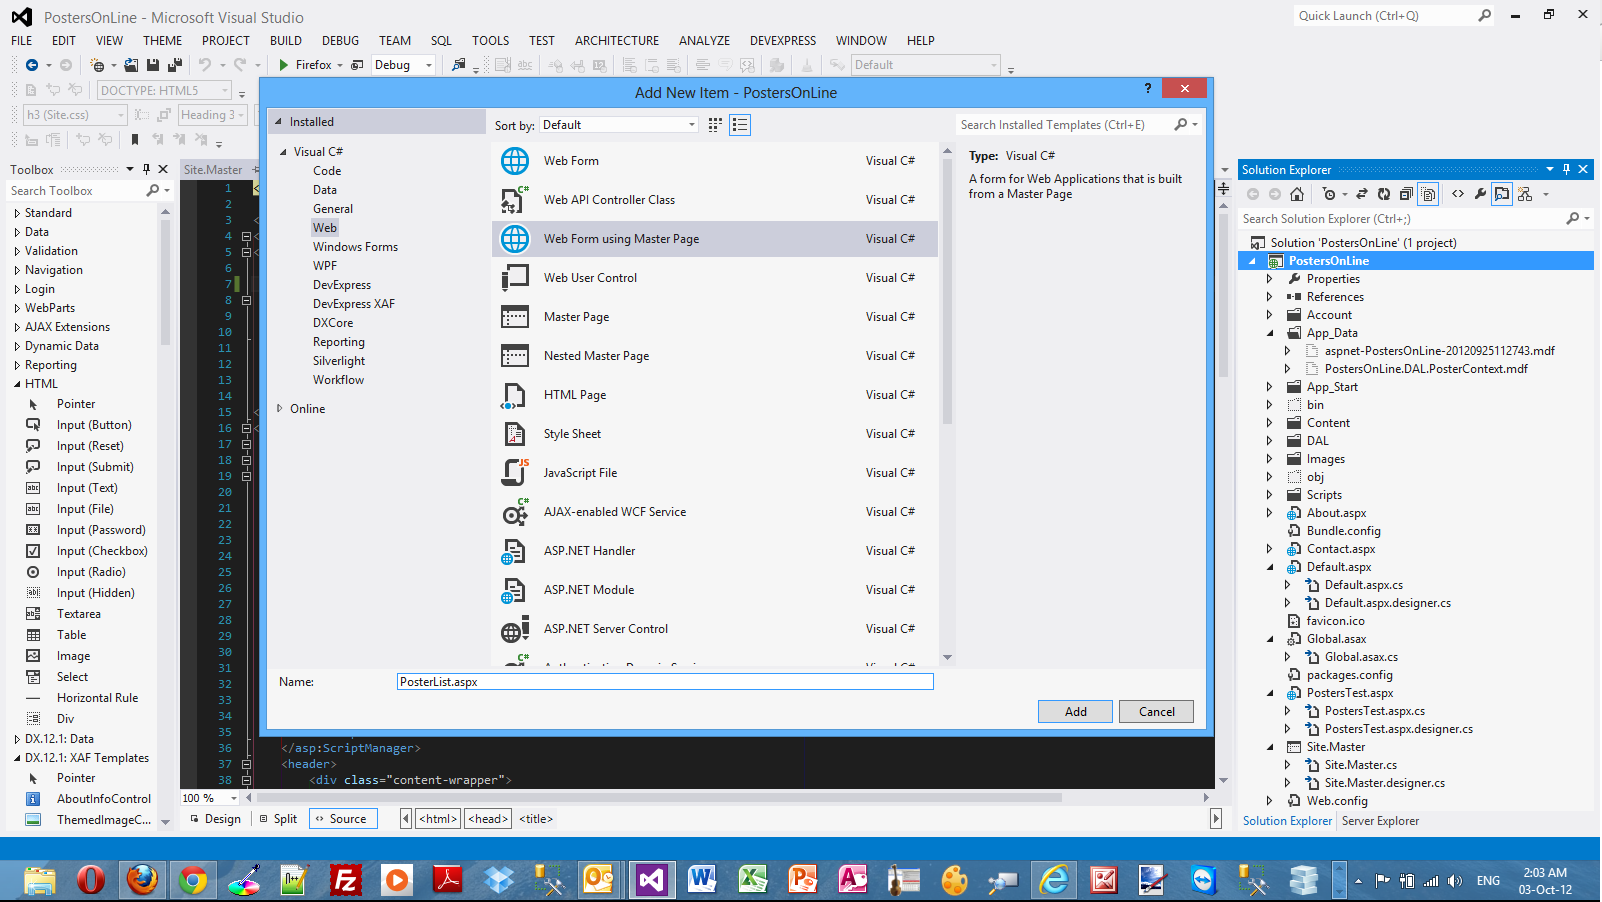
2) Add a new web form item on the project.Make sure you include the Master Page.Name it PosterDetails.aspx
3) Open the PosterDetails.aspx page. We will add some markup in this page. Have a look at the code below
<asp:Content ID="Content2" ContentPlaceHolderID="FeaturedContent" runat="server">
<asp:FormView ID="posterDetails" runat="server" ItemType="PostersOnLine.DAL.Poster" SelectMethod ="GetPosterDetails">
<ItemTemplate>
<div>
<h1><%#:Item.PosterName %></h1>
</div>
<br />
<table>
<tr>
<td>
<img src="<%#:Item.PosterImgpath %>" border="1" alt="<%#:Item.PosterName %>" height="300" />
</td>
<td style="vertical-align: top">
<b>Description:</b><br /><%#:Item.PosterDescription %>
<br />
<span><b>Price:</b> <%#: String.Format("{0:c}", Item.PosterPrice) %></span>
<br />
<span><b>Poster Number:</b> <%#:Item.PosterID %></span>
<br />
</td>
</tr>
</table>
</ItemTemplate>
</asp:FormView>
</asp:Content>
I set the ItemType property to the Poster entity class and the SelectMethod to the GetPosterDetails method.
The Item binding expression is available and we can retrieve properties of the Poster object.I retrieve the name, the image,the description and the price of each poster.
4) Now we need to write the
GetPosterDetails method.In the code behind of the
PosterDetails.aspx page we type
public IQueryable<Poster> GetPosterDetails([QueryString("PosterID")]int? posterid)
{
PosterContext ctx = new PosterContext();
IQueryable<Poster> query = ctx.Posters;
if (posterid.HasValue && posterid > 0)
{
query = query.Where(p => p.PosterID == posterid);
}
else
{
query = null;
}
return query;
}
I bind the value from the query string to the posterid parameter at run time.This is all possible due to the QueryStringAttribute class that lives inside the System.Web.ModelBinding and gets the value of the query string variable PosterID.If there is a matching poster it is fetched from the database.If not,there is no data at all coming back from the database.
5) I run my application and then click on the "Midfielders" link.Then click on the first poster that appears from the left (Kenny Dalglish) and click on it to see the details. Have a look at the picture below to see the results.

You can see that now I have all the details of the poster in a new page.
Μake sure you place breakpoints in the code so you can see what is really going on.
Hope it helps!!!

Τhis is the fourth post in a series of posts on how to design and implement an ASP.Net 4.5 Web Forms store that sells posters on line.
There are 3 more posts in this series of posts.Please make sure you read them first.You can find the first post here. You can find the second post here. You can find the third post here.
In this new post we will build on the previous posts and we will demonstrate how to display the posters per category.
We will add a ListView control on the PosterList.aspx and will bind data from the database. We will use the various templates.
Then we will write code in the PosterList.aspx.cs to fetch data from the database.
1) Launch Visual Studio and open your solution where your project lives
2) Open the PosterList.aspx page. We will add some markup in this page. Have a look at the code below
<section class="posters-featured">
<ul>
<asp:ListView ID="posterList" runat="server"
DataKeyNames="PosterID"
GroupItemCount="3" ItemType="PostersOnLine.DAL.Poster" SelectMethod="GetPosters">
<EmptyDataTemplate>
<table id="Table1" runat="server">
<tr>
<td>We have no data.</td>
</tr>
</table>
</EmptyDataTemplate>
<EmptyItemTemplate>
<td id="Td1" runat="server" />
</EmptyItemTemplate>
<GroupTemplate>
<tr ID="itemPlaceholderContainer" runat="server">
<td ID="itemPlaceholder" runat="server"></td>
</tr>
</GroupTemplate>
<ItemTemplate>
<td id="Td2" runat="server">
<table>
<tr>
<td> </td>
<td>
<a href="PosterDetails.aspx?posterID=<%#:Item.PosterID%>">
<img src="<%#:Item.PosterImgpath%>"
width="100" height="75" border="1"/></a>
</td>
<td>
<a href="PosterDetails.aspx?posterID=<%#:Item.PosterID%>">
<span class="PosterName">
<%#:Item.PosterName%>
</span>
</a>
<br />
<span class="PosterPrice">
<b>Price: </b><%#:String.Format("{0:c}", Item.PosterPrice)%>
</span>
<br />
</td>
</tr>
</table>
</td>
</ItemTemplate>
<LayoutTemplate>
<table id="Table2" runat="server">
<tr id="Tr1" runat="server">
<td id="Td3" runat="server">
<table ID="groupPlaceholderContainer" runat="server">
<tr ID="groupPlaceholder" runat="server"></tr>
</table>
</td>
</tr>
<tr id="Tr2" runat="server"><td id="Td4" runat="server"></td></tr>
</table>
</LayoutTemplate>
</asp:ListView>
</ul>
</section>
3) We have a ListView control on the page called PosterList. I set the ItemType property to the Poster class and then the SelectMethod to the GetPosters method. I will create this method later on.
(ItemType="PostersOnLine.DAL.Poster" SelectMethod="GetPosters")
Then in the code below I have the data-binding expression Item available and the control becomes strongly typed.So when the user clicks on the link of the poster's category the relevant information will be displayed (photo,name and price)
<td>
<a href="PosterDetails.aspx?posterID=<%#:Item.PosterID%>">
<img src="<%#:Item.PosterImgpath%>"
width="100" height="75" border="1"/></a>
</td>
4) Now we need to write the simple method to populate the ListView control.It is called GetPosters method.
The code follows
public IQueryable<Poster> GetPosters([QueryString("id")] int? PosterCatID)
{
PosterContext ctx = new PosterContext();
IQueryable<Poster> query = ctx.Posters;
if (PosterCatID.HasValue && PosterCatID > 0)
{
query = query.Where(p=>p.PosterCategoryID==PosterCatID);
}
return query;
}
This is a very simple method that returns information about posters related to the PosterCatID passed to it.
I bind the value from the query string to the PosterCatID parameter at run time.This is all possible due to the QueryStringAttribute class that lives inside the System.Web.ModelBinding and gets the value of the query string variable id.
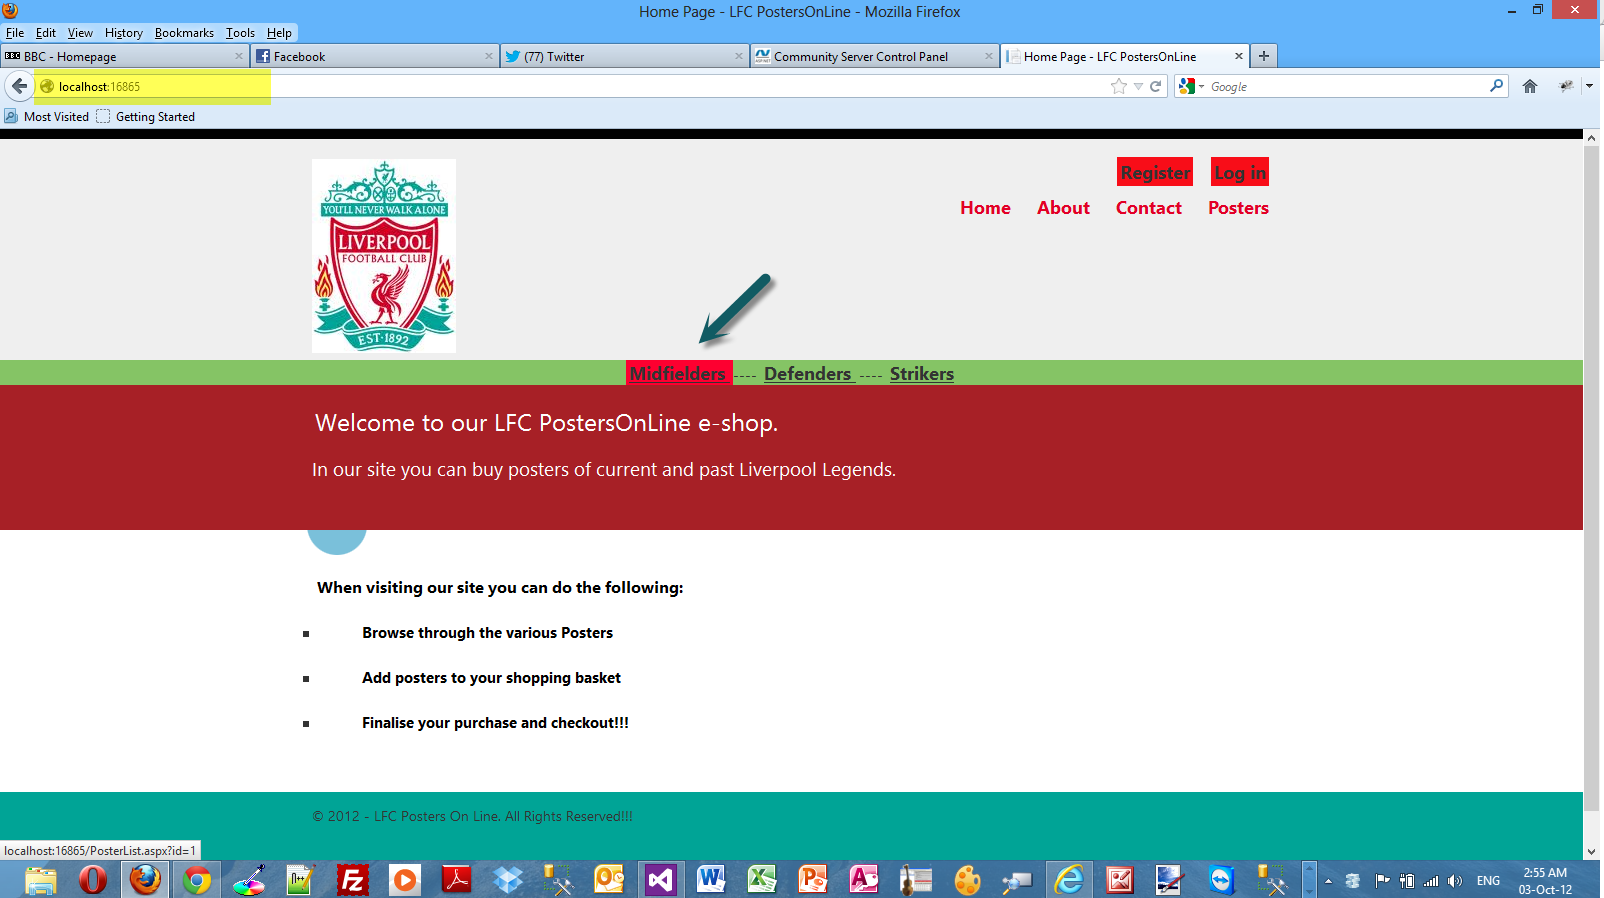
5) I run my application and then click on the "Midfilders" link. Have a look at the picture below to see the results.

In the Site.css file I added some new CSS rules to make everything more presentable.
.posters-featured {
width:840px;
background-color:#efefef;
}
.posters-featured a:link, a:visited,
a:active, a:hover {
color: #000033;
}
.posters-featured
a:hover {
background-color: #85c465;
}
6) I run the application again and this time I do not choose any category, I simply navigate to the PosterList.aspx page. I see all the posters since no query string was passed as a parameter.
Have a look at the picture below

Μake sure you place breakpoints in the code so you can see what is really going on.In the next post I will show you how to display poster details.
Hope it helps!!!

Τhis is the third post in a series of posts on how to design and implement an ASP.Net 4.5 Web Forms store that sells posters on line.
Make sure you read the first and second post in the series.
In this new post I will keep making some minor changes in the Markup,CSS and Master page but there is no point in presenting them here. They are just minor changes to reflect the content and layout I want my site to have.
What I need to do now is to add some more pages and start displaying properly data from my database.
Having said that I will show you how to add more pages to the web application and present data.
1) Launch Visual Studio and open your solution where your project lives
2) Add a new web form item on the project.Make sure you include the Master Page.Name it PosterList.aspx
Have a look at the picture below
3) In Site.Master add the following link to the master page so the user can navigate to it.You should only add the line in bold
<nav>
<ul id="menu">
<li><a runat="server" href="~/">Home</a></li>
<li><a runat="server" href="~/About.aspx">About</a></li>
<li><a runat="server" href="~/Contact.aspx">Contact</a></li>
<li><a href="http://weblogs.asp.net/PosterList.aspx">Posters</a></li>
</ul>
</nav>
4) Now we need to display categories from the database. We will use a ListView web server control.Inside the <div id="body"> add the following code.
<section id="postercat">
<asp:ListView ID="categoryList"
ItemType="PostersOnLine.DAL.PosterCategory"
runat="server"
SelectMethod="GetPosterCategories" >
<ItemTemplate>
<a href="http://weblogs.asp.net/PosterList.aspx?id=<%#: Item.PosterCategoryID %>">
<%#: Item.PosterCategoryName %>
</a>
</b>
</ItemTemplate>
<ItemSeparatorTemplate> ----- </ItemSeparatorTemplate>
</asp:ListView>
</section>
Let me explain what the code does.We have the ListView control that displays each poster category's name.It also includes a link to the PosterList.aspx page with a query-string value containing the ID of the category. We set the ItemType property in the ListView to the PosterCategory entity .We set the SelectMethod property to a method GetPosterCategories. Now we can use the data-binding expression Item (<%#: %>) that is available within the ItemTemplate .
5) Now we must write the GetPosterCategories method. In the Site.Master.cs file add the following code.This is just a simple function that returns the poster categories.
public IQueryable<PosterCategory> GetPosterCategories()
{
PosterContext ctx = new PosterContext();
IQueryable<PosterCategory> query = ctx.PosterCategories;
return query;
}
6) I just changed a few things in the Site.css file to style the new <section> HTML element that includes the ListView control.
#postercat {
text-align: center; background-color: #85C465;
}
7) Build and run your application. Everything should compile now. Have a look at the picture below.The links (poster categories) appear.Τhe ListView control when is called during the page lifecycle calls the GetPosterCategories() method.The method is executed and returns the poster categories that are bound to the control.
When I click on any of the poster category links, the PosterList.aspx page will show up with the appropriate Id that is the PosterCategoryID.
Have a look at the picture below

We will add more data-enabled controls in the next post in the PosterList.aspx page. Some people are complaining the posts are too long so I will keep them short.
Hope it helps!!!

Τhis is the second post in a series of posts on how to design and implement an ASP.Net 4.5 Web Forms store that sells posters on line.
Make sure you read the first post in the series.You can find it here.
In all these posts I am going to publish, I will change the layout. That means I will make changes to the .master,.css,.aspx files and images. In the final post I will add the whole solution so you can download everything.
Have a look at the picture below to see the new slightly changed layout

Now that we have made the necessary changes to the .aspx pages,the master page,the .css files and adding some more images to our site we are ready to move forward and implement the data access layer.
I will use Entity Framework 5.0 in order to create the data access layer.
Obviously I cannot go into much detail on what EF is and what it does. I
will give a short introduction though.The .Net framework provides
support for Object Relational Mapping through EF. So EF is a an ORM tool
and it is now the main data access technology that microsoft works on. I
use it quite extensively in my projects. Through EF we have many things
out of the box provided for us. We have the automatic generation of SQL
code.It maps relational data to strongly types objects.All the changes
made to the objects in the memory are persisted in a transactional way
back to the data store.
You can find in this post
an example on how to use the Entity Framework to retrieve data from an
SQL Server Database using the "Database/Schema First" approach.
In this approach we make all the changes at the database level and then we update the model with those changes.
In this post you can see an example on how to use the "Model First" approach when working with ASP.Net and the Entity Framework.
For this project I will use the Code First approach to build the data access layer.
The Code First approach is the more code-centric than the
other two (Database First, Model First). Basically we write POCO classes and then we persist to a
database using something called DBContext.
Code First relies on DbContext. We create 2,3 classes (e.g Person,Product) with properties and then these classes interact with the DbContext class and
we can create a new database based upon our POCOS classes and have
tables generated from those classes.We do not have an .edmx file in this
approach.By using this approach we can write much easier unit tests.
DbContext is a new context class and is smaller,lightweight wrapper for the main context class which is ObjectContext (Schema First and Model First).
Let's implement our POCO classes
1) Launch Visual Studio and open your solution where your project lives
2) Create a new folder. Name it DAL or any other name you think it is appropriate.We will place in there our entity classes
3) Obviously you must include EF in your solution. The good news is that EF is included in any ASP.Net Web Forms Application. If you are not sure whether you have the latest version or not of the EF then just use NuGet.
In my case the EF version is 5.0. Have a look at the picture below

4) We also need to add a reference to the System.Data.Entity namespace.Select References from the Solution Explorer and then choose Add Reference... You have to browse through the assemblies in the .Net Framework until you locate the System.Data.Entity and the click OK.
Have a look at the picture below

5) Select the DAL folder, then right-click and then select Add -> New Item.We will add a class file, Poster.cs. Have a look at the picture below

6) Now we need to write the code for the Poster.cs Entity class.Please bear in mind that every instance of the Poster class (an object) will represent a row in the database table and every property in the class declaration will represent a table column. The code follows
public class Poster {
[ScaffoldColumn(false)]
public int PosterID { get; set; }
[StringLength(50), Display(Name = "Poster Name")]
public string PosterName { get; set; }
[Required, StringLength(500), Display(Name = "Poster Description"), DataType(DataType.MultilineText)]
public string PosterDescription { get; set; }
public string PosterImgpath { get; set; }
[Display(Name = "Price")]
public double? PosterPrice { get; set; }
}
7) Select the DAL folder, then right-click and then select Add -> New Item.We will add a class file, PosterCategory.cs. The code follows
public class PosterCategory
{
[ScaffoldColumn(false)]
public int PosterCategoryID { get; set; }
[Required, StringLength(50), Display(Name = "Category Name")]
public string PosterCategoryName { get; set; }
[Required,StringLength(200),Display(Name = "Category Description")]
public string CategoryDescription { get; set; }
public List<Poster> Posters { get; set; }
}
8) Select the DAL folder, then right-click and then select Add -> New Item.We will add another entity class called PosterContext.cs. This class will inherit from DbContext. Now that we have the entity classes created, we must let the model know.I will have to use the DbSet<T> property.
This class manages the domain classes and provides data access to the database.Think of it as an orchestrator class.
The code for this class follows
public class PosterContext:DbContext
{
public DbSet<PosterCategory> PosterCategories { get; set; }
public DbSet<Poster> Posters { get; set; }
}
Do not forget to add (using System.Data.Entity;) in the beginning of the class file.
I would like to talk at this point a little bit about Code First Data Annotations.With Data Annotations we can configure our domain-entity classes so that they can take best advantage of the EF.We will decorate our entity classes with declarative attributes.Let me give you an insight on how EF Code First works.EF Code First at run time, looks at the entity-domain classes and infers from them the in-memory data that it needs to interpret the queries and interact with the database.For example it assumes that any property named ID represents the key property of the class.Please have a look at this post of mine to find out more about Data Annotations.
9)
Let's create a new class and add it in the DAL folder. I will call it PosterInsert.cs.In this class I will have the code to initialise the database and insert values. The code for this class follows public class PosterInsert : DropCreateDatabaseIfModelChanges<PosterContext>
{
protected override void Seed(PosterContext context)
{
var pcategory = new List<PosterCategory>
{
new PosterCategory {
PosterCategoryName = "Midfielders",CategoryDescription="Posters of active and past Liverpool Midfielders",
Posters = new List<Poster>
{
new Poster {PosterName = "King Kenny", PosterDescription="King Kenny lifting the European Cup",PosterImgpath="Images/posters/kenny-dalglish.jpg",PosterPrice=18.95},
new Poster {PosterName = "John Barnes", PosterDescription="El mago-a true genius in the midfield",PosterImgpath="Images/posters/john-barnes.jpg",PosterPrice=16.95},
new Poster {PosterName = "Steven Gerrard", PosterDescription="The Captain",PosterImgpath="Images/posters/steven-gerrard.jpg",PosterPrice=28.95},
}
},
new PosterCategory {
PosterCategoryName = "Defenders",CategoryDescription="Posters of active and past Liverpool Defenders",
Posters = new List<Poster>
{
new Poster {PosterName = "Jamie Carragher", PosterDescription="Th greatest defender in the last ten years",PosterImgpath="Images/posters/jamie-carragher.jpg",PosterPrice=21.95},
new Poster {PosterName = "Alan Hansen", PosterDescription="The legendary defender Alan Hansen",PosterImgpath="Images/posters/alan-hansen.jpg",PosterPrice=13.95},
new Poster {PosterName = "Martin Skrtel", PosterDescription="The most promising defender playing right now",PosterImgpath="Images/posters/martin-skrtel.jpg",PosterPrice=19.95},
}
},
new PosterCategory {
PosterCategoryName = "Strikers",CategoryDescription="Posters of active and past Liverpool Strikers",
Posters = new List<Poster>
{
new Poster {PosterName = "Ian Rush", PosterDescription="The greatest striker to wear a Liverpool shirt",PosterImgpath="Images/posters/ian-rush.jpg",PosterPrice=18.45},
new Poster {PosterName = "Robbie Fowler", PosterDescription="Robbie, a goal scoring machine",PosterImgpath="Images/posters/robbie-fowler.jpg",PosterPrice=18.45},
new Poster {PosterName = "Michael Owen", PosterDescription="The youngest deadliest striker Anfield has even known",PosterImgpath="Images/posters/michael-owen.jpg",PosterPrice=16.95},
}
}
};
pcategory.ForEach(post => context.PosterCategories.Add(post));
base.Seed(context);
}
}
In this class I inherit from the DropCreateDatabaseIfModelChanges<PosterContext> class and I will override the default behaviour of that class with my class.
I will ovverride the Seed method with some data.Then I create 3 instances of the PosterCategory entity and 9 entities of the Poster entity.
Then through a simple lambda expression I add the data to the database using this last line of code,
base.Seed(context);
10) Now we need to make one more change.in the Global.asax.cs.
In the Application_Start event handler routine (runs when the application starts) we will add this code
Database.SetInitializer(new PosterInsert());
11) I have also created a Posters folder inside the Images folder and placed in it the 9 images.
12) Build and run your application. Everything should compile now. Have a look at the picture below to see the structure of the web application so far.

13) Now we will create a test page to see if the database is created and populated with values.Add a web form page to the application.Name it PostersTest.Add a gridview web server control on the page. Make the page as the Start Page
In the Page_Load event handling routine type
PosterContext ctx = new PosterContext();
var query = from postcat in ctx.PosterCategories select postcat.PosterCategoryName;
GridView1.DataSource = query.ToList();
GridView1.DataBind();
Build and run your application. Have a look below to see the result I have got.

It seems to work. The database is created and populated through the magic of EF Code First. Have a look at the web.config for the connection string. In the Solution Explorer look into the App_Data folder.
If you open the Server Explorer and open the connection to the database (in my case PostersOnLine.DAL.PosterContext.mdf).I am using LocalDB, which is anew version of SQL Express.For more information have a look here.
Have a look at the picture below.These are the results when I query the tables.

Please make sure you follow all the steps.I will post soon part 3.
Hope it helps!!!!

I am going to start a new series of posts on how to build an application using ASP.Net 4.5 Web forms.A few days back I have been asked to present a number of presentations on ASP.Net 4.5.
Ι will demonstrate how to create a website that sells posters on line.In this web forms application I will design and implement the main functionality that is needed in order to have an operational e-shop. I will also use this series of posts to highlight the various features in ASP.Net and most particularly the new features available in ASP.Net 4.5.
This is going to be part 1 of the application where I will explain what I am going to do.In the final post on this series of posts I will demonstrate on how to deploy the web site to Windows Azure.
I will use Visual Studio 2012 Ultimate edition but you can use the Visual Studio Express 2012 for Web.You can download it here.The .Net framework will be installed automatically.
In case you have trouble installing Visual Studio please have a look at this link.
You can download everything you will need for this project if you use the Web Platform Installer. You must be administrator in your machine to run the Web Platform Installer.
I will try to explain everything in detail and with many screenshots. I would say that it would be very helpful if one has some knowledge of HTML, CSS, Javascript, relational databases,Object- oriented concepts.
This is not going to be a 100-level (beginner level tutorial) and very experienced developers will lot not gain much from this series of posts.
The development language will be C#. I will create a Web Application Project and not a Web Site Project.
There are a lot of web developers out there that use ASP.Net MVC.ASP.Net MVC provide us with a new way of writing ASP.Net applications.It does not replace web forms. It is just an alternative project type.It still runs on ASP.Net and supports caching,sesions and master pages.There is more emphasis on test-driven development and separation of concerns with ASP.Net MVC.
If I have time I will create another series of posts where I will create the exact same application using ASP.Net MVC 4.0.
There are two posts in my blog regarding ASP.Net MVC.You can find them here and here . I always thought that people who are familiar with RAD tools, the best way to learn web applications on the .Net framework is the ASP.Net Web forms paradigm.It is a control based, event-driven development model that suits most people that know how to create Windows Forms Applications or WPF applications.
Let's start with the actual demo-application.
1) Launch Visual Studio. Create a New Project (File->New Project).From the available templates choose ASP.Net Web Forms Application. Have a look at the picture below

2) Make sure that you spend some time reviewing the structure of the application and the files in the Solution Explorer. We have .aspx files,.js files (including the JQuery library), .css files e.t.c.Make sure you run the application and navigate to the various pages.Make sure you realise that ASP.Net is a server side technology.The built-in web server dynamically generates the HTML that is rendered on the browser. If you want to learn more about Page-lifecycle events have a look at this post of mine.We have a functional web application out of the box.There is common
structure-layout in this web application. This feature is known as Master Pages.
Please have a look at the HTML rendered in your browser.The ASP.Net application template uses HTML 5.Modernizr (open source javscript Library) is also included for browsers that do not support HTML 5. If you want to find more about HTML 5, have a look at these posts.
Have a look at the picture below

You can also use register and log in to the web site. If you want to learn more about membership controls and the Membership provider in ASP.Net have a look here.
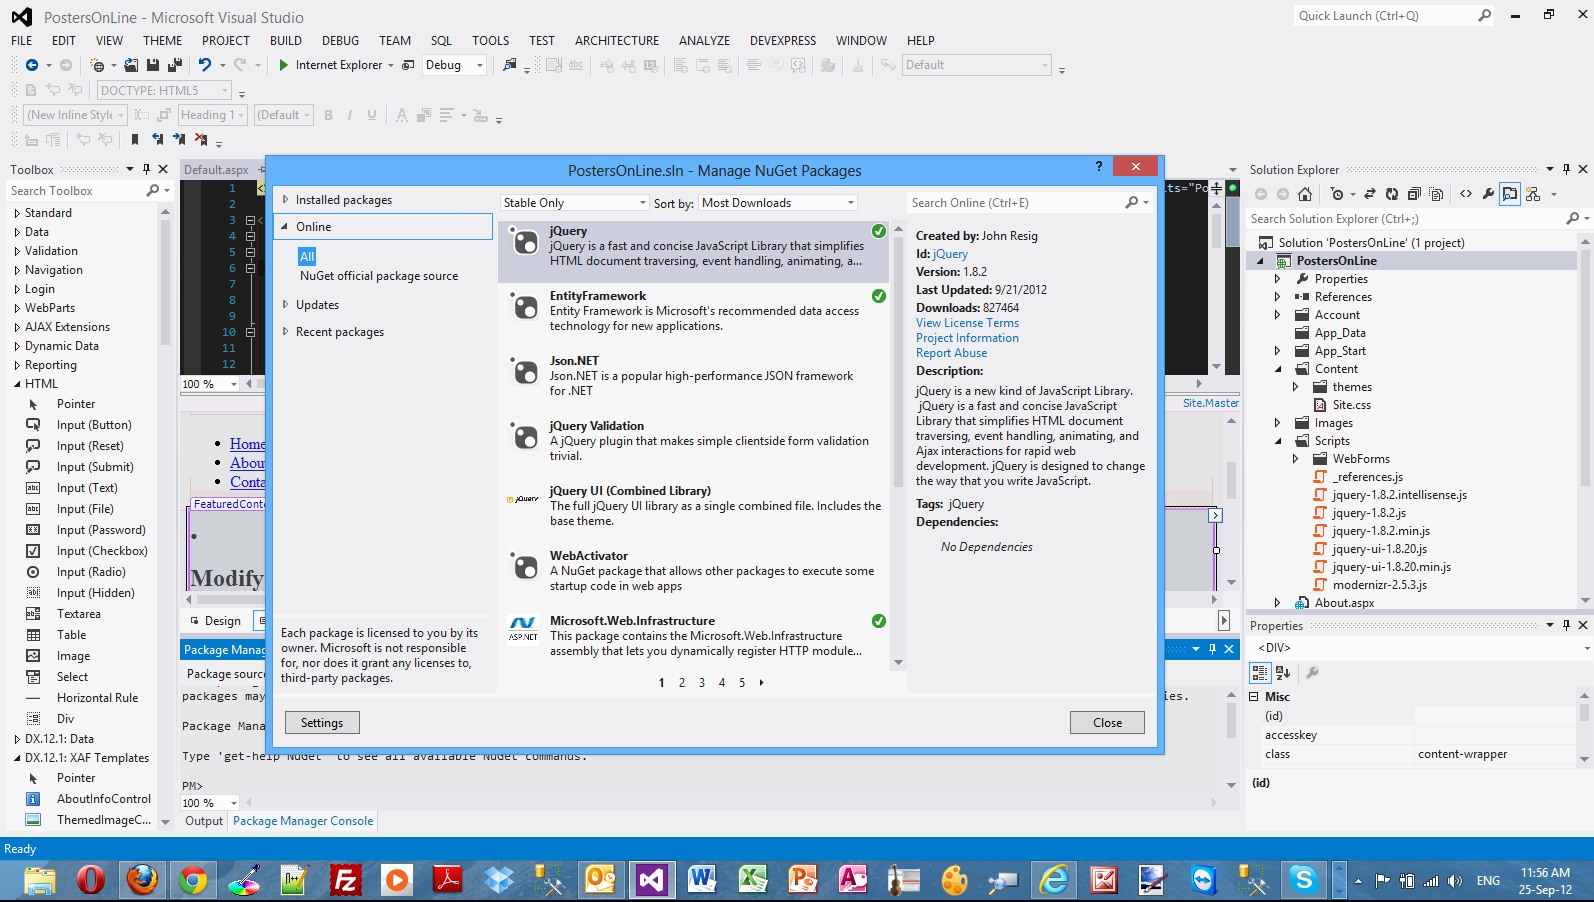
Another important feature I want to highlight is NuGet and Nuget packages.If you have a look at the JQuery .js files that are included in the web site out of the box, you will notice that this is not the latest version.
We can download the latest version of JQuery Library using Nuget.If you go to Tools->Library Package Manager->Manage NuGet Packages For Solution you can locate the latest version of JQuery and download it in your solution. You can also do with the other libraries and tools.NuGet is really great because when you install a package through NuGet it copies all the files to the solution,adding references and making changes to the web.config.Find more about Nuget in this post.
Please have a look at the picture below.
In the next post I will make some changes in the .css files and .master pages to give a unique look and feel to our site.
Hope it helps!!!

I have been looking into ASP.Net MVC 4.0 lately and I thought it would be a nice idea to create a small ASP.Net MVC 4.0 application and write a post about it. So this is going to be a rather long post that will show you with a hands-on example how to...(
read more)
