I have been delivering a certified course in MS SQL Server 2012 recently and I was asked several questions about Tempdb usage and temporary objects.
In this post I will try to shed light on this particular issue.
Temporary tables and table variables make use of the system tempdb database.
There is only one tempdb system database per SQL Server instance so if there is a huge usage of temporary objects in this database it can be the point of contention.
When you create an entry in database it needs to allocate space.This is also valid for the tempdb database.There are three types of pages involved in the allocation process in the tempdb data file:
- Page Free Space (PFS)
- Shared Global Allocation Map (SGAM)
- Global Allocation Map (GAM).
When there is a great page allocation contention in tempdb, the whole allocation process can suffer and we can experience with PAGELATCH waits.
In order to address the issue above, you can have a number of tempdb data files that are equal to the number of cores.For example if you have a system with less than 8 cores e.g 6 you should add/set up 6 data files for the tempdb.If you have a system with more than 8 cores you should add 8 data files for the tempdb and then if the contention is still big you can add 4 more data files.
By saying cores in this post I mean logical cores and not physical cores.So if you have 8 physical cores, then you have 16 logical cores and 32 logical cores if hyper-threading is enabled.
I will provide some demos in order to show you what tempdb contention might look like and what are the main wait latches that occur.
I have installed SQL Server 2012 Enterprise edition in my machine but you can use the SQL Server 2012/2008 Express edition as well.
I am connecting to my local instance through Windows Authentication and in a new query window I type (you can copy paste)
In this snippet, I create a new database and then create a new table with some constraints
CREATE DATABASE mytempdbcontention
GO

USE mytempdbcontention;
GO
 CREATE TABLE dbo.footballer
 (
 [FootballerID] INT IDENTITY NOT NULL PRIMARY KEY,
 [lastname] [varchar](15) NOT NULL,
 [firstname] [varchar](15) NOT NULL,
 [shirt_no] [tinyint] NOT NULL,
 [position_played] [varchar](30) NOT NULL,

);

GO

ALTER TABLE dbo.footballer
ADD CONSTRAINT CK_Footballer_Shirt_No
CHECK (shirt_no >= 1 AND shirt_no <= 11)

GO

ALTER TABLE dbo.footballer
ADD CONSTRAINT CK_Footballer_Position
CHECK (position_played IN ('goalkeeper','defender','midfielder','striker'))
GO
Now I need to populate the table with 50.000 rows. This is the script you need to execute in order to make this happen.
You can download it here. Rename the insert-footballer.doc to insert-footballer.sql and execute the script in a new query window.
Now I need to create a script that will create tempdb contention. This is the script that creates a temporary object- #footballer, populates the #footballer from the footballer table and then selects from it. Finally it drops the temporary object.
USE mytempdbcontention;
GO

SET NOCOUNT ON;
GO

WHILE 1 = 1
 BEGIN

IF OBJECT_ID('tempdb..#footballer') IS NOT NULL

 DROP TABLE #footballer;

CREATE TABLE #footballer
 (
 [FootballerID] INT IDENTITY NOT NULL PRIMARY KEY,
 [lastname] [varchar](15) NOT NULL,
 [firstname] [varchar](15) NOT NULL,
 [shirt_no] [tinyint] NOT NULL,
 [position_played] [varchar](30) NOT NULL,

);
 INSERT INTO #footballer
 (lastname,
 firstname,
 shirt_no,
 position_played)
 SELECT TOP 4000
 lastname,
 firstname,
 shirt_no,
 position_played

 FROM dbo.footballer;

SELECT lastname
 FROM #footballer;

DROP TABLE #footballer;
 END
 GO
Now I am going to create a .cmd file where I will create contention to the tempdb.
You can download it here. Rename the temp-sql.cmd.doc to temp-sql.cmd. Make sure you execute it (by double-clicking it).
This will create lots of contention to the tempdb. We need to see exactly what this contention is and the wait latches that have occurred.
Execute the script below.
USE tempdb
go
SELECT session_id, wait_duration_ms,wait_type, resource_description
from sys.dm_os_waiting_tasks
where wait_type like 'PAGE%LATCH_%'

and

resource_description like '2:%'
As you can see from the picture below, I have PAGEIOLATCH_SH wait types.This wait type occurs when a task is waiting on a latch for a buffer that is in an I/O request. The latch request is in Shared mode.

I have one tempdb data file, the default configurations
I have 8 cores in this machine so I will add 7 mores tempdb data files of equal size (MS recommendation).
Execute the script below.
USE [master]
GO

ALTER DATABASE [tempdb]
MODIFY FILE ( NAME = N'tempdev', SIZE = 500 MB ,
FILEGROWTH = 100 MB )
GO

ALTER DATABASE [tempdb]
ADD FILE ( NAME = N'tempdev2', FILENAME = N'd:\DATA\tempdb2.ndf' ,
SIZE = 500 MB , FILEGROWTH = 100 MB )
GO

ALTER DATABASE [tempdb]
ADD FILE ( NAME = N'tempdev3', FILENAME = N'd:\DATA\tempdb3.ndf' ,
SIZE = 500 MB , FILEGROWTH = 100 MB )
GO

ALTER DATABASE [tempdb]
ADD FILE ( NAME = N'tempdev4', FILENAME = N'd:\DATA\tempdb4.ndf' ,
SIZE = 500 MB , FILEGROWTH = 100 MB )
GO

ALTER DATABASE [tempdb]
ADD FILE ( NAME = N'tempdev5', FILENAME = N'd:\DATA\tempdb5.ndf' ,
SIZE = 500 MB , FILEGROWTH = 100 MB )
GO

ALTER DATABASE [tempdb]
ADD FILE ( NAME = N'tempdev6', FILENAME = N'd:\DATA\tempdb6.ndf' ,
SIZE = 500 MB , FILEGROWTH = 100 MB )
GO

ALTER DATABASE [tempdb]
ADD FILE ( NAME = N'tempdev7', FILENAME = N'd:\DATA\tempdb7.ndf' ,
SIZE = 500 MB , FILEGROWTH = 100 MB )
GO
Now run the query again and observe the results.
USE tempdb
go
SELECT session_id, wait_duration_ms,wait_type, resource_description
from sys.dm_os_waiting_tasks
where wait_type like 'PAGE%LATCH_%'

and

resource_description like '2:%'
You will see that there are no wait types hence no tempdb contention.
Stop now the temp-sql.cmd file so the contention of the tempdb stops.
Hope it helps!!!
I have been delivering a certified course in MS SQL Server 2012 recently and I was asked a very interesting question about SQL Server stored procedures and ownership chain.
Security is a big thing in SQL Server and can be implemented in various levels.
Before we move on, we should define some basic terms that are very important when we talk about security in SQL Server.
The principal access data. It should be authenticated by SQL Server which basically means that the principal should “prove” that it is , whom it claims to be.
Principal is a user a group or an application granted permission to access securables.So what is a securable? Securable is an object to which access privileges are granted.
Privilege is an action that a principal is allowed to perform an a securable.
I want to show you an example where we want to deny a user to the actual table-data but grant him access through a view or a stored procedure.UserA is the owner of tableA and creates StoredProcA that gets data from tableA. Then if the UserB is granted permission to execute the StoredProcA even though he does not have direct access to tableA he will be able to get access (indirectly) to the table. This is the concept of ownership chaining.
I have installed SQL Server 2012 Enterprise edition in my machine but you can use the SQL Server 2012/2008 Express edition as well.
I am connecting to my local instance through Windows Authentication and in a new query window I type (you can copy paste)
USE master
GO

--Create a sample database

CREATE DATABASE mysampledb;
GO

-- create a login

CREATE LOGIN login1 WITH PASSWORD ='login1', CHECK_POLICY = OFF;

USE mysampledb;
go

--Create a User for that login
CREATE USER thelogin1 FOR LOGIN login1;

--see the user that you are now (dbo)
SELECT user
--create table and populate it with sample data

CREATE TABLE dbo.person

(id INT IDENTITY (1,1),
 firstname varchar(40),
 lastname VARCHAR(50)

);
go

INSERT dbo.person VALUES ('nick','kenteris'),('maria','negri'),
('apostolis','kaperis'),('kostas','gekas');

CREATE PROCEDURE dbo.getpersons
AS SELECT id,firstname,lastname FROM dbo.person
go

--give permissions to execute the procedure to the thelogin1 user

GRANT EXECUTE ON dbo.getpersons TO thelogin1

--change the current user as thelogin1

EXECUTE AS USER = 'thelogin1'

--check if we are indeed thelogin1 user

SELECT USER

--fails
SELECT * FROM dbo.person

--works

EXECUTE dbo.getpersons

--get back to the dbo user

REVERT;

--see if the user is indeed dbo

SELECT USER

--we change the stored proc to use dynamic sql

ALTER PROCEDURE dbo.getpersons
AS
EXEC('SELECT id,firstname,lastname FROM dbo.person')
GO

--change the current user as thelogin1

EXECUTE AS USER = 'thelogin1'

--check to see if indeed the user is now thelogin1

SELECT USER

--this will fail

EXECUTE dbo.getpersons

--get back to the dbo user
REVERT;

--check to see if we are dbo user

SELECT user

--this will work

ALTER PROCEDURE dbo.getpersons
WITH EXECUTE AS OWNER
AS
EXEC('SELECT id,firstname,lastname FROM dbo.person')
GO

EXECUTE AS USER = 'thelogin1'

--check to see if we are dbo user

SELECT USER

--this will work

EXECUTE dbo.getpersons
Let me explain what I am doing in this bit of code
- I am creating a database in line 6
- I create a login in line 11
- I create a user-thelogin1 for that login in line 17
- I create a new table in lines 23-30
- Then I populate the table - dbo.person in lines 32
- Then I create a procedure - dbo.getpersons in lines 34-36
- Then I grant permissions to the stored procedure to the user thelogin1
- Then I execute the statements like user - thelogin1
- If I try to access the table directly then I fail. That makes sense.
- Then I execute the stored procedure as user - thelogin1 in lines 55
- Then I revert back to the dbo user
- Then I make a change in lines 67-70 to the stored procedure. I use in the body of stored procedure dynamic sql.
- Then I change the user to thelogin1 in lines 74
- Then I execute the stored procedure in line 82 . This will fail.The dynamic SQL statement causes a break in the ownership chain.
- Then I revert back to line 85 as the dbo user
- In the lines 93-97 I change the stored procedure again (WITH EXECUTE AS OWNER)
- Then I change the user to thelogin1 in lines 99
- Finally, I execute the stored procedure again in lines 107 and it works
Hope it helps!!!
I have been delivering a certified course in MS SQL Server 2012 recently and I was asked a very interesting question "If there is a way to find using T-SQL tables in a database that have no clustered indexes or no indexes at all"
I have answered that this is possible and I provided with some scripts.
There a lot of tasks that we cannot perform through the GUI of SSMS.So we have to search through the object metadata to get our answers.We can query the catalog views and get all the information we want
I have installed SQL Server 2012 Enterprise edition in my machine but you can use the SQL Server 2012/2008 Express edition as well.
I am connecting to my local instance through Windows Authentication and in a new query window I type (you can copy paste)
SELECT DB_NAME(DB_ID ('AdventureWorksLT2012')) + '. '
 +OBJECT_SCHEMA_NAME(t.object_ID)+ '.' +t.NAME AS
[tables without clustered index]
FROM sys.tables t
WHERE OBJECTPROPERTY(object_id, 'TableHasClustIndex')=0
AND OBJECTPROPERTY(object_id, 'IsUserTable')=1
ORDER BY [tables without clustered index]
If you execute this bit of code , you will see all the tables in the AdventureWorksLT2012 database that have not go a clustered index.
As you can see I query the sys.tables view.You can use this script to query your own database for tables without a clustered index.
If I want to find all the tables in the AdventureWorksLT2012 database or any other database for tables that have not indexes you can execute the following script.
SELECT DB_NAME(DB_ID ('AdventureWorksLT2012')) + '. '
 +OBJECT_SCHEMA_NAME(t.object_ID)+ '.' + t.NAME AS
[tables_without_an_index]
FROM sys.tables t
WHERE OBJECTPROPERTY(object_id, 'TableHasIndex')=0
AND OBJECTPROPERTY(object_id, 'IsUserTable')=1
ORDER BY [tables_without_an_index]
Hope it helps!!!
I have been delivering a certified course in MS SQL Server 2012 recently and I was asked a very interesting question about SQL Server pages and what types of pages exist.
I had to explain to them about SQL Server architecture first. Each data file is divided internally into pages.Each page has a size of 8 kbytes.
In each of these pages (data,metadata,indexes) are stored. 8 continuous pages of 8kbytes make up one extent which is 64kbytes.
If you make the calculations,16 extents make up 1 mbyte.
Extents are divided into 2 categories,
- Uniform - 8 pages belong to the same object e.g table
- Mixed - 8 pages do not belong to the same object
The first 96 bytes of the page are also reserved for the page header.
Page header includes information like
- Page number
- Page type
- Free space per page
The greatest size in bytes I can have in a page is 8060 bytes
So the maximum record length I can have in a table is 8060 bytes
If I have a table that its record length is 100 bytes, that means I can have 80 records per page.
If I have 200 records I need 3 pages. Each record belongs to only one page. You cannot have half record in one page and another half in another.
Ι was asked to provide an example where we will see the various SQL Server page types and what happens when the row size is larger than 8060 bytes.
I have installed SQL Server 2012 Enterprise edition in my machine but you can use the SQL Server 2012/2008 Express edition as well.
I am connecting to my local instance through Windows Authentication and in a new query window I type (you can copy paste)
USE tempdb
GO

CREATE TABLE largetable
( col1 VARCHAR(2000),
 col2 VARCHAR(8000),
 col3 VARCHAR(max)

 );

INSERT INTO largetable VALUES
(
REPLICATE('SQL Server 2012 will provide Mission Critical
Confidence with greater uptime
blazing-fast performance and enhanced
security features for mission critical workloads',12),
 REPLICATE('SQL Server 2012', 533),
REPLICATE('SQL Server indexes', 1000))


SELECT * FROM largetable
-- Shows types of pages available inside SQL Server

SELECT OBJECT_NAME (object_id) AS tablename, rows,
 type_desc AS page_types_SQL
FROM sys.partitions part
INNER JOIN sys.allocation_units alloc
ON part.partition_id = alloc.container_id
WHERE object_id = object_id('largetable');
Let me explain what I am doing in this bit of code
- I make the tempdb the current database
- I create a new table called largetable in the tempdb database. As you can see the record length is much larger than 8060 bytes.
- Insert some values into the table. I insert thousands of rows using the REPLICATE function.
- Finally I execute a SELECT JOIN statement from the sys.partitions and sys.allocation_units table.
The results are:
tablename rows page_types_SQL
largetable 1 IN_ROW_DATA
largetable 1 LOB_DATA
largetable 1 ROW_OVERFLOW_DATA
As you can see I have one row of data.Each of these types of pages is called an Allocation Unit.
IN_ROW_DATA refers to the situation where we have the whole row size staying within the 8,060-byte limit.
LOB_DATA refers to LOB data type columns, in this case the NVARCHAR(MAX) column and its values.
ROW_OVERFLOW_DATA refers to the data that could not be stored to single page for a single row and that is why it is using an overflow page.
Hope it helps!!!
I have been delivering a certified course in MS SQL Server 2012 recently and I was asked a very interesting question "Does the order of the column in an index matter?"
Let's give some basic definitions first and make some analogies.
A single column index is straightforward. Think of it as an index in the back of the book.
Let’s say you want to learn about “DBCC FREEPROCCACHE” . You look for that command in the index of the book. The index does not have the information. It has a pointer to the page where the command is described.You turn to that page and read about it. This is a good analogy for a single column,non-clustered index
In SQL Server you can also create an index that contains more than one column.This is known as the composite index. A good analogy for a composite index is the telephone book.
A telephone book lists everyone who has publicly available a telephone number in an area.It is organised not by one column but by two:last name and first name.To look up someone in the telephone book , we first navigate to the last name and then the first name. To find John Smith you first locate Smiths and then John. Composite indexes contain more than 1 column and can reference up to 16 columns from a single table or view.
Back to our question.I have answered this question with the demo below.
I have installed SQL Server 2012 Enterprise edition in my machine but you can use the SQL Server 2012/2008 Express edition as well.
I am connecting to my local instance through Windows Authentication and in a new query window I type (you can copy paste)
USE tempdb
GO

--create a sample table

CREATE TABLE Customers
(
Customer_ID INT NOT NULL IDENTITY(1,1),
Last_Name VARCHAR(20) NOT NULL,
First_Name VARCHAR(20) NOT NULL,
Email_Address VARCHAR(50) NULL

)
--create a clustered index on Customer_ID and
--a non-clustered composite index on the Last_Name and First_Name

CREATE CLUSTERED INDEX ix_Customer_ID ON Customers(Customer_ID)

CREATE NONCLUSTERED INDEX ix_Customer_Name ON Customers(Last_Name,First_Name)
--when we issue a query to SQL Server that
--retrieves data from the Customers table, the
--SQL Server query optimiser will consider
--the various retrieval methods at its disposal
--and select one it deems most appropriate

-- insert test row

INSERT INTO customerS VALUES('Smith','John','[email protected]')

--use SQL Data Generator to create sample data 10000 rows

SELECT * FROM customers

-- DBCC DROPCLEANBUFFERS removes all
-- buffers from the buffer pool
-- DBCC freeproccache removes all
-- entries from the procedure cache

DBCC dropcleanbuffers
DBCC freeproccache

-- when we run this query and see the execution plan
-- we have an index seek on the nonclustered index
-- to locate the rows selected by the query
-- we also have a key lookup to find the values for the email
-- to retrieve the non-indexed columns
SELECT last_name ,
 first_name ,
 email_address
FROM customers
WHERE Last_Name = 'Smith'
 AND First_Name = 'John'

-- what happens in this case?
--where we have the WHERE statement in different order than the index order?
-- it will use the same execution plan

SELECT last_name ,
 first_name ,
 email_address
FROM customers
WHERE First_Name = 'John'
 AND Last_Name = 'Smith'

-- and what happens in this case?
--where we use only last name?
--the same plan is used

SELECT last_name ,
 first_name ,
 email_address
FROM customers
WHERE Last_Name = 'Smith'
-- what happens in this case?
-- when we use only first_name
--the index cannot be used
-- an index cannot be used to seek rows of data when the first column
-- of the index is not specified in the WHERE clause

INSERT INTO customers VALUES ('kantzelis','nikos','[email protected]')

SELECT last_name ,
 first_name ,
 email_address
FROM customers
WHERE First_Name = 'nikos'

 SET STATISTICS IO on

 DBCC dropcleanbuffers
DBCC freeproccache

 SELECT last_name ,
 first_name ,
 email_address
 FROM customers
 WHERE Last_Name = 'kantzelis'

-- now lets drop the index to see what happens

DROP INDEX ix_Customer_Name ON customers

--and rerun the query
 --we see a huge increase in logical
-- reads without the index
 --we have in this case, in the
-- absence of the index a clustered index scan
 --which means that each row of the table had to be read
 SELECT last_name ,
 first_name ,
 email_address
 FROM customers
 WHERE Last_Name = 'kantzelis'
Let me explain what I am doing in this bit of code
- I make the tempdb the current database
- I create a new table called Customers
- I create a clustered index on the table ix_Customer_ID on Customer_ID
- I insert a test row to the table
- Then I use a third party generator tool to create 10.000 records
- Then I just use a simple statement to make sure all the rows were inserted
- Then I remove all buffers from the buffer pool and all entries from the procedure cache
- Then (I activate the actual execution plan) and execute the Select query in line 43.
- We have an index seek on the non clustered index and a key lookup to get the values for the email column.
- Then I execute the Select statement in lines 54. The order of the columns in the WHERE clause are different than the index order.
- Still the same execution plan is used
- Then I execute the Select statement in lines 65. We have just the last_name column in the WHERE clause.The same plan is used
- Then in line 76 I insert a new value in the table
- Then I execute another Select statement (lines 78) where just the first_name column is in the WHERE clause.In this case the index cannot be used. An index cannot be used to seek rows of data when the first column of the index is not specified in the WHERE clause.
- Then in line 84 I set statistics IO on so i can investigate the logical reads when having or not the index.
- In line 89 I run a Select query again and make a note of the logical reads , which is 4 in my case.
- Then I drop the index and rerun the query (line 103). This time the logical reads are 77. So you can see that the performance of the query without the index has been dramatically decreased.
Hope it helps!!!
I have been delivering a certified course in MS SQL Server 2012 recently and I have found something that was really impressive regarding SET options in SQL Server and index creation.
I will look into the SET QUOTED_IDENTIFIER and SET ANSI_NULLS options and how their values can affect index creation.
I have installed SQL Server 2012 Enterprise edition in my machine but you can use the SQL Server 2012/2008 Express edition as well.
I am connecting to my local instance through Windows Authentication and in a new query window I type (you can copy paste)
[sourcecode language="sql"]
USE tempdb
GO

--create a sample table

CREATE TABLE Customers
(
Customer_ID INT NOT NULL IDENTITY(1,1),
Last_Name VARCHAR(20) NOT NULL,
First_Name VARCHAR(20) NOT NULL,
Email_Address VARCHAR(50) NULL,
Fullname AS first_name + '' + last_name
)

SET QUOTED_IDENTIFIER OFF;
SET ANSI_NULLS OFF;
--create a clustered index on Customer_ID and
--a non-clustered composite index on the fullname

--index failed
CREATE NONCLUSTERED INDEX ix_Customer_fName ON Customers(Fullname)

SET QUOTED_IDENTIFIER ON;
SET ANSI_NULLS ON;

-successful index creation
CREATE NONCLUSTERED INDEX ix_Customer_fName ON Customers(Fullname)

[/sourcecode]
Let me explain what I am doing in this bit of code
- I make the tempdb the current database
- I create a new table called Customers
- I have a computed column in Fullname in the table Customers
- Then I set QUOTED_IDENTIFIER and ANSI_NULLS to OFF
- Then I create a non clustered index on the computed column. It failed with this error "CREATE INDEX failed because the following SET options have incorrect settings: 'ANSI_NULLS, QUOTED_IDENTIFIER'. Verify that SET options are correct for use with indexed views and/or indexes on computed columns and/or filtered indexes and/or query notifications and/or XML data type methods and/or spatial index operations."
- Then I set QUOTED_IDENTIFIER and ANSI_NULLS to ON
- Then I create a non clustered index on the computed column again. This time works just fine.
Hope it helps!!!
I have been delivering a certified course in MS SQL Server 2012 recently and I was asked to provide a demo about the MERGE statement.
I will provide you with a demo in this post trying to explain more about the MERGE T-SQL statement and its use.
This statement was introduced back to SQL Server 2008.We can use a MERGE statement to modify data in a target table based on data in a source table.The statement joins the target to the source by using a column common to both tables, such as a primary key.
You can then insert, modify, or delete data from the target table—all in one statement—according to how the rows match up as a result of the join.
You need to have SELECT permissions on the source and INSERT,UPDATE,DELETE permissions on the target.
In this example I will create two tables, one source and one target table. I will use the WHEN MATCHED THEN clause to update rows in the target table that match rows in the source table.
I have installed SQL Server 2012 Enterprise edition in my machine but you can use the SQL Server 2012/2008 Express edition as well.
I am connecting to my local instance through Windows Authentication and in a new query window I type (you can copy paste)
[sourcecode language="sql"]
USE master
GO

CREATE DATABASE mergedata
GO

USE mergedata
GO

IF OBJECT_ID ('CarsStock', 'U') IS NOT NULL

DROP TABLE dbo.CarsStock;

 -- this is our target table

CREATE TABLE dbo.CarsStock

(

CarID INT NOT NULL PRIMARY KEY,

CarModel NVARCHAR(100) NOT NULL,

Quantity INT NOT NULL

CONSTRAINT Qt_Df_1 DEFAULT 0

);
IF OBJECT_ID ('CarsOrders', 'U') IS NOT NULL

DROP TABLE dbo.CarsOrders;

--this is the souce table.

CREATE TABLE dbo.CarsOrders

(

CarID INT NOT NULL PRIMARY KEY,

CarModel NVARCHAR(100) NOT NULL,

Quantity INT NOT NULL

CONSTRAINT Qt_Df_2 DEFAULT 0

);

INSERT CarsStock VALUES

(1, 'BMW Cabrio', 12),

(2, 'Ford Focus', 13),

(3, 'LexusLS460', 2),

(5, 'KIA Preggio', 1),

(6, 'Citroen Picasso', 1),

(8, 'Ford escape', 4);

INSERT CarsOrders VALUES

(1, 'BMW Cabrio', 4),

(3, 'LexusLS460', 1),

(4, 'Citroen Picasso', 4),

(5, 'KIA Preggio', 5),
 (7, 'KIA optima', 8);

 --Implementing the WHEN MATCHED Clause

 --The first MERGE clause we’ll look at is
 -- WHEN MATCHED. You should use this clause
 -- when you want to update or delete rows
 -- in the target table that match rows in the
 -- source table

 MERGE CarsStock cs

USING CarsOrders co

ON cs.CarID = co.CarID

WHEN MATCHED THEN

UPDATE

SET cs.Quantity = cs.Quantity + co.Quantity;

SELECT * FROM CarsStock;

[/sourcecode]
Let me explain what I am doing in this bit of code
- I make the master database the current database
- I create a new database mergedata
- I create a table called CarsStock
- I create a table called CarsOrders
- I insert values in the CarsStock table - target table
- I insert values in the CarsOrders table -source table
- Then I use the WHEN MATCHED THEN clause with the MERGE statement because I want to update rows(quantity column) in the target table that match rows in the source table
- Then I select the contents of the CarsStock table and see the values updated (Quantity column) where the values of the CarID is the same in the two tables- joined column values are the same.
I will let you investigate the
- WHEN NOT MATCHED [BY TARGET] clause
- WHEN NOT MATCHED BY SOURCE clause
Hope it helps!!!
In my last SQL Server 2012 administration seminar, I used Performance Monitor to analyse and troubleshoot issues regarding SQL Server.
It is built into Windows and many administrators used it a lot in the old days when some of the tools we have now in our disposal did not exist.
So this is a free tool that you do not need to download.
Performance Monitor or PerfMon for short, can be used to monitor performance real-time, capture various metrics and you can select what you want to monitor and for how long.You can capture information about the hardware, the operating system, SQL Server and more.So it is not a tool for troubleshooting SQL Server only. The whole process is automated and so is the data collection.
With PerfMon we can track nearly every type of system performance
The overhead of using PerfMon is minimal in most cases but you should be careful when selecting the sampling interval.
One good advice is not to use too many counters and not sampling intervals less than one second.
Sometimes it is better to use DMVs,Trace, SQL Server profiler and Extended Events.
You should use PerfMon when you need to collect OS and hardware resource counters as well as SQL Server counters.
The performance data generated by a system component is represented by a performance object
A performance object provides counters that represent specific aspects of a component such as % Processor Time for a Processor object
PerfMon allows real-time data to be viewed and analysed in multiple ways.
In this post I am going to present some of the main SQL Server counters that can be monitored through Performance Monitor and some none SQL Server related counters.
You do not require to have any previous knowledge.
You can start PerfMon by going to Start->Run->perfmon or you can go Control Panel\All Control Panel Items\Administrative Tools and then start Performance Monitor.
When I start PerfMon I see the Processor counter counter. I will add some more.
Have a look at the picture below

I click on the green cross icon, and I add some counters for the PhysicalDdisk object.
I will add the Avg. Disk Sec/Read counter and the Avg. Disk Sec/Write, select them and add them to the counters area.
Have a look at the picture below

Avg. Disk Sec/Read = average time in ms to read from disk
a good value for this counter is average value < 10 ms
Avg. Disk Sec/Write = average time in ms to write to disk
a good value for this counter is average value < 10 ms
Now I am going to add some more counters from the Memory object.
I will add Available bytes (free physical memory).
I will also add an SQL Server related counter (Batch Requests per second) from the SQL Server:SQL Statistics.
Then I install/attach the AdventureWorks2012 database. You can use any database you want.
I need to generate some workload so I can get values for the counters.
I use the free tool , SQL Load Generator, from codeplex to generate multiple reads and writes.
Once more I observe the counters and see/analyse the results.
I will show you some common options in the PerfMon GUI.
You can change the colour of the counter.
Have a look at the picture below

You can also change the view that you see the results. You can select e.g the Report view.
Have a look at the picture below

You can also change the Sample interval (1 second) and the Duration (default 100 sec)/
Have a look at the picture below
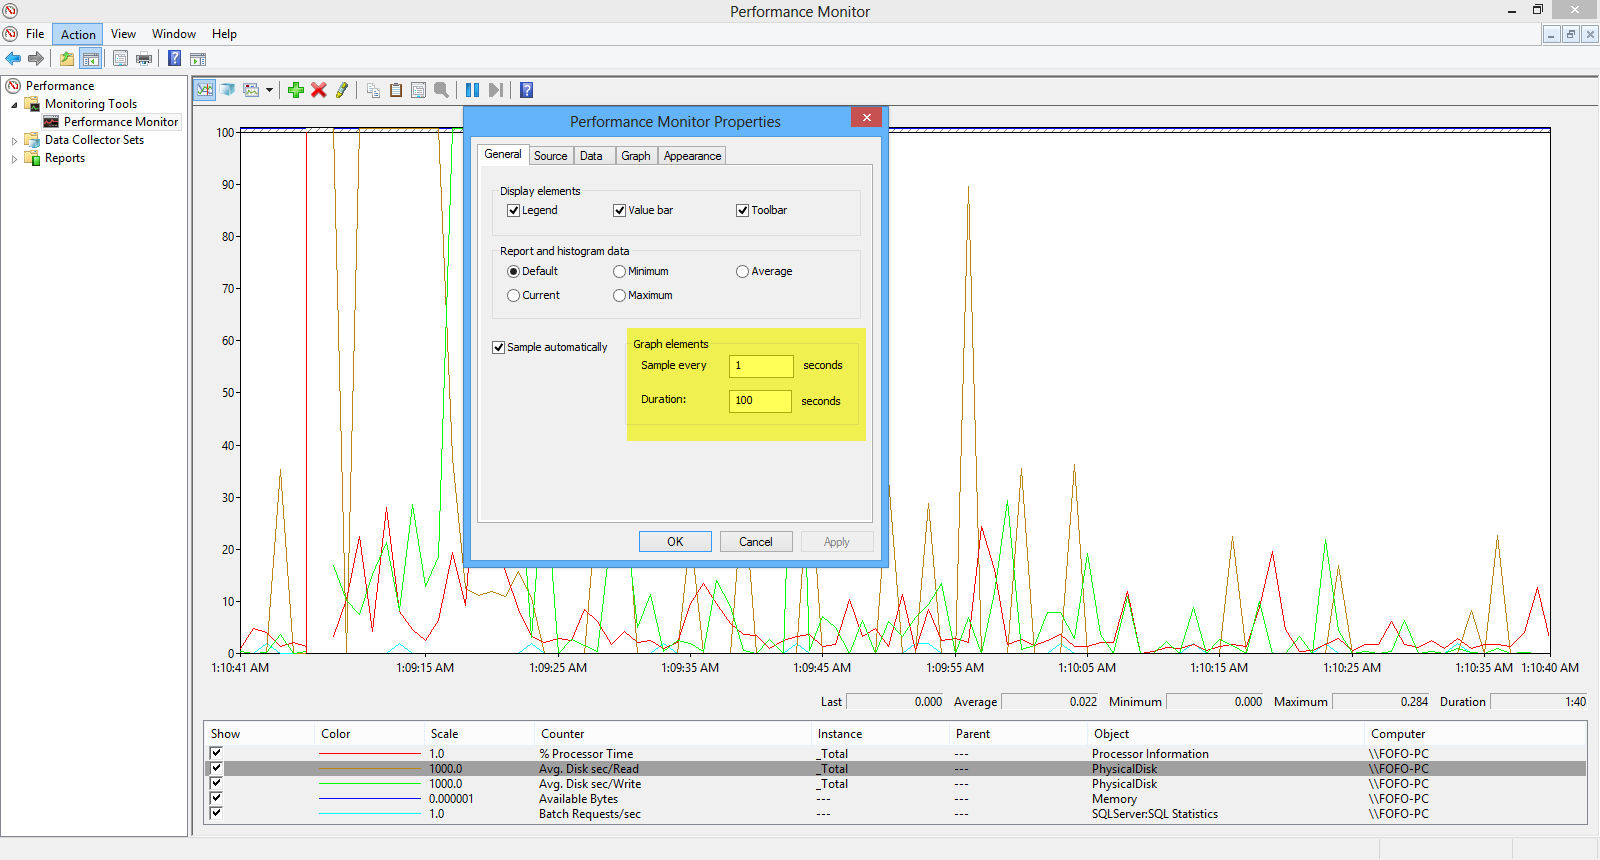
You can also add a counter, highlight a counter and freeze the display.

There will be more posts on Performance monitor.
Hope it helps!!!
In this post I will talk about SQL Server Traces, what they are and how we can use them.
An SQL Trace is a low-level server-side event inside SQL Server that can be used to audit activity,troubleshoot performance debug T-SQL statements and stored procedures.With SQL Traces we can have a real-time or offline analysis of data.We can capture more than 150 events. It was introduced back in SQL Server 6.0.
We can create a SQL Trace using the SQL Server Profiler.
Alternatively you can use the sp_trace_create with the required parameters to create a new trace. Then you need to setup sp_trace_setevent with the required parameters to select the events and columns to trace.
We can start traces manually or as a part of a scheduled job.
Obviously as with all tools of such nature there is an overhead so you have to be careful. You should not add too many events in the same trace.
I have installed SQL Server 2012 Enterprise edition in my machine but you can use any other version of SQL Server.
I will connect to the local instance of SQL Server with windows authentication.
Then I go to Tools-->SQL Server Profiler i connect to my local instance of SQL Server
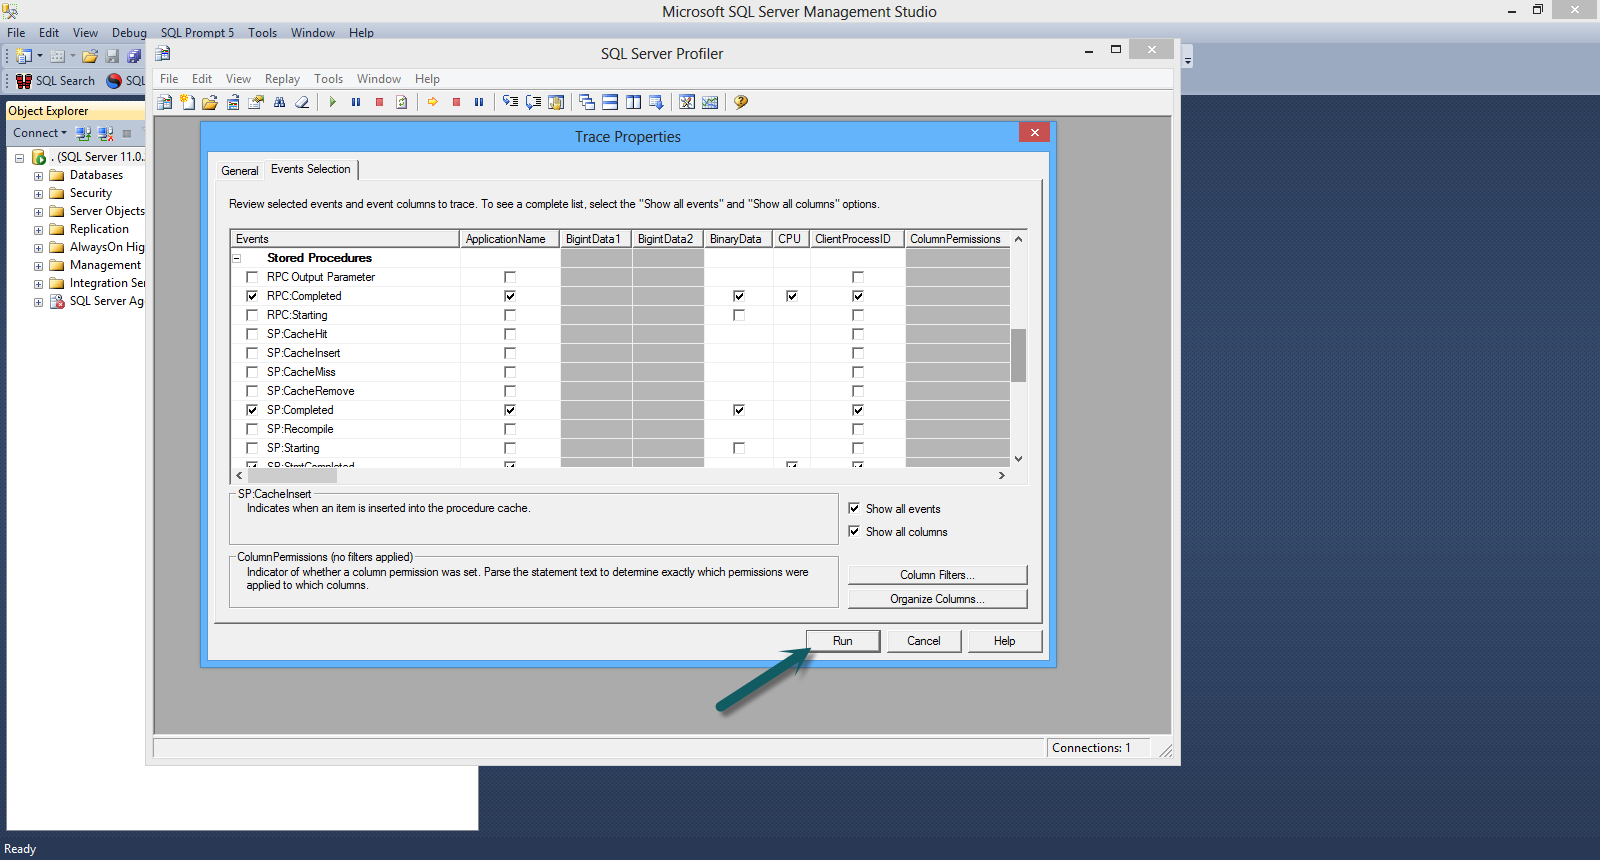
I start with a blank template.
Have a look at the picture below

Then I select some events for the trace.
From the Stored Procedures event group I select
- RPC:Completed
- SP:Completed
- SP:StmtCompleted
From the TSQL event group I select
- SQL:BatchCompleted
- SQL:StmtCompleted
Have a look at the picture below
Then I hit the Run button and immediately stop the trace (hitting the red square).
Then under File->Export I select Script Trace definition->For SQL Server 2005-SQL11 and save the file in folder in my hard disk.
Have a look at the picture below.
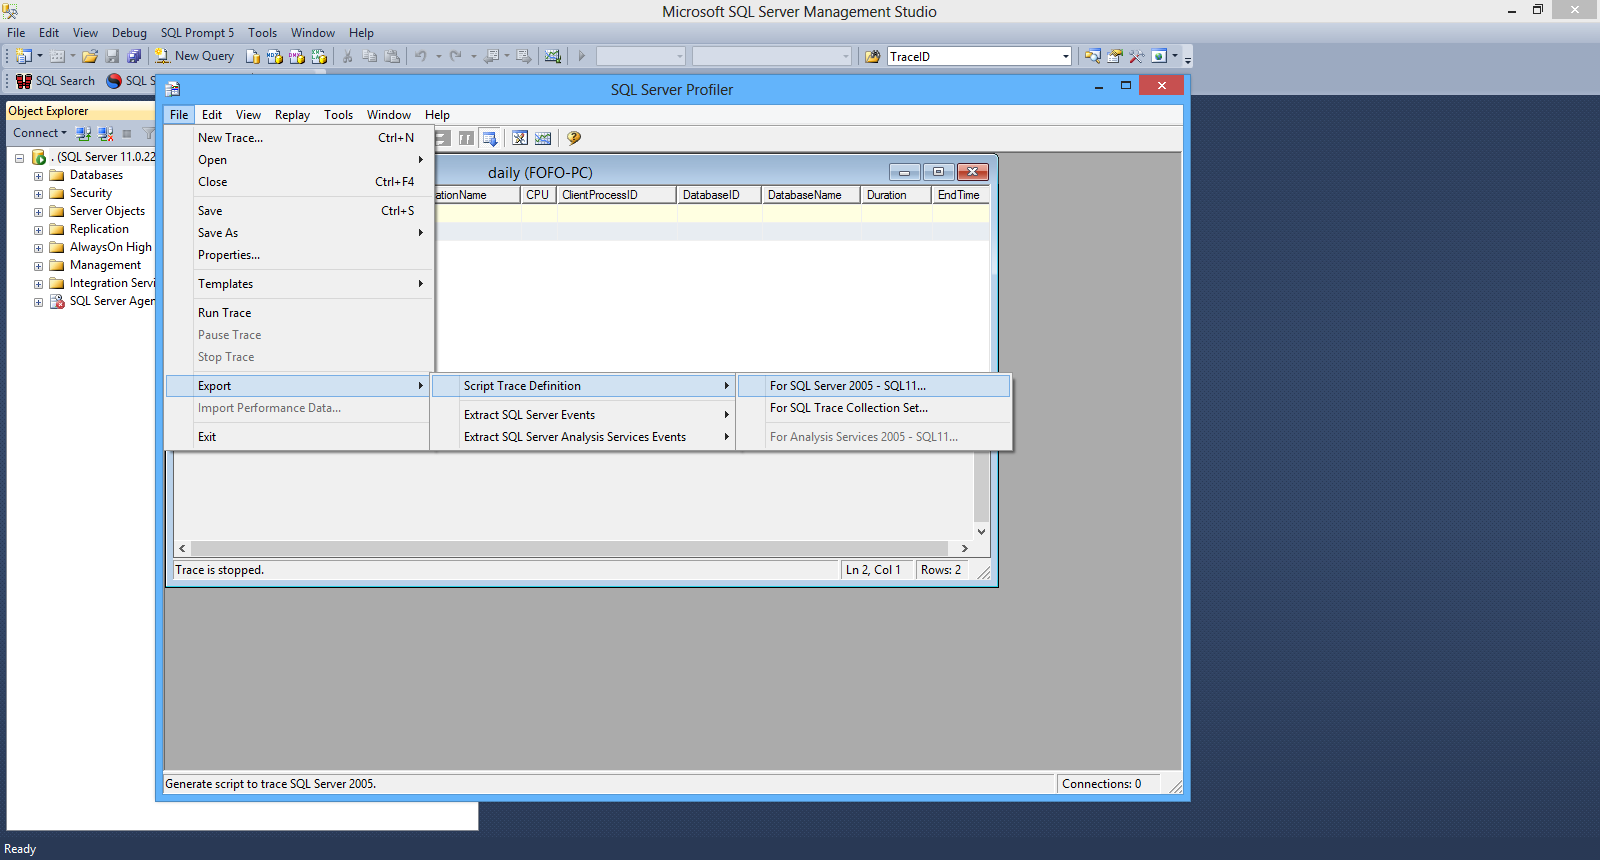
This will be an .sql file. Then I open the file in new query window in SSMS.
In my case this is the trace script that was generated.
[sourcecode language="sql"]
/****************************************************/
/* Created by: SQL Server 2012 Profiler */
/* Date: 11/14/2013 10:48:57 PM */
/****************************************************/
-- Create a Queue
declare @rc int

declare @TraceID int
declare @maxfilesize bigint
set @maxfilesize = 5

-- Please replace the text InsertFileNameHere, with an appropriate
-- filename prefixed by a path, e.g., c:\MyFolder\MyTrace. The .trc extension
-- will be appended to the filename automatically. If you are writing from
-- remote server to local drive, please use UNC path and make

sure server has
-- write access to your network share

exec @rc = sp_trace_create @TraceID output, 0, N'InsertFileNameHere', @maxfilesize, NULL
if (@rc != 0) goto error

-- Client side File and Table cannot be scripted

-- Set the events
declare @on bit
set @on = 1
exec sp_trace_setevent @TraceID, 10, 1, @on
exec sp_trace_setevent @TraceID, 10, 9, @on
exec sp_trace_setevent @TraceID, 10, 2, @on
exec sp_trace_setevent @TraceID, 10, 66, @on
exec sp_trace_setevent @TraceID, 10, 10, @on

exec sp_trace_setevent @TraceID, 10, 3, @on
exec sp_trace_setevent @TraceID, 10, 4, @on
exec sp_trace_setevent @TraceID, 10, 6, @on
exec sp_trace_setevent @TraceID, 10, 7, @on
exec sp_trace_setevent @TraceID, 10, 8, @on
exec sp_trace_setevent @TraceID, 10, 11, @on
exec sp_trace_setevent @TraceID, 10, 12, @on
exec sp_trace_setevent @TraceID, 10, 13, @on
exec sp_trace_setevent @TraceID, 10, 14, @on
exec sp_trace_setevent @TraceID, 10, 15, @on
exec sp_trace_setevent @TraceID, 10, 16, @on
exec sp_trace_setevent @TraceID, 10, 17, @on
exec sp_trace_setevent @TraceID, 10, 18, @on
exec sp_trace_setevent @TraceID, 10, 25, @on
exec sp_trace_setevent @TraceID, 10, 26, @on
exec sp_trace_setevent @TraceID, 10, 31, @on

exec sp_trace_setevent @TraceID, 10, 34, @on
exec sp_trace_setevent @TraceID, 10, 35, @on

exec sp_trace_setevent @TraceID, 10, 41, @on
exec sp_trace_setevent @TraceID, 10, 48, @on
exec sp_trace_setevent @TraceID, 10, 49, @on
exec sp_trace_setevent @TraceID, 10, 50, @on
exec sp_trace_setevent @TraceID, 10, 51, @on
exec sp_trace_setevent @TraceID, 10, 60, @on
exec sp_trace_setevent @TraceID, 10, 64, @on
exec sp_trace_setevent @TraceID, 43, 1, @on
exec sp_trace_setevent @TraceID, 43, 9, @on
exec sp_trace_setevent @TraceID, 43, 2, @on
exec sp_trace_setevent @TraceID, 43, 66, @on
exec sp_trace_setevent @TraceID, 43, 3, @on
exec sp_trace_setevent @TraceID, 43, 4, @on
exec sp_trace_setevent @TraceID, 43, 5, @on
exec sp_trace_setevent @TraceID, 43, 6, @on
exec sp_trace_setevent @TraceID, 43, 7, @on
exec sp_trace_setevent @TraceID, 43, 8, @on

exec sp_trace_setevent @TraceID, 43, 10, @on

exec sp_trace_setevent @TraceID, 43, 11, @on
exec sp_trace_setevent @TraceID, 43, 12, @on
exec sp_trace_setevent @TraceID, 43, 13, @on
exec sp_trace_setevent @TraceID, 43, 14, @on
exec sp_trace_setevent @TraceID, 43, 15, @on
exec sp_trace_setevent @TraceID, 43, 22, @on
exec sp_trace_setevent @TraceID, 43, 26, @on
exec sp_trace_setevent @TraceID, 43, 28, @on
exec sp_trace_setevent @TraceID, 43, 29, @on
exec sp_trace_setevent @TraceID, 43, 34, @on
exec sp_trace_setevent @TraceID, 43, 35, @on
exec sp_trace_setevent @TraceID, 43, 41, @on
exec sp_trace_setevent @TraceID, 43, 48, @on
exec sp_trace_setevent @TraceID, 43, 49, @on
exec sp_trace_setevent @TraceID, 43, 50, @on
exec sp_trace_setevent @TraceID, 43, 51, @on
exec sp_trace_setevent @TraceID, 43, 60, @on

exec sp_trace_setevent @TraceID, 43, 62, @on
exec sp_trace_setevent @TraceID, 43, 64, @on

exec sp_trace_setevent @TraceID, 45, 1, @on
exec sp_trace_setevent @TraceID, 45, 9, @on
exec sp_trace_setevent @TraceID, 45, 3, @on
exec sp_trace_setevent @TraceID, 45, 4, @on
exec sp_trace_setevent @TraceID, 45, 5, @on
exec sp_trace_setevent @TraceID, 45, 6, @on
exec sp_trace_setevent @TraceID, 45, 7, @on
exec sp_trace_setevent @TraceID, 45, 8, @on
exec sp_trace_setevent @TraceID, 45, 10, @on
exec sp_trace_setevent @TraceID, 45, 11, @on
exec sp_trace_setevent @TraceID, 45, 12, @on
exec sp_trace_setevent @TraceID, 45, 13, @on
exec sp_trace_setevent @TraceID, 45, 14, @on
exec sp_trace_setevent @TraceID, 45, 15, @on
exec sp_trace_setevent @TraceID, 45, 16, @on
exec sp_trace_setevent @TraceID, 45, 17, @on

exec sp_trace_setevent @TraceID, 45, 18, @on
exec sp_trace_setevent @TraceID, 45, 22, @on
exec sp_trace_setevent @TraceID, 45, 25, @on

exec sp_trace_setevent @TraceID, 45, 26, @on
exec sp_trace_setevent @TraceID, 45, 28, @on
exec sp_trace_setevent @TraceID, 45, 29, @on
exec sp_trace_setevent @TraceID, 45, 34, @on
exec sp_trace_setevent @TraceID, 45, 35, @on
exec sp_trace_setevent @TraceID, 45, 41, @on
exec sp_trace_setevent @TraceID, 45, 48, @on
exec sp_trace_setevent @TraceID, 45, 49, @on
exec sp_trace_setevent @TraceID, 45, 50, @on
exec sp_trace_setevent @TraceID, 45, 51, @on
exec sp_trace_setevent @TraceID, 45, 55, @on
exec sp_trace_setevent @TraceID, 45, 60, @on
exec sp_trace_setevent @TraceID, 45, 61, @on
exec sp_trace_setevent @TraceID, 45, 62, @on
exec sp_trace_setevent @TraceID, 45, 64, @on

exec sp_trace_setevent @TraceID, 45, 66, @on
exec sp_trace_setevent @TraceID, 12, 1, @on
exec sp_trace_setevent @TraceID, 12, 9, @on

exec sp_trace_setevent @TraceID, 12, 3, @on
exec sp_trace_setevent @TraceID, 12, 11, @on
exec sp_trace_setevent @TraceID, 12, 4, @on
exec sp_trace_setevent @TraceID, 12, 6, @on
exec sp_trace_setevent @TraceID, 12, 7, @on
exec sp_trace_setevent @TraceID, 12, 8, @on
exec sp_trace_setevent @TraceID, 12, 10, @on
exec sp_trace_setevent @TraceID, 12, 12, @on
exec sp_trace_setevent @TraceID, 12, 13, @on
exec sp_trace_setevent @TraceID, 12, 14, @on
exec sp_trace_setevent @TraceID, 12, 15, @on
exec sp_trace_setevent @TraceID, 12, 16, @on
exec sp_trace_setevent @TraceID, 12, 17, @on
exec sp_trace_setevent @TraceID, 12, 18, @on
exec sp_trace_setevent @TraceID, 12, 26, @on

exec sp_trace_setevent @TraceID, 12, 31, @on
exec sp_trace_setevent @TraceID, 12, 35, @on
exec sp_trace_setevent @TraceID, 12, 41, @on
exec sp_trace_setevent @TraceID, 12, 48, @on
exec sp_trace_setevent @TraceID, 12, 49, @on
exec sp_trace_setevent @TraceID, 12, 50, @on
exec sp_trace_setevent @TraceID, 12, 51, @on
exec sp_trace_setevent @TraceID, 12, 60, @on
exec sp_trace_setevent @TraceID, 12, 64, @on
exec sp_trace_setevent @TraceID, 12, 66, @on
exec sp_trace_setevent @TraceID, 41, 1, @on
<pre></pre>
exec sp_trace_setevent @TraceID, 41, 9, @on
exec sp_trace_setevent @TraceID, 41, 3, @on
<pre></pre>
exec sp_trace_setevent @TraceID, 41, 4, @on
exec sp_trace_setevent @TraceID, 41, 5, @on
exec sp_trace_setevent @TraceID, 41, 6, @on
exec sp_trace_setevent @TraceID, 41, 7, @on
exec sp_trace_setevent @TraceID, 41, 8, @on
exec sp_trace_setevent @TraceID, 41, 10, @on
exec sp_trace_setevent @TraceID, 41, 11, @on
exec sp_trace_setevent @TraceID, 41, 12, @on
exec sp_trace_setevent @TraceID, 41, 13, @on
exec sp_trace_setevent @TraceID, 41, 14, @on
exec sp_trace_setevent @TraceID, 41, 15, @on
exec sp_trace_setevent @TraceID, 41, 16, @on
exec sp_trace_setevent @TraceID, 41, 17, @on

exec sp_trace_setevent @TraceID, 41, 18, @on
exec sp_trace_setevent @TraceID, 41, 25, @on
exec sp_trace_setevent @TraceID, 41, 26, @on
exec sp_trace_setevent @TraceID, 41, 29, @on
exec sp_trace_setevent @TraceID, 41, 35, @on
exec sp_trace_setevent @TraceID, 41, 41, @on
exec sp_trace_setevent @TraceID, 41, 48, @on
exec sp_trace_setevent @TraceID, 41, 49, @on
exec sp_trace_setevent @TraceID, 41, 50, @on
exec sp_trace_setevent @TraceID, 41, 51, @on

exec sp_trace_setevent @TraceID, 41, 55, @on
exec sp_trace_setevent @TraceID, 41, 60, @on
exec sp_trace_setevent @TraceID, 41, 61, @on
exec sp_trace_setevent @TraceID, 41, 64, @on

exec sp_trace_setevent @TraceID, 41, 66, @on
-- Set the Filters
declare @intfilter int
declare @bigintfilter bigint

-- Set the trace status to start
exec sp_trace_setstatus @TraceID, 1

-- display trace id for future references

select TraceID=@TraceID
goto finish

error:
select ErrorCode=@rc

finish:
go
[/sourcecode]
You can set the set @maxfilesize = 5 to some other value.
In this line exec @rc = sp_trace_create @TraceID output, 0, N'InsertFileNameHere', @maxfilesize, NULL
You can set the path where the trace will be stored.In my case I chose "C:\Users\Nikos\Desktop\traces\daily".The extension is always .trn
Then I run the script and I get a TraceID of 3.
In a new query window I type
SELECT * FROM ::fn_trace_getinfo(0)
and I can see all the traces that are currently running.
Have a look at the picture below.

If I want to stop the trace I type
exec sp_trace_setstatus 3, 0
You can create SQL Server jobs that will start and stop the trace so you do not have to start and it stop it.
Then I execute a series of T-SQL statements and stored procedures and the data is gathered in the trace file.
I use the "sys.fn_trace_gettable" to get the content of one or more trace files in tabular form.
[sourcecode language="sql"]
SELECT *

FROM fn_trace_gettable('c:\traces\daily.trc', DEFAULT)

[/sourcecode]
In general do not use SQL Server traces if you can get the same information though DMVs and DMFs. DMVs and DMFs are supported since SQL Server 2005.
You should use SQL Server Extended events when you can get the same information with SQL traces and when you have an SQL Server version like SQL Server 2008 or 2012 that support SQL Server Extended events.
You can learn more about SQL Server Extended Events in this post
Finally make sure you have a good look at these free tools that help us greatly with trace analysis
Hope it helps!!!
I have just finished a seminar in SQL Server 2012 and one of the topics I have explained thoroughly was Trace flags.
In this post I will try to shed some light on what trace flags are and how we can use them.
Trace flags are used to change the behavior of SQL Server. Please bear in mind that you should use them with caution.
There are hundred of Trace flags that help us troubleshoot and optimise SQL Server installations.
Before turning trace flags on, make sure you understand fully what they do.
There are global trace flags (server level) that are enabled the entire time SQL Server is running.
There are session trace flags. These trace flags are enabled and disabled at the client session level. Those flags influence only the current session.
I will provide some hands-one demos. In the first one I will look into backups and trace flags. In the second demo I will look into deadlocks and trace flags.
We use DBCC TRACEOFF/DBCC TRACEON flags to enable trace flags at both the global and session level. They do not require to restart the service.
You can also use the SQL Server Configuration Manager, to enable them by using the startup parameter flags.(-Txxx format)
Have a look at the picture below.

I have SQL Server 2012 Enterprise edition installed in my machine. You can try these examples in any edition/version of SQL Server.
I connect to my local instance through windows authentication and I create a new query window.
USE master
GO

DBCC TRACESTATUS(-1);
GO
First I check if there are any trace flags enabled on my server at a global level. In my case there is no a global trace flag.
Type and execute the following t-sql code.
Firstly I recycle the SQL Server error log so I have a brand new error log. Then I create a database backup of the AdventureWorksLT2o12 database. You can use any database you want.
EXEC sp_cycle_errorlog;

BACKUP DATABASE [AdventureWorksLT2012] TO
 DISK = N'C:\sqldata\fulladv.bak'
 WITH NOFORMAT, NOINIT,
 NAME = N'AdventureWorksLT2012-Full Database Backup',
 SKIP, NOREWIND, NOUNLOAD, STATS = 10
GO 20
All the backups by default write detailed information to the SQL Server error log.
When I go again and view the SQL Server error log I see it with lots of entries about the backups.
Have a look at the picture below

I might want to change that behavior and make less entries to the SQL Server error log so I can see easier the real errors.
In a new query window type(copy-paste) the following.
--enable the this flag at the global level

--With this trace flag, we can suppress these log entries
DBCC TRACEON(3226,-1)

--check to see if flags exist at the global level

DBCC TRACESTATUS(-1)

--recycle the error log again

EXEC sp_cycle_errorlog;

BACKUP DATABASE [AdventureWorksLT2012] TO
 DISK = N'C:\sqldata\fulladv1.bak'
 WITH NOFORMAT, NOINIT,
 NAME = N'AdventureWorksLT2012-Full Database Backup',
 SKIP, NOREWIND, NOUNLOAD, STATS = 10
GO 20
I enable the 3226 flag. Then I check to see if this flag is indeed enabled with the DBCC TRACESTATUS command.
Then I recycle the error log and then I run the database backup script again. Now all these entries are not going to be logged into the error log.
Have a look at the picture below.

In this new demo I will show you what trace flags you can enable in order to get deadlock information.
By default deadlock related entries do not go into the SQL Server error log.
We have a deadlock when two separate processes/transactions hold locks on resources that each other needs. Nothing can happen. This situation could go on forever.But one of the transactions is forced by SQL Server to “die”.SQL Server selects a victim and kills the process/transaction. It usually kills the one that is least expensive to roll back. We can also have some control over the process to be chosen to be the victim by setting the deadlock priority by typing “SET DEADLOCK_PRIORITY LOW”.This option makes SQL Server to choose that session to be the victim when a deadlock occurs.
I will use the Northwind database to create a deadlock. If you need the installation scripts for the sample Northwind database, click here
Type (copy-paste) the following T-SQL statements.
[sourcecode language="sql"]

--Returns the resources and types of locks that are participating in a deadlock
DBCC TRACEON(1222,-1)

--check to see if flags exist at the global level

DBCC TRACESTATUS(-1)

USE Northwind
GO
--open a query window (1) and run these commands
begin tran
update products set CategoryID = 7

use Northwind
GO
--go to query window (2) and run this command

begin tran
UPDATE Suppliers set CompanyName = 'Mycompany'
update products set CategoryID = 12

--execute this line after you execute the statement in the other query window(1) , in the original query window

update Suppliers set CompanyName = 'TheCompany'

[/sourcecode]
First, I enable the 1222 trace flag.Then I check that this flag is enabled.Then I start a transaction in the query window in the current session.
In another query window I type and execute another t-sql statement. Then I returned to the original query window and typed
update Suppliers set CompanyName = 'TheCompany'
After I execute the line above, a deadlock occured
If I go to the SQL Server error log I will see the deadlock info captured in it. Have a look at the picture below.

By all means use trace flags but make sure that you know what each does before you enable them in your SQL Server ecosystem.
Hope it helps!!!
I have just finished a seminar in SQL Server 2012 where the topic of "indexes" was again a very highly discussed topic.
At one point I had to present a demo on covering indexes.
In this post I will try to shed some light on covering indexes and their use.
The right index on the right column is the basis on which query tuning begins.
On the other hand a missing index or an index placed on the wrong column,or columns can be the basis for all performance problems starting with basic data access, continuing with joins and ending in filtering clauses.
Placing the correct index(es) on table(s) is an art in itself.
A covering index is simply an index that contains the value being queried.
That means that the non-clustered index (covering index) will not use the clustered index to find the data asked from the query. The data is already in the clustered index.We avoid the lookup step.
I have installed a SQL Server 2012 Enterprise edition in my machine.
You can use SQL Server 2005/2008/2012 Express edition as well which is a free edition.
In a new query window type the following
CREATE DATABASE myindexdb

USE myindexdb
go

CREATE table cars
(
id int identity primary key,
length DECIMAL(2,1),
width DECIMAL(2,1),
colour varchar(10)
)

insert into cars values
(3.3, 1.8, 'black'),
(3, 2, 'green'),
(2.9, 1.2, 'blue'),
(2.8, 1.4, 'yellow'),
(3, 1.2, 'white'),
(2.9, 1.5, 'black'),
(2.6, 1.2, 'brown'),
(3.2, 1.2, 'white'),
(2.2, 1.5, 'red')

--the optimiser will do an clustered index scan
select id,length,width from cars
WHERE length =2.9 AND width=1.5

CREATE INDEX lengthwidth ON cars (length,width)

--this time the optimiser will do an non-clustered index seek
select id,length,width from cars
WHERE length =2.9 AND width=1.5
Let me explain what I am doing in this snippet of code above.
First, I crate a dummy database. Then I create a table with 3 columns including a primary key. Because I have a primary key I have a clustered index.
Then I insert some values in it. In line 26 I have a simple select query. The optimiser (enable the actual execution plan) will use a clustered index scan to find the values because it did not have an appropriate index.
Then in line 28 I create a non-clustered index to include the columns (width,length) and then in line 31 I re-run the same query as before.
This time the optimiser will select a different execution plan and will use an non-clustered index seek instead that in general it is a much quicker way to get our data back.
This query execution gives us back the following results
6 2.9 1.5
In the same query windows type the following. With this statement we will get the contents of the non-clustered index.
--get the contents of the non-clustered index
select cast(length as varchar(4)) + ',' + cast(width as varchar(4)) +
 ',' + cast(id as varchar(4)) from cars order by length, width

[/sourcecode]
When we execute the statement above we get
2.2, 1.5, 9
2.6, 1.2, 7
2.8, 1.4, 4
2.9, 1.2, 3
2.9 ,1.5, 6
3.0, 1.2, 5
3.0, 2.0, 2
3.2, 1.2, 8
3.3, 1.8, 1
As you can see the index contains all the data that we need to satisfy that query so there is no need for a table look-up or any other operation.
The last value in the rows above is the primary key value.
Now, in the same query window let's type another t-sql query.
select id,length,width,colour from cars WHERE length =2.9 AND width=1.5
In this case the non-clustered index cannot be used so the optimiser chooses again a clustered index scan.
If we want to force the optimiser we need to create another covering index.
DROP INDEX lengthwidth ON cars

CREATE INDEX lengthwidthcolour ON cars (length,width,colour)

select id,length,width,colour from cars WHERE length =2.9 AND width=1.5
i drop the original non-clustered index. I create a new one that covers all the columns in the query. Then I run my query again. This time the optimiser chooses a non-clustered index seek.
This is the result of the query above
6 2.9 1.5 black
In the same query window type the following t-sql statement and then execute it.
--get the contents of the non-clustered index
select cast(length as varchar(4)) + ',' + cast(width as varchar(4)) + ', ' + colour +
 ',' + cast(id as varchar(4)) from cars order by length, width,colour
You will get the following results
2.2,1.5, red,9
2.6,1.2, brown,7
2.8,1.4, yellow,4
2.9,1.2, blue,3
2.9,1.5, black,6
3.0,1.2, white,5
3.0,2.0, green,2
3.2,1.2, white,8
3.3,1.8, black,1
As you can see all the data that I need is in the non-clustered index.
let's see what happens when we do a simple update in the table
[sourcecode language="sql"]

UPDATE cars SET colour ='brown' WHERE id=8

--get the contents of the non-clustered index

select cast(length as varchar(4)) + ',' + cast(width as varchar(4)) + ', ' + colour +
 ',' + cast(id as varchar(4)) from cars order by length, width,colour

[/sourcecode]
So I execute the simple update above. Obviously the update will be successful.
If we see the contents of the index (by executing the statement)we will see different results than previously. The data in the index page has been re-ordered.
2.2,1.5, red,9
2.6,1.2, brown,7
2.8,1.4, yellow,4
2.9,1.2, blue,3
2.9,1.5, black,6
3.0,1.2, white,5
3.2,1.2, brown,8
3.0,2.0, green,2
3.3,1.8, black,1
Than means that SQL Server had to do some extra work. So we must be careful with covering indexes that include columns that have frequently updates.
Let's find a quick way around that problem. In the same query window type
[sourcecode language="sql"]
drop INDEX lengthwidthcolour ON cars

CREATE INDEX newlengthwidthcolour ON cars (length,width) INCLUDE (colour)

UPDATE cars SET colour ='blue' WHERE id=8

--get the contents of the non-clustered index
select cast(length as varchar(4)) + ',' +
cast(width as varchar(4)) + ', ' + colour +
 ',' + cast(id as varchar(4))
 from cars order by length, width,colour

[/sourcecode]
In this bit of code we drop the index and we create a new one using the INCLUDE keyword for the colour column.
2.2,1.5, red,9
2.6,1.2, brown,7
2.8,1.4, yellow,4
2.9,1.2, blue,3
2.9,1.5, black,6
3.0,1.2, white,5
3.0,2.0, green,2
3.2,1.2, blue,8
3.3,1.8, black,1
You can see that there was no need for the index to reorder its contents, so there is no extra cost.
Try the examples above and you will understand what covering indexes are and why we use them.
Hope it helps!!!!
I have just finished a seminar in SQL Server 2012 and some of the people attending it (from all walks of life) were asking me about dirty pages,what they are and if I can provide a demo.
I will try to explain what dirty pages are and how they are flushed to finally to the disk.
I will also provide a demo, where we can see the dirty pages of a database.
SQL Server makes changes to the memory. So all our transactions take place in the memory.
Pages are loaded to the memory (if they are not already there) and all the updates take place in memory.
Dirty pages are the pages that have changed in memory since they were last loaded from disk.
Those pages are written back to the disk through an SQL Server periodic scheduling functionality widely known as checkpoints.
Checkpoints make sure that committed transactions are flushed to the disk.
It also marks the transaction log so server knows where it has to recover from.
I am going to use the Northwind database to make an update and then. You can use any database you want and perform a simple update.
I connect to my local instance of SQL Server 2012 Enterprise edition through windows authentication.
[sourcecode language="sql"]
USE NORTHWIND
GO
BEGIN TRANSACTION
UPDATE Products set CategoryID = 1
WHERE SupplierID IN (14,19)
COMMIT TRANSACTION
GO

SELECT DB_NAME(database_ID) AS 'Database',
COUNT(page_id) AS 'Dirty Pages'
FROM sys.dm_os_buffer_descriptors
WHERE is_modified = 1
AND DB_NAME(database_id)='NorthWind'
GROUP BY DB_NAME(database_id)
ORDER BY COUNT(page_id) DESC;

GO

CHECKPOINT
GO

SELECT DB_NAME(database_ID) AS 'Database',
COUNT(page_id) AS 'Dirty Pages'
FROM sys.dm_os_buffer_descriptors
WHERE is_modified = 1
AND DB_NAME(database_id)='NorthWind'
GROUP BY DB_NAME(database_id)
ORDER BY COUNT(page_id) DESC;

GO

[/sourcecode]
In lines 1-7 i create a simple update query
In lines 11-17 I see the dirty pages for that database.
In line 21 i do a manual checkpoint and pages are flushed to the disk.
Then in lines 24-30 I run the same query again (lines 11-17) and this time I see no dirty pages for the database.
Hope it helps!!!
Recently in one of my SQL Server seminars, I was asked to give a short introduction and a demo on SQL Server Extented events.
In this post I will explain what Extended Events are and provide a hands on demo.
SQL Server Profiler is (was) the main tool for DBA admins and developers to find out why there were performance issues with SQL Server queries and troubleshoot them. DBAs also use sql traces, DBCC commands and trace flags for performance related issues. Now we have an additional tool in our disposal. We have SQL Server Extended events which were firstly introduced in SQL Server 2008.
SQL Server 2008 introduced Extended Events which is a system for collecting event-driven data about a SQL Server instance and its databases. In SQL Server 2008 we had no GUI (wizards) for the extended events, In that version of SQL Server 2008 we had to write complex T-SQL statements to gather the information we needed to analyse. The results from those SQL queries was returned in an XML format and sometimes it was difficult to analyse them. In SQL Server 2012 we have support for Extended events in SQL Server Management Studio through a GUI component which makes working with Extended Events a simple operation. You can find the Extended Events node under the Management folder in SSMS. We use sessions (we create and configure sessions) to collect data in order to analyse it. Extended events have less impact on the server resources than SQL Server Profiler.
Let's move on to our actual demo. I will use Extended Εvents sessions to capture and analyse data about deadlocks.
We have a deadlock when two separate processes/transactions hold locks on resources that each other needs. Nothing can happen. This situation could go on forever.But one of the transactions is forced by SQL Server to “die”.SQL Server selects a victim and kills the process/transaction. It usually kills the one that is least expensive to roll back. We can also have some control over the process to be chosen to be the victim by setting the deadlock priority by typing “SET DEADLOCK_PRIORITY LOW”.This option makes SQL Server to choose that session to be the victim when a deadlock occurs.
If you want to find our more about deadlocks then have a look at this post of mine.
In that post I use the SQL Server Profiler to look for Deadlock events (Deadlock Graph event).
I have installed in my Windows 8 machine an instance of SQL Server 2012 Enterprise edition. You can download a trial version here .
You can install the developer edition of SQL Sever 2012 as well.
I connect to my local default instance of SQL Server 2012 through windows authentication.
Then I navigate to Management->Extended Events->Sessions->New Session Wizard (right-click)
Have a look at the picture below.

Then we click Next. In the next screen we need to give a name to our session.
Have a look at the picture below

We give a name to our session and then we click Next. Do not choose the option "Start the event session at server startup".
In the next screen we do not use an existing template and then we click Next.

In this screen we can see all the events and select those that we want to capture from the event library.
I select the event xml_deadlock_report. We can have multiple events per sessions. Then I click Next.
Have a look at the picture below

In the new screen I can select global fields which are common to all events. In my case I select database_id and database_name and click Next.
Have a look at the picture below

In the next screen we can apply filters. I am not going to select any filters. Υοu can select any filters you want in another scenario. There are many clauses.
Have a look at the picture below

Then I click Next.
In the next screen I specify how we can collect the data for analysis.
I choose "Save data to a file for later analysis"
Have a look at the picture below
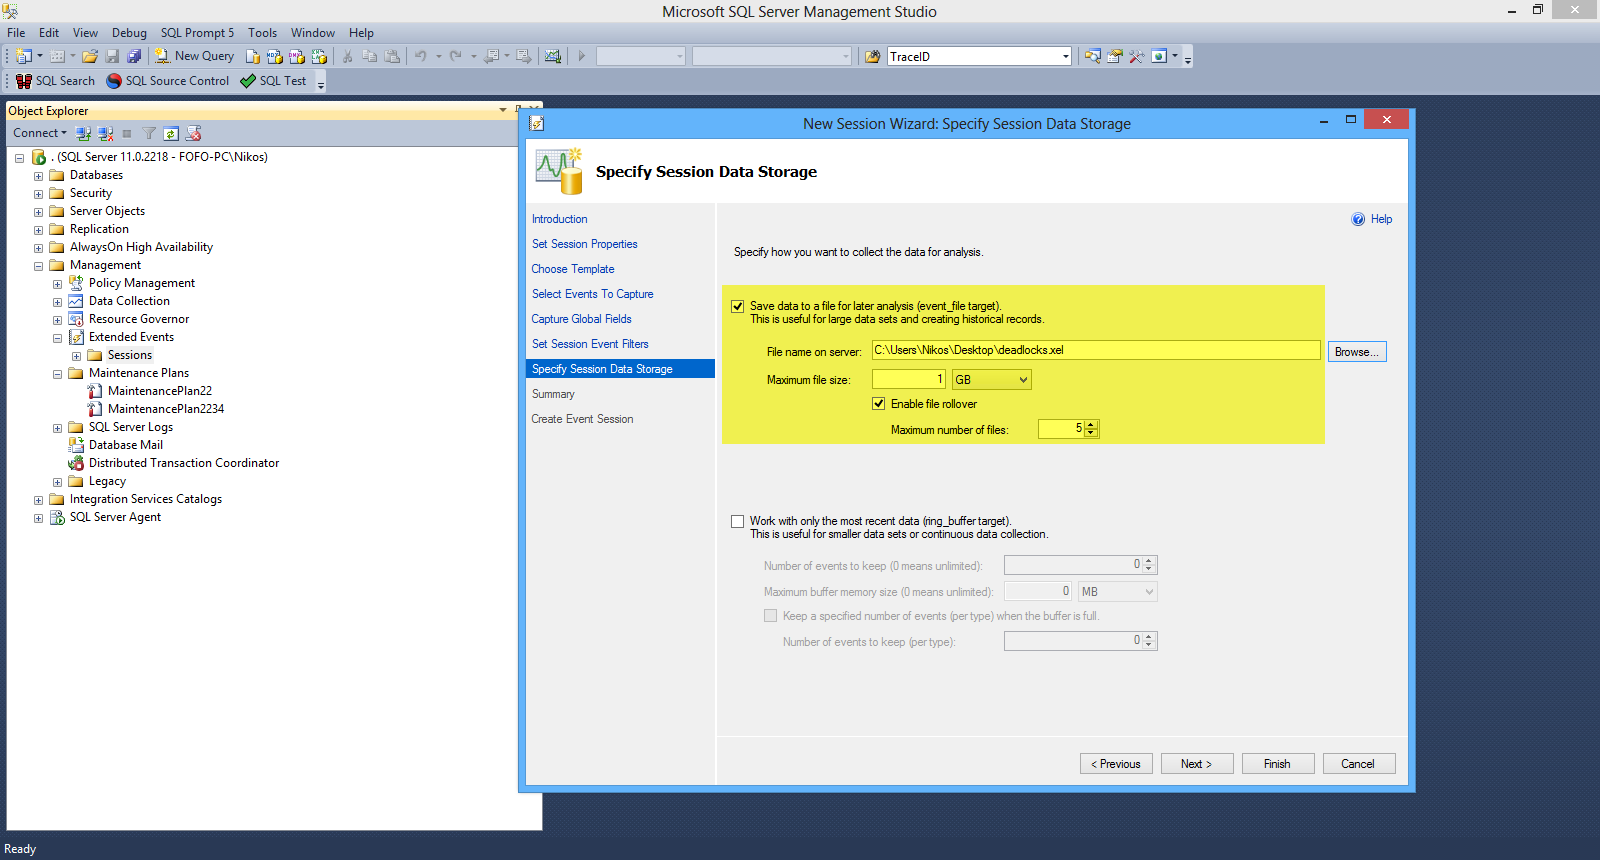
Then I click Next and I am presented with my summary list. We have the chance to review all the options and we can also script the whole process. Finally I click Finish and I am presented with the Success screen.
Finally we need to enable the session, so I click on my session (deadlocks) and choose "Start Session".
Now I am going to simulate a deadlock scenario. I have downloaded and installed the NorthWind database. You can download it from here.
In a new query window in SSMS , execute this first statement.
[sourcecode language="sql"]

USE Northwind
GO
--open a query window (1) and run these commands
begin tran
update products set CategoryID = 7

[/sourcecode]
In a new query window , execute this second statement.
[sourcecode language="sql"]

use Northwind
GO
--go to query window (2) and run this command

begin tran
UPDATE Suppliers set CompanyName = 'Mycompany'
update products set CategoryID = 12

[/sourcecode]
Go back to the first query window, and execute this third statement.
[sourcecode language="sql"]

-- go back to query window (1) and run this command

update Suppliers set CompanyName = 'TheCompany'

[/sourcecode]
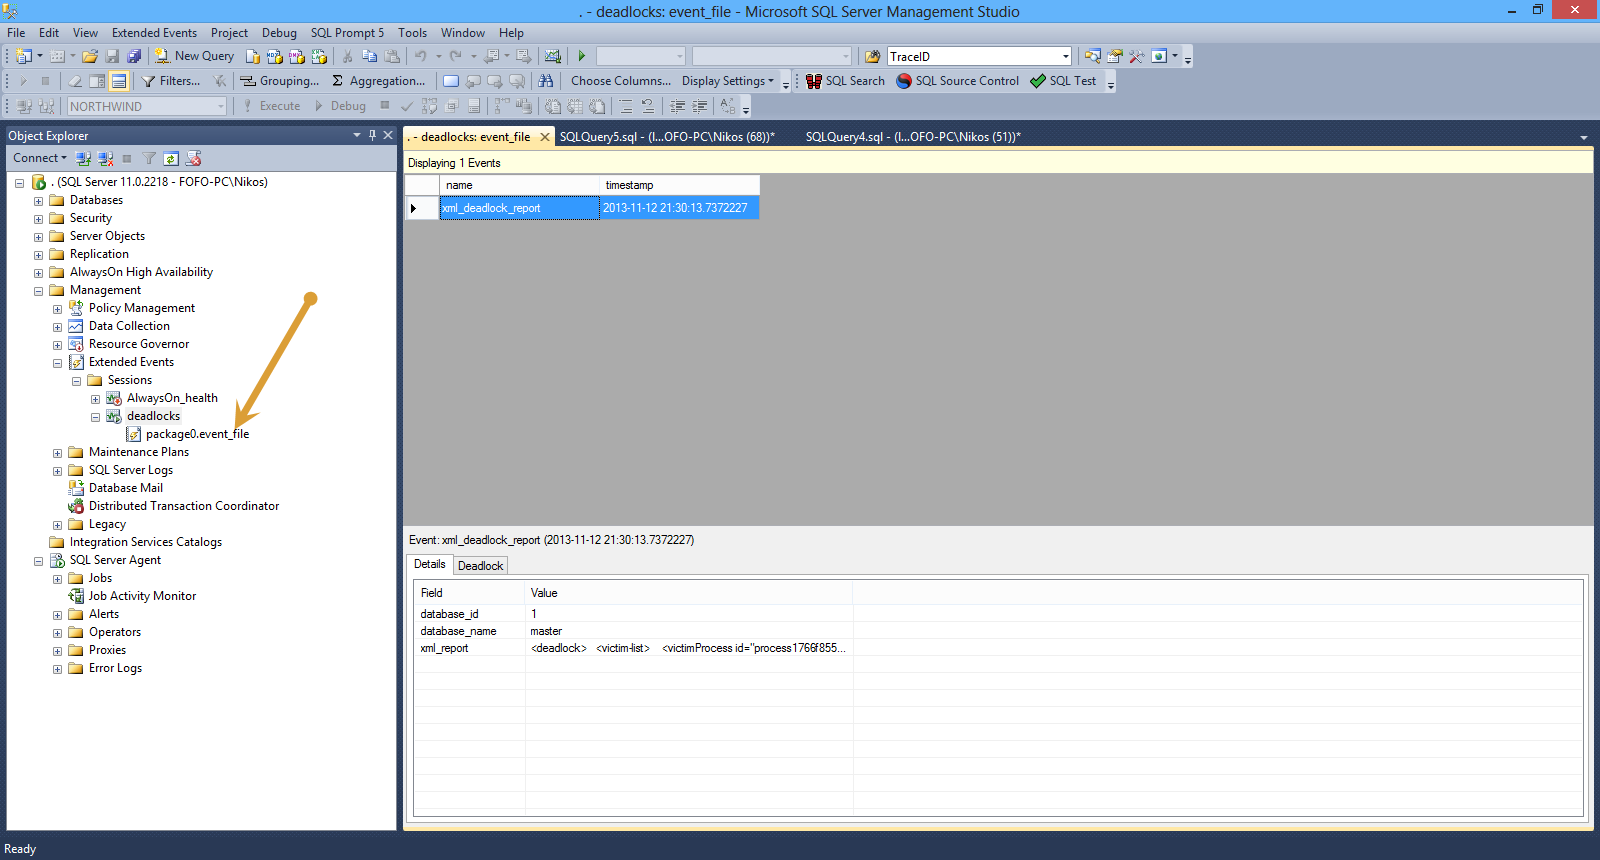
Now we have a deadlock. Double-click on the package0_event_file
We will see the captured information from the deadlock above.
Have a look at the picture below.
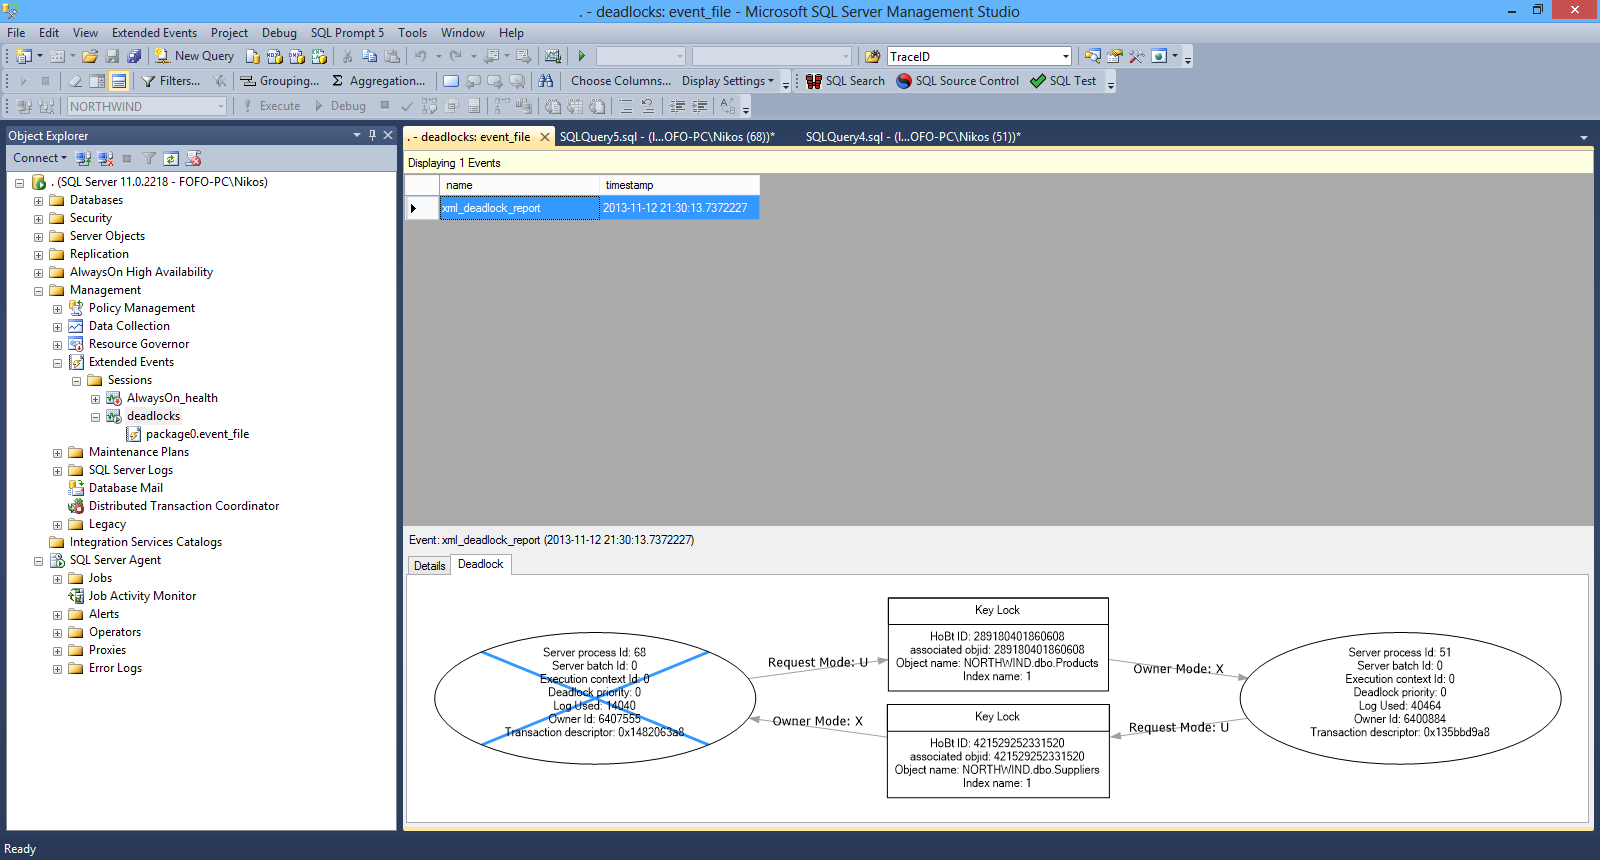
By clicking the "Deadlock" tab we can see a graph that gives us all the information about the processes.
Have a look at the picture below
I encourage you to use the SQL Server Extended events for gathering data for troubleshooting all aspects of an SQL Server 2012 instance.
Hope it helps!!!
In a recent seminar I gave regarding SQL Server 2012 I was asked to clear a few things regarding SQL Server 2012 editions and their license options/pricing. In this post i will shed some light on this issue.
I will start by talking about the various license costs per SQL Server 2012 editions. Please note that there is no datacenter and workgroup edition in SQL Server 2012 version.
Before I go on I would like you to note that there is not a socket licensing anymore.
A physical socket is what sits on the motherboard.This is where the processor fits. Multi-core is a physical processor that has many cores in it. For example you can have one socket with one processor that has four cores. Some people are confused with the term logical core. The new licensing model that is based on physical cores not logical ones. Logical cores is a term that refers to hyper-threading,meaning we can have logical cores from each physical core.
In SQL Server 2012 Enterprise Edition we have a core-based licensing system. The cost is $6874.00 per core. The absolute minimum is four-core per socket.
In SQL Server 2012 Business Intelligence Edition the licensing system is different. You have to pay a Server license plus CALs.This is $8592.00 per server, plus CALs which is $209 per CAL.
In SQL Server 2012 Standard Edition you can pick the licensing model that fits your needs.You can go for core-based which is $1793.00 per core. The absolute minimum is four-core per socket.
Alternatively you can go with Server license plus CALs. The cost is $898.00 per server, plus CALs which is $209.00 per CAL.
These are the official figures.
If you have a virtualised environment you must license the virtual core in each virtual machine. There is a minimum of 4 core lisenses required for each virtual machine.
Your organisation can have different arrangements with Microsoft.In any case you can always have a look at the Microsoft License Advisor tool.
Now I would like to talk about the various editions and their hardware related license limits that could affect your hardware selection decisions e.g the processor selection and how many cores it has.
In SQL Server 2012 Enterprise Edition we have features like database snapshots, data compression,table partitioning,resource governor. These are critical features for large databases and we must opt for that edition. Naturally it has the highest license costs.
When it comes to operating system memory that can be used from SQL Server Enterprise Edition 2012 is all that the operating system can provide e.g in Windows Server 2012 the OS supports 4TB of RAM.
SQL Server 2012 Enterprise edition can support all this memory. When it comes to processors it can support all the processors the OS "sees". It can use for example 128 processors. Make sure that you choose a server hardware very carefully. There are for example processors in the AMD family that have 4 sockets with 16 physical cores in each of them. That is 64 cores X the cost for the Enterprise edition that is almost half a million dollars in licensing costs.Make sure you choose a processor that can handle your workload and keep in mind licensing costs.
In SQL Server 2012 Business Intelligence Edition (SSIS,SSAS,SSRS) when it comes to hardware upper limits, this edition can use all the physical cores the OS supports which in Windows Server 2012 edition is 4TB of RAM. It can also use all the processors that the OS "sees" which is hundreds of physical cores for Windows Server 2012 edition.
With Business Intelligence Edition multiple, high core-count processors are affordable since it is a server based license. No worries about the number of cores for you.
Many organisations use the Standard Edition of SQL Server 2012. That is due to budget limitations. There are hardware limits for this edition. It supports 4 sockets or 16 physical cores and 64 Gbytes of RAM for the database engine and the SSAS.
Well, in this case you have to be careful. Do not write a hardware recommendation for a server that has a 4 socket processor with 32 cores or 256Gbytes of RAM if you plan to install SQL Server 2012 Standard Edition in it. Standard edition cannot use/harness this hardware-power. So you might get an angry call from your manager if you are not careful.
When it comes to Developer edition of SQL Server 2012 there are no license costs but you cannot have this edition in a production environment.
The SQL Server 2012 Express Edition is a free edition. It has a four-core CPU limit and 1GB RAM limit
It also has 10GB database size limit.
The SQL Server 2012 Web Edition is targeted at web hosting. It supports 64GB limit for memory for Database Engine 64GB limit for memory for SSAS.
Hope it helps!!!!
I had a seminar in SQL Server 2012 recently and one of the people in my class asked me what is the best way to restore a
In this post I will like to shed some light on the issue.
As we all know we must include in our backup strategy, the system databases backup. We must backup the
master and
msdb databases regularly.
If for some reason the
master database becomes corrupt or missing , the SQL Server instance cannot be started.
Master and
tempdb cannot be repaired. Repair requires single-user mode, since
master and
tempdb cannot be put into
single-user mode.
If your SQL Server master database becomes corrupt, some people suggest to
rebuild the master database, then start SQL Server, then restore the backup of the
master database. I do not suggest rebuilding the
master database.That is really time-consuming and you need to do a lot of trial-and-error, especially if have a cluster disk subsystem.Some people recommend the full re-installation of the SQL Server. Well that does not sound ideal as well.
Instead,
you can restore a backup of the master database on another instance of SQL Server as long as it's the same version of SQL Server, then use the restored files to replace the corrupt files on the broken system.
- An easier solution would be to restore the backup of the master database backup to another instance of SQL Server
- In the section of the Restore Database dialog box, use a different database name such as attempted_recovery_master to avoid conflict with the master database on the SQL Server you are restoring.
- The master .mdf/.ldf files will be be named attempted_recovery_master.mdf and attempted_recovery_master_1.ldf.
- We then need to detach the attempted_recovery_master database
- Then we need to copy the attempted_recovery_master.mdf and the attempted_recovery_master_1.ldf and then paste them to the instance of SQL Server with the corrupted master database.
- We then must delete the corrupted master.mdf and mastlog.ldf file
- Then we need to rename attempted_recovery_master.mdf to master.mdf and rename attempted_recovery_master_1.ldf to mastlog.ldf.
- We can now safely restart the SQL Server service
One thing to note is that the SQL Server versions of the two instances must match. You cannot restore a master database backup from SQL Server 2005 to SQL Server 2008,detach it and then try to restore it to a SQL Server 2005 instance.I will not work.
It is always better to use a restore to fix system database/table corruption.
Hope it helps!!!
In this post I will demonstrate with a hands on demo how to localise your ASP.Net MVC applications.
The most important thing to point out is that in this
world we live in, we should expect our site to be visited by various
people from different cultures and languages.So we must be prepared to
have our site internationalised. Thankfully ASP.Net MVC simplifies the whole
internationalisation/localisation process.
I would like to talk about the Thread.CurrentCulture property that impacts formatting. That means that this property instructs the runtime how it should display strings e.g the currency in ($ or €) or how the date should be displayed.
The other imporant property is Thread.CurrentUICulture which is used by the Resource Manager to look up culture-specific resources at run-time.
I have installed VS 2012 Ultimate edition in my Windows 8 machine. Υou can use Visual Studio Express 2012 for Web. You can install Visual Studio Express 2012 for Web if you download Web Platform Installer.You can download this tool from this link.
1) I am launching VS 2012 and I will Visual C# as the programming language. I will also select ASP.NET MVC 4 Web Application from the available templates. Choose C# as the development language and Internet Application. I will name my application MvcLocalization.All the necessary files are created
2) In the Ιndex.chstml view in the Home folder add the following code
@{

    var mysalary = 2450.0m;

    var birthday = new DateTime(1980, 2, 17);

}

<div>
    @mysalary.ToString("c")

</div>


<br />


<div>

    @birthday.ToShortDateString()

</div>
I just declare two variables and output them back to the screen. I format the mysalary value as currency.
3) Now we need to change our settings in the web.config file.In the <system.web> section add
<globalization culture="auto" uiCulture="auto"/>
4) Build and run your application and you should will see something like the picture below

My default culture in this machine is US English. So everything is formatted accordingly.
I go to Internet Explorer ( I view my app in IE ) -> Tools ->Languages->Set Language Preferences and add another language (Greek)
Now I run again my application. Now I see the new culture format is applied in both my strings.
Have a look at the picture below

The way ASP.Net runtime managed to display everything in the new culture because it identified the Accept-Language HTTP Header and the globalization entry in the web.config.
5) Now let's move to the next step of localisation and localise some other strings.
To localise text I am going to use .resx files. These files are xml file and are capable of storing localised text per culture.
We need a .resx for every language we want to support.All these resources are compiled in strongly typed classes.
Ι change my language back to English.
I will add a string in the Index.cshml view
<div>Welcome</div>
Now I need to create my resource files.I go to Home (Views Folder) and I add a resource item - Resources.resx.
Now you will that there is Resources.resx.cs file created.Inside there, there is a strongly typed class. In the editor that pops up I will make a new entry.
Have a look at the picture below

Now I go back to the Index.cshtml file and
change this
<div>Welcome</div>
to
<div>@MvcLocalization.Views.Home.Resources.WelcomeText</div>
I add the namespace and then the name of the class (Resources) and the name of the string (WelcomeText).
Build and run your application. You will see the text "Welcome to you all!!!"
Now if I want to add another language I must add create another .resx file.Once more I go to Home (Views Folder) and I add a resource item - Resources.el.resx.
Then I add another entry for the greek language.
Have a look at the picture below

Now,I go to Internet Explorer ( I view my app in IE ) -> Tools
->Languages->Set Language Preferences and add another language
(Greek)
I build and run my application. Now I see the localised text "Kαλώς Ήλθατε"
Hope it helps!!!

In this post I will demonstrate with a hands-on demo the importance of using patterns in an ASP.Net MVC application. I will use the Repository Pattern to create an additional abstract layer between my domain classes and the data layer.
For a more formal definition, I will use the definition that Martin Fowler has given to his book "Patterns of Enterprise Application Architecture".
"Repository Pattern mediates between the domain and the data mapping layers using a collection-like interface for accessing domain objects".
Basically what that means is that it is a layer to separate our application from the data storage technology. It is a pattern for data access.
I will explain more about this pattern as I build the application.
First I will build a small ASP.Net MVC 4.0 EF Code first application without using the repository pattern and then I will rewrite my code leveraging that pattern.
People who follow this blog have seen me in the past building an application first and then changing it a bit to demonstrate the post's main idea.
I will keep things simple. I will create a simple POCO class, Footballer, and then build an ASP.Net MVC application where one can create,edit and delete Footballer entities.
Also I will show you how to architecture properly your ASP.Net MVC 4.0 EF Code first application.
We should not have our domain classes, data access classes and views,controllers in the same project.
We should have them in 3 different projects.
That way our code is more extensible, maintainable and easy to reuse in other non web applications that might need to consume or use EF Code first data access layer.We have a clear separation of concerns.
I have installed VS 2012 Ultimate edition in my Windows 8 machine. Υou can use Visual Studio Express 2012 for Web. You can install Visual Studio Express 2012 for Web if you download Web Platform Installer.You can download this tool from this link.
1) I am launching VS 2012 and I will Visual C# as the programming language. I will also select ASP.NET MVC 4 Web Application from the available templates. Choose C# as the development language and Internet Application. I will name my application MvcRepository. This will be the startup project.
2) Now that we have our MVC project structure we will create another project in our solution. This will be a Windows Library project. I will name it MvcRepository.DomainClasses. In this project I will add only the definitions of the domain class Footballer. I delete the class1.cs class file.
I create a new class, Footballer.cs. The code follows
   public class Footballer
    {
        public int FootballerID { get; set; }
        public string FirstName { get; set; }
        public string LastName { get; set; }
        public double Weight { get; set; }
        public double Height { get; set; }


    }
My class is simple class and knows nothing about the Entity Framework.
3) I will add another project in this solution. This will be a Windows Library project. I will name it MvcRepository.DomainAccess.I delete the class1.cs class file.
In this class I will add classes that act at the data access layer that will interact with the ASP.Net MVC application and the SQL Server database that will be created.
I will add a reference to the MvcRepository.DomainClasses project as well.
Then we need to install Entity Framework 5.0. We will do that through Nuget packages. Make sure you do that.
Then we need to create a context class that inherits from DbContext.Add a new class to project. Name it TheFootballerDBContext.Now that we have the entity class created, we must let the model know.I will have to use the DbSet<T> property.The code for this class follows
 public class TheFootballerDBContext : DbContext
    {

 public DbSet<Footballer> Footballers { get; set; }

    }
Do not forget to add (using System.Data.Entity;) in the beginning of the class file
4) We must take care of the connection string. It is very easy to create one in the web.config.It does not matter that we do not have a database yet.When we run the DbContext and query against it , it will use a connection string in the web.config and will create the database based on the classes.I will use the LocalDb.
In my case the connection string inside the web.config, looks like this
      <add name="TheFootballerDBContext"
 connectionString="Data Source=(LocalDb)\v11.0;
 AttachDbFilename=|DataDirectory|\NewDBFootballers.mdf;
 Integrated Security=True"
 providerName="System.Data.SqlClient" />
5) Now we need to access our model from a controller.This is going to be a simple class that retrieves the footballers data.
I will add a reference to the MvcRepository.DomainClasses project.
Right-click the Controllers folder and create a new FootballerController controller. Have a look at the picture below to set the appropriate settings and then click Add.
Have a look at the picture below

Visual Studio 2012 will create the following
A FootballerController.cs file in the project's Controllers folder.
A Footballer folder in the project's Views folder.
Create.cshtml, Delete.cshtml, Details.cshtml, Edit.cshtml, and Index.cshtml in the new Views\Footballer folder.
Then we need to make a small change to the _Layout.cshtml file. We will add this line of code to add another item in the menu so we can navigate to the Footballers page.
<li>@Html.ActionLink("Footballers", "Index", "Footballer")</li>
6) Build and run your application.Navigate to the localhost/youport/footballer
You have a UI ready for you to add,edit,delete footballers. I will add 2-3 entries.
7) Now we are ready to change our code to incorporate the Repository pattern.
I am going to show you the contents of the FootballerController.cs class, so you can see changes we will make to the controller later on, when we incorporate the Repository pattern.
    public class FootballerController : Controller
    {
        private TheFootballerDBContext db = new TheFootballerDBContext();

        //
        // GET: /Footballer/

        public ActionResult Index()
        {


            return View(db.Footballers.ToList());
        }

        //
        // GET: /Footballer/Details/5

        public ActionResult Details(int id = 0)
        {
            Footballer footballer = db.Footballers.Find(id);
            if (footballer == null)
            {
                return HttpNotFound();
            }
            return View(footballer);
        }

        //
        // GET: /Footballer/Create

        public ActionResult Create()
        {
            return View();
        }

        //
        // POST: /Footballer/Create

        [HttpPost]
        [ValidateAntiForgeryToken]
        public ActionResult Create(Footballer footballer)
        {
            if (ModelState.IsValid)
            {
                db.Footballers.Add(footballer);
                db.SaveChanges();
                return RedirectToAction("Index");
            }

            return View(footballer);
        }

        //
        // GET: /Footballer/Edit/5

        public ActionResult Edit(int id = 0)
        {
            Footballer footballer = db.Footballers.Find(id);
            if (footballer == null)
            {
                return HttpNotFound();
            }
            return View(footballer);
        }

        //
        // POST: /Footballer/Edit/5

        [HttpPost]
        [ValidateAntiForgeryToken]
        public ActionResult Edit(Footballer footballer)
        {
            if (ModelState.IsValid)
            {
                db.Entry(footballer).State = EntityState.Modified;
                db.SaveChanges();
                return RedirectToAction("Index");
            }
            return View(footballer);
        }

        //
        // GET: /Footballer/Delete/5

        public ActionResult Delete(int id = 0)
        {
            Footballer footballer = db.Footballers.Find(id);
            if (footballer == null)
            {
                return HttpNotFound();
            }
            return View(footballer);
        }

        //
        // POST: /Footballer/Delete/5

        [HttpPost, ActionName("Delete")]
        [ValidateAntiForgeryToken]
        public ActionResult DeleteConfirmed(int id)
        {
            Footballer footballer = db.Footballers.Find(id);
            db.Footballers.Remove(footballer);
            db.SaveChanges();
            return RedirectToAction("Index");
        }

        protected override void Dispose(bool disposing)
        {
            db.Dispose();
            base.Dispose(disposing);
        }
    }
 public class FootballerController : Controller
    {
        private TheFootballerDBContext db = new TheFootballerDBContext();
I want to remind you that in an MVC application the View is my user interface and the Controller interacts with the view.
Ιn the line above I can see that I create an instance of the TheFootballerDBContext class that inherits from the DbContext class. That means that I work directly with EF.
I do not want that. I do not want to work with EF in all the layers of my application.
Have a look in some action methods in the FootballerController.cs class
        public ActionResult Index()
        {
            return View(db.Footballers.ToList());
        }

        //
        // GET: /Footballer/Details/5

        public ActionResult Details(int id = 0)
        {
            Footballer footballer = db.Footballers.Find(id);
            if (footballer == null)
            {
                return HttpNotFound();
            }
            return View(footballer);
        }
You can see that there are queries that talk directly to the data access layer.Not just the queries in those two methods but in all methods in the controller. That is not the ideal option.We need a new abstract layer between the Controller class and the DbContext class.
We will do that by adding another class.In that way our code facilitates unit testing and test driven development.
8) Now we will add another class file to the MvcRepository.DomainAccess project. I will name it IFootballerRepository.cs. The code follows
    public interface IFootballerRepository : IDisposable
    {
        IEnumerable<Footballer> GetFootballers();
        Footballer GetFootballerByID(int FootballerID);
        void InsertFootballer(Footballer footballer);
        void DeleteFootballer(int FootballerID);
        void UpdateFootballer(Footballer footballer);
        void Save();
    }
In this class we declare CRUD methods.We also have two read methods. The first one returns all Footballer entities, and the second one finds a single Footballer entity by ID.
Now we will add another class file to the MvcRepository.DomainAccess project. I will name it FootballerRepository.cs. It will implement the IFootballerRepository interface. Interfaces cannot be instantiated and the methods they declare cannot be implemented. You can inherit only from one base class but from multiple interfaces.
The code for the FootballerRepository.cs follows
    public class FootballerRepository : IFootballerRepository, IDisposable
    {
        private TheFootballerDBContext context;

        public FootballerRepository(TheFootballerDBContext context)
        {
            this.context = context;
        }

        public IEnumerable<Footballer> GetFootballers()
        {
            return context.Footballers.ToList();
        }

        public Footballer GetFootballerByID(int id)
        {
            return context.Footballers.Find(id);
        }

        public void InsertFootballer(Footballer footballer)
        {
            context.Footballers.Add(footballer);
        }

        public void DeleteFootballer(int FootballerID)
        {
            Footballer footballer = context.Footballers.Find(FootballerID);
            context.Footballers.Remove(footballer);
        }

        public void UpdateFootballer(Footballer footballer)
        {
            context.Entry(footballer).State = EntityState.Modified;
        }

        public void Save()
        {
            context.SaveChanges();
        }

        private bool disposed = false;

        protected virtual void Dispose(bool disposing)
        {
            if (!this.disposed)
            {
                if (disposing)
                {
                    context.Dispose();
                }
            }
            this.disposed = true;
        }

        public void Dispose()
        {
            Dispose(true);

        }
    }
The database context is defined in a class variable, and the constructor expects the calling object to pass in an instance of the context.
The implementation of the various methods is straightforward
       public void InsertFootballer(Footballer footballer)
        {
            context.Footballers.Add(footballer);
        }
In the simple method above, a footballer entity is passed from the calling application (controller) to the method and this is added to the collection of footballers.
Please run your application and place breakpoints so you can see what is going on.
We also implement the SaveChanges method so all the data that lives in the memory is saved back to the datastore in a transactional way.
        public void Save()
        {
            ctx.SaveChanges();
        }
We also implement the IDisposable and dispose the database context.
Now I will show you the complete code (with the changes made) to the FootballerController.cs class. I have used italics to highlight the changes.
    public class FootballerController : Controller
    {
        private IFootballerRepository footballerRepository = null;

    public FootballerController()

    {
this.footballerRepository=new FootballerRepository(new TheFootballerDBContext());
    }

    public FootballerController(IFootballerRepository footballerRepository)
    {
        this.footballerRepository = footballerRepository;
    }

        //
        // GET: /Footballer/

        public ActionResult Index()
        {
IEnumerable<Footballer> footballers=footballerRepository.GetFootballers();
            return View(footballers);
        }

        //
        // GET: /Footballer/Details/5

        public ViewResult Details(int id = 0)
        {
Footballer footballer = footballerRepository.GetFootballerByID(id);
            return View(footballer);
        }

        //
        // GET: /Footballer/Create

        public ActionResult Create()
        {
            return View();
        }

        //
        // POST: /Footballer/Create

        [HttpPost]
        [ValidateAntiForgeryToken]
        public ActionResult Create(Footballer footballer)
        {
            if (ModelState.IsValid)
            {
        footballerRepository.InsertFootballer(footballer);
        footballerRepository.Save();
        return RedirectToAction("Index");
            }

            return View(footballer);
        }

        //
        // GET: /Footballer/Edit/5

        public ActionResult Edit(int id = 0)
        {
 Footballer footballer = footballerRepository.GetFootballerByID(id);
            if (footballer == null)
            {
                return HttpNotFound();
            }
            return View(footballer);
        }

        //
        // POST: /Footballer/Edit/5

        [HttpPost]
        [ValidateAntiForgeryToken]
        public ActionResult Edit(Footballer footballer)
        {
            if (ModelState.IsValid)
            {
     footballerRepository.UpdateFootballer(footballer);
     footballerRepository.Save();
     return RedirectToAction("Index");
            }
            return View(footballer);
        }

        //
        // GET: /Footballer/Delete/5

        public ActionResult Delete(int id = 0)
        {
  Footballer footballer = footballerRepository.GetFootballerByID(id);

            return View(footballer);
        }

        //
        // POST: /Footballer/Delete/5

        [HttpPost,ActionName("Delete")]
        [ValidateAntiForgeryToken]
        public ActionResult DeleteConfirmed(int id)
        {
   Footballer footballer = footballerRepository.GetFootballerByID(id);
  footballerRepository.DeleteFootballer(id);
  footballerRepository.Save();
  return RedirectToAction("Index");
        }

        protected override void Dispose(bool disposing)
        {
            footballerRepository.Dispose();
            base.Dispose(disposing);
        }
    }
The controller declares a class variable for an object that implements the IFootballerRepository interface.
The default constructor creates a new context instance, and the other constructor allows the caller to pass in a context instance.
All the methods in the controller are very easy to understand.
Have a look at the method below.
Instead of working with the DbContext (EF) directly we now make calls to the Repository methods (footballerRepository.ΙnsertFootballer(footballer)) that are part of our data access layer (MvcRepository.DomainAccess) that talk with the TheFootballerDBContext that inherits from the DbContext = EF. But this time we have the controller talking to the repository that talks to the data access layer that talks to the database.
        [HttpPost]
        [ValidateAntiForgeryToken]
        public ActionResult Create(Footballer footballer)
        {
            if (ModelState.IsValid)
            {
   footballerRepository.InsertFootballer(footballer);
   footballerRepository.Save();
   return RedirectToAction("Index");
            }

            return View(footballer);
        }
Build and run your application. If you have understood and followed everything your ASP.Net MVC will work just fine. Try to add some more footballer entries.
Hope it helps!!!
In this post I will demonstrate with a hands-on example how to use the Fluent API to map POCO classes (set configurations) to SQL Server tables without using the set of conventions Entity Framework Code First expects.
I will also give a short introduction to ASP.Net MVC and its main components. I will talk briefly about Entity Framework Code First, Database First and Model First.
Also I will show you how to architecture properly your ASP.Net MVC 4.0 EF Code first application.
We should not have our domain classes, data access classes and views,controllers in the same project.
We should have them in 3 different projects.
That way our code is more extensible, maintainable and easy to reuse in other non web applications that might need to consume or use EF Code first data access layer.We have a clear separation of concerns.
We can configure our POCO classes with Data Annotations. By using Data Annotations we can configure our domain-entity classes so that they can take best advantage of the EF.We can decorate our entity classes with declarative attributes.
If you want to find out how you can use Data Annotations have a look at this post.
Fluent API supports all the configurations that Data Annotations support and more.Data Annotations support only a subset of the configurations that Fluent API supports.
You can configure your classes not in a declarative way (Data Annotations) but you can create a new class and configure the entity classes through pure C# code and lambda expressions. This is the Fluent API way.Code purists prefer this way since we keep our domain classes without any other declarations.
Before I can go on I will explain that the EF Code First Model works with conventions.
- The table names are derived from the entity class names
- If have a entity key in entity e.f Customer (CustomerID) , this will be the Primary Key in the Customer table.How does EF do that? By default Code First will look either for a property with the name id to create the primary key.This is the default behavior. We can change that behavior with Fluent API.
- All the string properties in my EF classes became nvarchar(max,null) .This is default behavior. We can change that behavior with Fluent API.
Through Fluent API, we can configure entities and properties in various ways.We can configure things like
- Relationships between entities
- The column name of an entity property
- The column order of an entity property
- The column type of an entity property
- The precision of an entity property
- If an entity property is required
We can also configure things like Inheritance Hierarchies, map an entity to multiple tables and a table to multiple entities.
I will demonstrate most of these configurations.
Let me give you a short introduction to ASP.Net MVC first. I suggest that you go through some of the videos and other learning resources from the official ASP.Net MVC site.
I will say a few words on how I understand ASP.Net MVC and what its main benefits/design goals are.
Obviously the first paradigm on building web applications on the web is Web Forms.
Web forms was the first and only way to build web application when ASP.Net was introduced to the world, nine years ago.
It replaced the classic ASP model by providing us with a strongly typed code that replaced scripting.We had/have languages that are compiled.Web forms feels like a form that you programmed with VB 6.0 for the desktop.
The main idea was to abstract the WEB. By that I mean HTML is abstracted in a way. Click events replaced "Post" operations.Since that time, web standards have strengthened and client side programming is on the rise. Developers wanted to have more control on the HTML.Web forms , as I said before handles HTML in an abstract way and is not the best paradigm for allowing full control on the HTML rendering.
ASP.Net MVC provide us with a new way of writing ASP.Net applications.It does not replace web forms. It is just an alternative project type.It still runs on ASP.Net and supports caching,sesions and master pages. In ASP.Net MVC applications we have no viewstate or page lifecycle. For more information on understanding the MVC application execution process have a look at this link .It is a highly extensible and testable model.
In order to see what features of ASP.Net are compatible in both Models have a look here.
MVC pattern has been around for decades and it has been used across many technologies as a design pattern to use when building UI. It is based on an architecture model that embraces the so called "seperation of concern pattern".
There are three main building blocks in the MVC pattern. The View talks to the Model. The Model has the data that the View needs to display.The View does not have much logic in them at all.
The Controller orchestrates everything.When we have an HTTP request coming in, that request is routed to the Controller. It is up to the Controller to talk to the file system,database and build the model.The routing mechanism in MVC is implemented through the System.Web.Routing assembly. Routes are defined during application startup.Have a look at the Global.asax file,when building an MVC application.
The Controller will select which View to use to display the Model to the client.It is clear that we have now a model that fully supports "separation of concerns".The Controller is responsible for building the Model and selecting the View.
The Controller does not save any data or state. The Model is responsible for that.The Controller selects the View but has nothing to do with displaying data to the client.This is the View's job.
The Controller component is basically a class file that we can write VB.Net or C# code. We do not have Page_Load event handler routines, just simple methods which are easy to test.No code behind files are associated with the Controller classes.All these classes should be under the Controllers folder in your application.Controller type name must end with Controller (e.g ProductController).
In the Views folder we should place the files responsible for displaying content to the client.Create subfolders for every Controller. Shared folder contains views used by multiple controllers.
In this post I will use the Razor View engine rather than the WebForms View. Razor View engine is designed with MVC in mind and it is the way (as far as I am concerned) to work with ASP.Net MVC.
Before we start I will give again a short introduction to Entity Framework. The stable version of Entity Framework as we speak is EF 5.0.It is available through Nuget and it is an open source project.
The .Net framework provides support for Object Relational Mapping through EF. So EF is a an ORM tool and it is now the main data access technology that microsoft works on. I use it quite extensively in my projects. Through EF we have many things out of the box provided for us. We have the automatic generation of SQL code.It maps relational data to strongly types objects.All the changes made to the objects in the memory are persisted in a transactional way back to the data store.
You can search in my blog, because I have posted many posts regarding ASP.Net and EF.
There are different approaches (paradigms) available using the Entity Framework, namely Database First, Code First, Model First.
You can find in this post an example on how to use the Entity Framework to retrieve data from an SQL Server Database using the "Database/Schema First" approach.
In this approach we make all the changes at the database level and then we update the model with those changes.
In this post you can see an example on how to use the "Model First" approach when working with ASP.Net and the Entity Framework.
This model was firstly introduced in EF version 4.0 and we could start with a blank model and then create a database from that model.When we made changes to the model , we could recreate the database from the new model.
The Code First approach is the more code-centric than the other two. Basically we write POCO classes and then we persist to a database using something called DBContext.
In this application we will us the Code First approach when building our data-centric application with EF.
Code First relies on DbContext. We create classes with properties and then these classes interact with the DbContext class.Then we can create a new database based upon our POCOS classes and have tables generated from those classes.We do not have an .edmx file in this approach.By using this approach we can write much easier unit tests.
DbContext is a new context class and is smaller,lightweight wrapper for the main context class which is ObjectContext (Schema First and Model First).
I am running VS Studio 2012 Ultimate edition but you can use Visual Studio Express 2012 for Web. You can install Visual Studio Express 2012 for Web if you download Web Platform Installer.You can download this tool from this link.
I will create an ASP.Net MVC application that has two entities, Department and Courses. They have one to many relationships between them.
1) I am launching VS 2012 and I will Visual C# as the programming language. I will also select ASP.NET MVC 4 Web Application from the available templates. Choose C# as the development language and Internet Application. I will name my application FluentAPIMVC. This will be the startup project.
2) Now that we have our MVC project structure we will create another project in our solution. This will be a Windows Library project. I will name it FluentAPIMVC.DomainClasses. In this project I will add only the definitions of the two domain classes Course and Department. I delete the class1.cs.
I create a new class, Department.cs. The code follows
    public class Department
    {
        public int DepartmentId { get; set; }
        public string Name { get; set; }
        public decimal Budget { get; set; }
        public DateTime StartDate { get; set; }
        public virtual ICollection<Course> Courses { get; set; }
    }
I will add another class, Course.cs
public class Course
    {
        public int CourseID { get; set; }
        public string Title { get; set; }
        public int Credits { get; set; }
        public int DepartmentID { get; set; }
        public virtual Department Department { get; set; }
    }
These are just two plain POCO classes that know nothing at all about Entity Framework.
3) I will add another project in this solution. This will be a Windows Library project. I will name it FluentAPIMVC.DomainAccess.
In this class I will add classes that act at the data access layer that will interact with the ASP.Net MVC application and the SQL Server database that will be created.
I will add references to System.Data.Entity
I will add a reference to the FluentAPIMVC.DomainClasses project as well.
Then we need to install Entity Framework 5.0. We will do that through Nuget packages. Make sure you do that.
I will add a class DepartmentDBContext to the project.
The contents of this class are:
 public class DepartmentDBContext:DbContext

    {

        public DbSet<Department> Departments { get; set; }
        public DbSet<Course> Courses { get; set; }

    }
This class inherits from DbContext. Now that we have the entity classes created, we must let the model know.I will have to use the DbSet<T> property.
I will add more code to this class later on.
4) We must take care of the connection string. It is very easy to create one in the web.config.It does not matter that we do not have a database yet.When we run the DbContext and query against it , it will use a connection string in the web.config and will create the database based on the classes.I will use the LocalDb
      <add name="DepartmentDBContext"
 connectionString="Data Source=(LocalDb)\v11.0;
 AttachDbFilename=|DataDirectory|\DepartmentCourses.mdf;
 Integrated Security=True"
 providerName="System.Data.SqlClient" />
5) Now we can build our application to make sure everything works ok. Now I want to insert data , seed the database, to the tables.
I will add another class to the FluentAPIMVC.DomainAccess. I name it DepartmentCoursesInsert.
The contents of this class follow
 public class DepartmentCoursesInsert:
    DropCreateDatabaseAlways<DepartmentDBContext> {
        protected override void Seed(DepartmentDBContext context)
        {
            var departments = new List<Department>
            {
            new Department {

     Name = "Physics",Budget=35500, StartDate=DateTime.Parse("12/12/1999"),
     Courses = new List<Course>
                {

    new Course {Title = "Nuclear Physics", Credits= 45},
    new Course {Title = "Quantum Physics", Credits= 35}

                }

                            },

             new Department {

     Name = "Maths",Budget=45500, StartDate=DateTime.Parse("12/12/2009"),
     Courses = new List<Course>
                {

     new Course {Title = "Trigonometry", Credits= 35},
     new Course {Title = "Analytic Geometry", Credits= 45}

                }

                            },

            };

     departments.ForEach(dep => context.Departments.Add(dep));
     base.Seed(context);
        }
    }
We need to add entries for the System.Data.Entity and the FluentAPIMVC.DomainClasses namespace for this class to compile.
In this class I inherit from the DropCreateDatabaseAlways<DepartmentDBContext>
class and I will override the default behavior of that class with my class.
I will ovverride the Seed method with some data.Then I create 2 instances of the Department entity and 4 entities of the Course entity.
Then through a simple lambda expression I add the data to the database using these last lines of code.
   departments.ForEach(dep => context.Departments.Add(dep));
     base.Seed(context);
This is just a way to populate initially the database with some data. You could leave this step out and populate the database through the views.
There is another way to populate the database and you should not use DropCreateDatabaseAlways in production databases.
We have Code First Migrations to insert data but I will not show that here. You can read about Code First Migration in this post.
Before the addition of Code First Migrations (4.1,4.2 versions), Code First database initialisation meant that Code First would create the database if it does not exist (the default behaviour - CreateDatabaseIfNotExists).
Another pattern is DropCreateDatabaseAlways which means that Code First will recreate the database every time one runs the application.
The other pattern we could use is DropCreateDatabaseIfModelChanges which means that Entity Framework, will drop the database if it realises that model has changes since the last time it created the database.
That is of course fine for the development database but totally unacceptable and catastrophic when you have a production database. We cannot lose our data because of the way that Code First works.
Now we need to make one more change.in the Global.asax.cs file to add a line of code
Database.SetInitializer(new DepartmentCoursesInsert());
We add this line of code to the Application_Start() method.
I will add references to System.Data.Entity
I will add a reference to the FluentAPIMVC.DomainAccess project as well.
6) Now I will create a new class in the in the FluentAPIMVC.DomainAccess project. I will name it CourseMap.
This is a configuration class that uses Fluent API to configure the type.It defines the table the entity maps to. It defines-matches the columns of the table with the entity properties. Also defines any relationships and things like Primary key e.t.c. Its contents follow.
public class CourseMap : EntityTypeConfiguration<Course>
    {
        public CourseMap()
        {
            // Primary Key
            this.HasKey(t => t.CourseID);

            // Properties
            this.Property(t => t.CourseID)
 .HasDatabaseGeneratedOption(DatabaseGeneratedOption.Identity);

            this.Property(t => t.Title)
                .IsRequired()
                .HasMaxLength(70);

            this.Property(t => t.Credits)
               .IsRequired();


            // Table & Column Mappings
   this.ToTable("Course");
   this.Property(t => t.CourseID).HasColumnName("ID");
   this.Property(t => t.Title).HasColumnName("Title");
   this.Property(t => t.Credits).HasColumnName("CreditsForCourse");
   this.Property(t => t.DepartmentID).HasColumnName("DepID");

            // Relationships
      this.HasRequired(t => t.Department)
      .WithMany(t => t.Courses)
      .HasForeignKey(d => d.DepartmentID);

        }
    }
In the code above I define the primary key. I define that the primary key as an identity. Then I set that the Title property is non nullable and has a max length of 70. The entity property Credits is required.
Then I define the Table and Column mappings. The entity maps to a table called Course.Then I define the names for the column names.So I can change the entity name properties to different table column names.
Finally I define the one to many relationship.
7) Now I will create a new class in the in the FluentAPIMVC.DomainAccess project. I will name it DepartmentMap.
This is a configuration class that uses Fluent API to
configure the type.It defines the table the entity maps to. It
defines-matches the columns of the table with the entity properties.
Also defines any relationships and things like Primary key e.t.c. Its
contents follow.
public class DepartmentMap : EntityTypeConfiguration<Department>
    {
        public DepartmentMap()
        {
            // Primary Key
            this.HasKey(t => t.DepartmentId);

            // Properties
            this.Property(t => t.DepartmentId)
  .HasDatabaseGeneratedOption(DatabaseGeneratedOption.Identity);

            this.Property(t => t.Name)
                .IsRequired()
                .HasMaxLength(40);

            this.Property(t => t.Budget)
               .IsRequired()
               .HasColumnType("decimal")
               .HasPrecision(20, 4)
               ;

            this.Property(t => t.StartDate)
           .IsOptional();

            // Table & Column Mappings
 this.ToTable("Department");
 this.Property(t => t.DepartmentId).HasColumnOrder(1).HasColumnName("ID");
 this.Property(t => t.Name).HasColumnOrder(2).HasColumnName("Dep Name");
 this.Property(t => t.Budget).HasColumnOrder(4).HasColumnName("Budget");
 this.Property(t=>t.StartDate).HasColumnOrder(3).HasColumnName("Start Date");

        }
    }
In the code above I define the primary key. I define that the primary key as an identity. Then I set that the Name property is non nullable and has a max length of 40. The entity property Budget is required (not null in the respective column) and its datatype will be decimal with a precision of (20,4).
The StartDate entity property is not required (allow null in the respective column in the table).
Then
I define the Table and Column mappings. The entity maps to a table
called Department.Then I define the names for the column names.So I can
change the entity name properties to different table column names.I also change the order of the columns.
I am sure you have realised what Fluent API is and how we can use it to define mappings. I have just demonstrated some of the most common settings and configurations used in Fluent API.
8) Now I need to add some more code in the DepartmentDBContext class.
I need to override the OnModelCreating method so I can give the builder useful information before it goes on and builds the model.
 protected override void OnModelCreating(DbModelBuilder modelBuilder)
   {
   modelBuilder.Configurations.Add(new CourseMap());
   modelBuilder.Configurations.Add(new DepartmentMap());
   }
The complete code for this class follows
    public class DepartmentDBContext:DbContext
    {


    public DbSet<Department> Departments { get; set; }
   public DbSet<Course> Courses { get; set; }


   protected override void OnModelCreating(DbModelBuilder modelBuilder)
   {
   modelBuilder.Configurations.Add(new CourseMap());
   modelBuilder.Configurations.Add(new DepartmentMap());
   }

    }
9) Now I need to make some changes to the FluentAPIMVC project.
I will add a reference to the FluentAPIMVC.DomainClasses project.
I need to add a controller. I will name it DepartmentController
Have a look at the picture below.

Now we need to make a small change to the _Layout.cshtml file. We will add this line of code to add another item in the menu.
<li>@Html.ActionLink("Departments", "Index", "Department")</li>
10) Build and run your application.
Navigate to the your localhost/port/department, in my case (http://localhost:57958/Department).
Have a look at App_Data folder. You will see the DepartmentCourses.mdf localdb database.Τhis database was created from EF Code First.
Have a look at the picture below to see the table's definitions. If we go back to your configuration classes where we did the initial mapping you will see that all Fluent API configurations were honored.Have a look at the column names,types and order. Check which types allow nulls and which not.

Have a look at the picture below to see the department page.You can see the seeded data. You can edit existing departments,create new departments and delete them.

Hope it helps!!!
In this post I will provide a short introduction to Glimpse and why i think it is very important for any developer that builds ASP.Net sites (both Web Forms and MVC) to use it.
I am building ASP.Net applications and I have started using it.
Glimpse will show you valuable information about your ASP.Net application from within the browser. It will show you what is happening on the server where you ASP.Net application is hosted.
I have posted a post on Page Inspector here. Page Inspector gives developers a very good/handy way to identify layout issues and to find out which part of server side code is responsible for that HTML snippet of code.
A short definition of Glimpse is that it is a diagnostics platform for the web.Gives us an opportunity to glimpse on the server side of things and your asp.net applications. It gathers very detailed information and diagnostics about the behavior and execution of our ASP.Net application and then sends back this information. We can see for example what kind of code was executed and how long it took.
The good news first. Glimpse is free and open source. That means that everyone can download it and install it and extend it by writing your own plugins.
As you will see from the screenshots I will provide, Glimpse looks a lot like Firebug or Chrome Dev tools but please bear in mind that those tools show you what happens on the browser while Glimpse shows you what is going on, on the server.
Firstly I will create a simple ASP.Net MVC 4.0 application using Entity Framework 5.0 and Code first.Obviously we need some sort of ASP.net application to show off Glimpse.
Ι will show you how to get Glimpse (though Nuget) first and then how to install it in your application.
I have installed VS 2012 Ultimate edition in my Windows 8 machine. Υou can use Visual Studio Express 2012 for Web. You can install Visual Studio Express 2012 for Web if you download Web Platform Installer.You can download this tool from this link.
1) Create an ASP.Net MVC 4.0 application.Give it an appropriate name.
2) Add a new item in your application, a class file. Name it Footballer.cs. This is going to be a simple POCO class.Place this class file in the Models folder.
The code follows
   public class Footballer
    {
        public int FootballerID { get; set; }
        public string FirstName { get; set; }
        public string LastName { get; set; }
        public double Weight { get; set; }
        public double Height { get; set; }


    }
3) Then we need to create a context class that inherits from DbContext.Add a new class to the Models folder.Name it TheFootballerDBContext.Now that we have the entity classes created, we must let the model know.I will have to use the DbSet<T> property.The code for this class follows
 public class TheFootballerDBContext:DbContext
    {

      public DbSet<Footballer> Footballers { get; set; }

    }
Do not forget to add (using System.Data.Entity;) in the beginning of the class file
4) We must take care of the connection string. It is very easy to create one in the web.config.It does not matter that we do not have a database yet.When we run the DbContext and query against it , it will use a connection string in the web.config and will create the database based on the classes.I will use the name "NewFootballers" for the database.
In my case the connection string inside the web.config, looks like this
   <connectionStrings>

   <add name="TheFootballerDBContext"
connectionString="server=.;integrated security=true;
  database=NewFootballers" providerName="System.Data.SqlClient"/>


    </connectionStrings>
5) Now we need to access our model from a controller.This is going to be a simple class that retrieves the footballers data.
Right-click the Controllers folder and create a new FootballerController controller. Have a look at the picture below to set the appropriate settings and then click Add.
Have a look at the picture below

Visual Studio 2012 will create the following
A FootballerController.cs file in the project's Controllers folder.
A Footballer folder in the project's Views folder.
Create.cshtml, Delete.cshtml, Details.cshtml, Edit.cshtml, and Index.cshtml in the new Views\Footballer folder.
6) Build and run your application.Navigate to the localhost/youport/footballer
I will insert some data in the database through the interface. So now we have a working ASP.Net MVC 4.0 application using EF 5.0 and I am ready to examine it through Glimpse.
7) I will install Glimpse through Nuget.Select your project and then right-click on it and from the context menu select Manage Nuget Packages. Then in the search area search for Glimpse finf Glimpse Mvc4 and install it.Once you’ve done that, Glimpse will automatically add a few entries to your web.config for you.
Open your web.config file and search for Glimpse to see the added sections.If you have installed Glimpsed you will see the picture below

8) Now we must turn it on and that is very simple. Build and run your application again Navigate to the localhost/youport/glimpse.axd in my case (http://localhost:55139/glimpse.axd) and you will see the Glimpse page.
Then we just need to turn it on. Just click on the "Turn Glimpse On". We set a cookie that will tell the Glimpse running on the server to send you Glimpse data.
Have a look at the picture below

9) Now we have the basic setup of Glimpse ready and we can use it.
Navigate to the localhost/youport/footballer, in my case ( http://localhost:55139/footballer/ ) and you will see the Glimpse icon on the lower-right hand corner.
When you click it you will see something like the picture below. It resembles the Chrome Dev tool and Firebug. Have a look at the picture below.

10) Now I will explain what kind of information we can see in the various tabs.
There are 8 tabs in Glimpse. Configuration tab contains information from the web.config file. By all means have a look at it.You can see values that come from the machine.config as well.Click this tab and see for yourself.
There is also the Environment tab. In this tab we can see information like the server that handles the request. It provides the name of the server, the operating system that runs on the server and the version of the .Net framework installed. It also provides information on the version of the IIS.We can also see information the Application Assemblies.
The next tab is the Request tab. In this tab we get information about the request and more specifically how the server received it.You can see information like the User Agent,the cookies, the Raw Url, the Query String,the current UI culture.
Next is the Route tab. In this tab we get information about all the routes that are registered and which route was actually used to service your request.
Next is the Server tab. In this tab we get information about all the web server variables that are available for the request for example APPL_PHYSICAL_PATH, HTTP_COOKIE,HTTP_REFERER,HTTP_USER_AGENT
Next is the Session tab. In this tab we get information about all the keys and values of the data that is stored in the user's Session.The session is for each user/browser and it is managed in the server.
Next is the Timeline tab. In this tab we get information about what was executed in the server and how much time it took, for that method in the controller to execute. We have events like Start Request, InvokeActionResult, RenderView.You can see the whole HTTP MVC Pipeline.
Next is the Trace tab. In this tab we get messages about any messages traced to the System.Diagnostics.Trace or System.Diagnostics.Debug.
So if you go to the Index method of the Footballer controller and type e.g
Trace.Write("this is a test");
Trace.TraceError("error");
these trace messages will show on the Trace tab.
These are the main tabs but we also have the Ajax Tab. In this tab we can get information about all the ajax requests made since the page was loaded.
If you add some Ajax code in your controller methods, you will see the data related with those Ajax requests in the Ajax tab.
We also have the History tab. In this tab we can see all the requests made to the server and we can inspect each request.We can see data under the Request URL, Method, Duration , Date/Time,Is Ajax headers.
Glimpse works well with mobile devices. It will count all requests from mobile devices like a mobile phone or a pad.
I am running again my application and I go to http://localhost:55139/footballer page.You should do that as well, having Glimple enabled.
I will show you some more tabs that are specific to ASP.Net MVC like Execution tab. The execution tab shows information about all the methods executed for the processing of the specific HTTP request. You can see the controller name, the action methods and the time elapsed.
Have a look at the picture below

Next we have the Model Binding Tab.This tab shows you what parameters were bound and with what values for the specific request. I Hit the Edit link (http://localhost:55139/footballer) and i move to the http://localhost:55139/footballer/Edit/1.
You will have to do the same for your own localhost/youport/footballer page request.
If you do that you will see something like the picture below
 Next we can see the Metadata tab that shows the model medata ASP.Net MVC has used to display the view.
Next we can see the Views tab that shows information about the views ASP.Net MVC that has used and information about the views.
You can see how ASP.Net MVC works in regard with views.Once again I click on the Edit link- http://localhost:55139/footballer/Edit/1.
We can see the View that rendered the request and the model type passed to that view from the Controller.
Have a look at the picture below

Hope it helps!!!
In this rather short post I will be demonstrating with a hands-on example the usefulness of the Linq Zip operator.
You can find more information on Linq expressions and operators (both in query and method syntax) in this post.
I am going to use Visual Studio 2012 Ultimate edition (Visual Studio 2012 Express for Web edition) and I will create an ASP.Net 4.0 Web forms application
I can use LINQ queries not only against databases but against arrays, since the array of strings/integers implement the IENumerable interface.
Just to be absolutely clear you can query any form of data that implements the IENumerable interface.
The Zip operator merges the corresponding elements of two sequences using a specified selector function.
The Zip query operator was not included in LINQ. It was added later in .NET 4.0.
1) Fire up Visual Studio 2012.
2) Create an empty web site. Give it the name of your choice.Choose C# as the development language.
3) Add a web form item to your site. Leave the default name.
We will have two string arrays. One array will consist of football teams and another one will consist of their football nicknames.
We will merge those two arrays.
4) In the Page_Load event handling routine type
protected void Page_Load(object sender, EventArgs e)
    {
string[] footballteamnames = { "Manchester United", "Liverpool",
                                 "Arsenal", "Aston Villa" };

string[] footballnicknames = { "Red Devils", "The Reds",
                                 "Gunners", "Villagers"};

var teamswithnicknames = footballteamnames.Zip
 (footballnicknames,(team, nickname) => team + " - " + nickname);


  foreach ( var item in teamswithnicknames )
  {
      Response.Write(item);
      Response.Write("<br/>");
  }

    }
We declare two string arrays footballteamnames and footballnicknames. We will match the football names with the nicknames.
We declare a variable teamswithnicknames and then we call the Zip operator on the first list,passing in the name of the second list. Then we have a lambda expression declaring how we want the lists zipped together.
So we say that we want the second array to be zipped with the first one and then we indicate through the delegate how they should be combined.
Build and run your application. You will see the following results.
Manchester United - Red Devils
Liverpool - The Reds
Arsenal - Gunners
Aston Villa - Villagers
Hope it helps!!!!
In this blog post I will demonstrate with a hands-on example how to use EF Code First Workflow to create an entity data model, an .edmx file so I can visualise my POCO classes
I will follow the steps that I created in this post. In that post I managed to create POCO classes without actually writing the classes myself, but I had EF taking care of that by pointing to the right database.
Please note that what I am about to show will work just fine when one creates his own POCO classes. By that I mean is that you do not need to reverse engineer Code First classes from an existing database for the visualisation to work. You can create your POCO classes from scratch and still use Entity Framework Power Tools to create the .edmx file.
I am going to re-create some of the steps of my other post in this one.
I am running VS Studio 2012 Ultimate edition but you can use Visual Studio Express 2012 for Web. You can install Visual Studio Express 2012 for Web if you download Web Platform Installer.You can download this tool from this link.
1) I am launching VS 2012 and I will Visual C# as the programming language. I will also select ASP.NET MVC 4 Web Application from the available templates.I will name my application CodeFirstExistingDatabase
2) Normally with Code First we create new classes and then EF knows how tο create the database from those classes. In this application we will do the reverse.
3) Before I create the database I need to download and install Entity Framework Power Tools Beta 3. Go to Tools -> Extensions and updates and search for Entity Framework Power Tools Beta 3 and then install it. Have a look at the picture below. I have already installed it.In you case it will say Install.
The good news is that Entity Framework Power Tools will be included in EF 6.0.
4) I have already created a sample database. It is called School. It has two tables with data, Course and Department. There is one to many relationship between Department and Course. A Department has many Course(s). This is the script ( SchoolDB.zip) that will install the database with the data in your SQL Server instance.Make sure you have the database installed.
5) Right-click on your project, then select Entity Framework -> Reverse Engineer Code First.Have a look at the picture below
6) In the next step we will be prompted to connect to the database. Connect to the SQL Server instance and the connect to the DB and hit OK.Have a look at the picture below

7) Now the Power Tools of EF have created the necessary classes. Have a look under the Models,Mapping folder to see the generated files.
Have a look at the picture below
Open web.config. EF has added a connection string to the database
<add name="schoolContext" connectionString="Data Source=.\sqlexpress;Initial Catalog=school;
         Integrated Security=True;MultipleActiveResultSets=True"
      providerName="System.Data.SqlClient" />
The schoolContext.cs file has been created. There is a class in there schoolContext. It has the same name as the name in the name property of the connection string above (name=schoolContext).The schoolContext class derives from the DbContext. DbContext is a base class in EF and it is responsible for change tracking,persisting data back to the database and in general managing the entity objects during runtime. DbSet properties are also exposed and those properties represent collections of the specified entities in the context.
 public schoolContext()
            : base("Name=schoolContext")
Those two lines of code above tell EF that the connection information for this context should be loaded from web.config.
Τhese are the contents of the schoolContext.cs file
public partial class schoolContext : DbContext
    {
        static schoolContext()
        {
            Database.SetInitializer<schoolContext>(null);
        }

        public schoolContext()
            : base("Name=schoolContext")
        {
        }

        public DbSet<Course> Courses { get; set; }
        public DbSet<Department> Departments { get; set; }

        protected override void OnModelCreating(DbModelBuilder modelBuilder)
        {
            modelBuilder.Configurations.Add(new CourseMap());
            modelBuilder.Configurations.Add(new DepartmentMap());
        }
    }
There Department.cs and Course.cs are also included.These are the POCO classes i was talking earlier. These two classes are very simple classes and have no dependency from EF. The Department class follows.
public partial class Department
    {
        public Department()
        {
            this.Courses = new List<Course>();
        }

        public int DepartmentID { get; set; }
        public string Name { get; set; }
        public decimal Budget { get; set; }
        public System.DateTime StartDate { get; set; }
        public Nullable<int> Administrator { get; set; }
        public virtual ICollection<Course> Courses { get; set; }
    }
You can see the properties that map to the columns of the Department table in the database. The Courses property is a navigation property. A Department entity can related to any number of Courses entities.Navigation properties are typically defined as virtual so that they can take advantage of certain Entity Framework functionality such as lazy loading.
The Course.cs file follows
 public partial class Course
    {
        public int CourseID { get; set; }
        public string Title { get; set; }
        public int Credits { get; set; }
        public int DepartmentID { get; set; }
        public virtual Department Department { get; set; }
    }
The DepartmentMap.cs file is a configuration file for the Department entity type in the model.It uses Fluent API to configure the type.It defines the table the entity maps to. It defines-matches the columns
of the table with the entity properties. Also defines any relationships
and things like Primary key e.t.c. Its contents follow.
public class DepartmentMap : EntityTypeConfiguration<Department>
    {
        public DepartmentMap()
        {
            // Primary Key
            this.HasKey(t => t.DepartmentID);

            // Properties
            this.Property(t => t.DepartmentID)
                .HasDatabaseGeneratedOption(DatabaseGeneratedOption.None);

            this.Property(t => t.Name)
                .IsRequired()
                .HasMaxLength(50);

            // Table & Column Mappings
        this.ToTable("Department");
        this.Property(t => t.DepartmentID).HasColumnName("DepartmentID");
        this.Property(t => t.Name).HasColumnName("Name");
        this.Property(t => t.Budget).HasColumnName("Budget");
        this.Property(t => t.StartDate).HasColumnName("StartDate");
        this.Property(t => t.Administrator).HasColumnName("Administrator");
        }
    }
The CourseMap.cs file is a configuration file for the Course entity type in the model. It uses Fluent API to configure the type.It defines the table the entity maps to. It defines-matches the columns of the table with the entity properties. Also defines any relationships and things like Primary key e.t.c. Its contents follow.
public class CourseMap : EntityTypeConfiguration<Course>
    {
        public CourseMap()
        {
            // Primary Key
            this.HasKey(t => t.CourseID);

            // Properties
            this.Property(t => t.CourseID)
                .HasDatabaseGeneratedOption(DatabaseGeneratedOption.None);

            this.Property(t => t.Title)
                .IsRequired()
                .HasMaxLength(100);

            // Table & Column Mappings
          this.ToTable("Course");
          this.Property(t => t.CourseID).HasColumnName("CourseID");
          this.Property(t => t.Title).HasColumnName("Title");
          this.Property(t => t.Credits).HasColumnName("Credits");
          this.Property(t => t.DepartmentID).HasColumnName("DepartmentID");

            // Relationships
            this.HasRequired(t => t.Department)
                .WithMany(t => t.Courses)
                .HasForeignKey(d => d.DepartmentID);

        }
    }
8) Finally we need to create the .edmx file. Select the schoolContext.cs file in the Solution Explorer then right-click, select Entity Framework ->View Entity Data Model (Read-only)
Have a look at the picture below.

9) Then the entity data model is created.This is read-only model. You cannot work with your model (.edmx) and POCO classes at the same time.This is just for visualisation purposes
Have a look at the picture below

if you want to have the XML representation of the .edmx file you can select the View Entity Data Model XML.Select Entity Framework ->View Entity Data Model XML.
If you want to displays the DDL SQL statements that corresponds to the SSDL in the underlying Entity Data Model select Entity Framework ->View Entity Data Model DDL SQL
In my case I see the following T-SQL statements that create my DB structure.
create table [dbo].[Course] (
    [CourseID] [int] not null,
    [Title] [nvarchar](100) not null,
    [Credits] [int] not null,
    [DepartmentID] [int] not null,
    primary key ([CourseID])
);
create table [dbo].[Department] (
    [DepartmentID] [int] not null,
    [Name] [nvarchar](50) not null,
    [Budget] [decimal](18, 2) not null,
    [StartDate] [datetime] not null,
    [Administrator] [int] null,
    primary key ([DepartmentID])
);
alter table [dbo].[Course] add constraint [Course_Department] foreign key
([DepartmentID]) references [dbo].[Department]([DepartmentID])
 on delete cascade;
Hope it helps!!!
In this blog post I will try to explain with a hand-on demo how we can use Entity Framework Code first with an existing database. I will create the database and then I will use an ASP.Net MVC 4.0 application to demonstrate how to map Code First EF Workflow to the database.
Before we start I will give again a short introduction to Entity Framework. The stable version of Entity Framework as we speak is EF 5.0.It is available through Nuget and it is an open source project.
The .Net framework provides support for Object Relational Mapping through EF. So EF is a an ORM tool and it is now the main data access technology that microsoft works on. I use it quite extensively in my projects. Through EF we have many things out of the box provided for us. We have the automatic generation of SQL code.It maps relational data to strongly types objects.All the changes made to the objects in the memory are persisted in a transactional way back to the data store.
You can search in my blog, because I have posted many posts regarding ASP.Net and EF.
There are different approaches (paradigms) available using the Entity Framework, namely Database First, Code First, Model First.
You can find in this post an example on how to use the Entity Framework to retrieve data from an SQL Server Database using the "Database/Schema First" approach.
In this approach we make all the changes at the database level and then we update the model with those changes.
In this post you can see an example on how to use the "Model First" approach when working with ASP.Net and the Entity Framework.
This model was firstly introduced in EF version 4.0 and we could start with a blank model and then create a database from that model.When we made changes to the model , we could recreate the database from the new model.
The Code First approach is the more code-centric than the other two. Basically we write POCO classes and then we persist to a database using something called DBContext.
In this application we will us the Code First approach when building our data-centric application with EF.
Code First relies on DbContext. We create classes with properties and then these classes interact with the DbContext class.Then we can create a new database based upon our POCOS classes and have tables generated from those classes.We do not have an .edmx file in this approach.By using this approach we can write much easier unit tests.
DbContext is a new context class and is smaller,lightweight wrapper for the main context class which is ObjectContext (Schema First and Model First).
I am running VS Studio 2012 Ultimate edition but you can use Visual Studio Express 2012 for Web. You can install Visual Studio Express 2012 for Web if you download Web Platform Installer.You can download this tool from this link.
1) I am launching VS 2012 and I will Visual C# as the programming language. I will also select ASP.NET MVC 4 Web Application from the available templates.I will name my application CodeFirstExistingDatabase
2) Normally with Code First we create new classes and then EF knows how tο create the database from those classes. In this application we will do the reverse.
3) Before I create the database I need to download and install Entity Framework Power Tools Beta 3. Go to Tools -> Extensions and updates and search for Entity Framework Power Tools Beta 3 and then install it. Have a look at the picture below. I have already installed it.In you case it will say Install.
The good news is that Entity Framework Power Tools will be included in EF 6.0.
4) I have already created a sample database. It is called School. It has two tables with data, Course and Department. There is one to many relationship between Department and Course. A Department has many Course(s). This is the script ( SchoolDB.zip) that will install the database with the data in your SQL Server instance.Make sure you have the database installed.
5) Right-click on your project, then select Entity Framework -> Reverse Engineer Code First.Have a look at the picture below
6) In the next step we will be prompted to connect to the database. Connect to the SQL Server instance and the connect to the DB and hit OK.Have a look at the picture below
7) Now the Power Tools of EF have created the necessary classes. Have a look under the Models,Mapping folder to see the generated files.
Have a look at the picture below
Open web.config. EF has added a connection string to the database
<add name="schoolContext" connectionString="Data Source=.\sqlexpress;Initial Catalog=school;
         Integrated Security=True;MultipleActiveResultSets=True"
      providerName="System.Data.SqlClient" />
The schoolContext.cs file has been created. There is a class in there schoolContext. It has the same name as the name in the name property of the connection string above (name=schoolContext).The schoolContext class derives from the DbContext. DbContext is a base class in EF and it is responsible for change tracking,persisting data back to the database and in general managing the entity objects during runtime. DbSet properties are also exposed and those properties represent collections of the specified entities in the context.
 public schoolContext()
            : base("Name=schoolContext")
Those two lines of code above tell EF that the connection information for this context should be loaded from web.config.
There Department.cs and Course.cs are also included.These are the POCO classes i was talking earlier. These two classes are very simple classes and have no dependency from EF. The Department class follows.
public partial class Department
    {
        public Department()
        {
            this.Courses = new List<Course>();
        }

        public int DepartmentID { get; set; }
        public string Name { get; set; }
        public decimal Budget { get; set; }
        public System.DateTime StartDate { get; set; }
        public Nullable<int> Administrator { get; set; }
        public virtual ICollection<Course> Courses { get; set; }
    }
You can see the properties that map to the columns of the Department table in the database. The Courses property is a navigation property. A Department entity can related to any number of Courses entities.Navigation properties are typically defined as virtual so that they can take advantage of certain Entity Framework functionality such as lazy loading.
The Course.cs file follows
 public partial class Course
    {
        public int CourseID { get; set; }
        public string Title { get; set; }
        public int Credits { get; set; }
        public int DepartmentID { get; set; }
        public virtual Department Department { get; set; }
    }
The DepartmentMap.cs file is a configuration file for the Department entity type in the model.It uses Fluent API to configure the type.It defines the table the entity maps to. It defines-matches the columns
of the table with the entity properties. Also defines any relationships
and things like Primary key e.t.c. Its contents follow.
public class DepartmentMap : EntityTypeConfiguration<Department>
    {
        public DepartmentMap()
        {
            // Primary Key
            this.HasKey(t => t.DepartmentID);

            // Properties
            this.Property(t => t.DepartmentID)
                .HasDatabaseGeneratedOption(DatabaseGeneratedOption.None);

            this.Property(t => t.Name)
                .IsRequired()
                .HasMaxLength(50);

            // Table & Column Mappings
          this.ToTable("Department");
          this.Property(t => t.DepartmentID).HasColumnName("DepartmentID");
          this.Property(t => t.Name).HasColumnName("Name");
          this.Property(t => t.Budget).HasColumnName("Budget");
          this.Property(t => t.StartDate).HasColumnName("StartDate");
          this.Property(t => t.Administrator).HasColumnName("Administrator");
        }
    }
The CourseMap.cs file is a configuration file for the Course entity type in the model. It uses Fluent API to configure the type.It defines the table the entity maps to. It defines-matches the columns of the table with the entity properties. Also defines any relationships and things like Primary key e.t.c. Its contents follow.
public class CourseMap : EntityTypeConfiguration<Course>
    {
        public CourseMap()
        {
            // Primary Key
            this.HasKey(t => t.CourseID);

            // Properties
            this.Property(t => t.CourseID)
                .HasDatabaseGeneratedOption(DatabaseGeneratedOption.None);

            this.Property(t => t.Title)
                .IsRequired()
                .HasMaxLength(100);

            // Table & Column Mappings
          this.ToTable("Course");
          this.Property(t => t.CourseID).HasColumnName("CourseID");
          this.Property(t => t.Title).HasColumnName("Title");
          this.Property(t => t.Credits).HasColumnName("Credits");
          this.Property(t => t.DepartmentID).HasColumnName("DepartmentID");

            // Relationships
            this.HasRequired(t => t.Department)
                .WithMany(t => t.Courses)
                .HasForeignKey(d => d.DepartmentID);

        }
    }
8) Now we are ready to query our model and retrieve some data back from the database. We will use the magic of scaffolding to help us out.
We will create a Course controller.Right-click the Controllers folder in Solution Explorer, select Add, and then click Controller. In the Add Controller dialog box, make the following selections and then click Add:
Controller name: CourseController.
Template: MVC controller with read/write actions and views, using Entity Framework
Model class: Course (CodeFirstExistingDatabase.Models)
Data context class: SchoolContext (CodeFirstExistingDatabase.Models)
Views: Razor (CSHTML). (The default.) Then click Add.
Have a look at the picture below

The Course controller has been created. Have a look under the Controllers folder.
A part of the Course controller class follows
private schoolContext db = new schoolContext();

        //
        // GET: /Course/

        public ActionResult Index()
        {
            var courses = db.Courses.Include(c => c.Department);
            return View(courses.ToList());
        }
A class variable has been created that instantiates a database context object.
The Index action method gets a list of Courses along with the related departments using the Include method. This is an example of eager loading. That basically means that when Course entity data is read , related data is retrieved along with it in the first attempt.
I am not going to write anything else on this method.
Under the Views folder a Course folder has been created with the Index.cshtml,Create.cshtml,Delete.cshtml,Edit.cshtml,Details.cshtml views.
Now we are ready to retrieve data from the database through our model. I am going to make a small change to _Layout.cshtml file in the menu id so i can click to see the Courses.
  <ul id="menu">
                 <li>@Html.ActionLink("Home", "Index", "Home")</li>
                 <li>@Html.ActionLink("About", "About", "Home")</li>
                 <li>@Html.ActionLink("Contact", "Contact", "Home")</li>
                 <li>@Html.ActionLink("Courses", "Index", "Course")</li>
  </ul>
I just added
<li>@Html.ActionLink("Courses", "Index", "Course")</li>
9) Build and run your application. Then click Courses from the menu.Title and credits data appear for each Course along with the related Department name.
Have a look at the picture below.

Hope it helps!!!
Usually I am not reviewing software books but recently I have purchased and read
Getting Started with nopCommerceThe overwhelming majority of my websites are built using NopCommerce (ASP.Net MVC,Entity Framework,JQuery).
I am a senior developer at a small company (NopServices – http://www.nopservices.com ) that use NopCommerce as the shopping cart of choice, so I grabbed this
book just out of sheer curiosity.
I use this book to help content writers/managers who work under me at my day job acclimated to NopCommerce so that they are able to take the sites I have built, add products, add content and in general make all the necessary configurations.
This book is rather short is very easy to read and understand. The whole learning experience is smooth because of the many screenshots that appear in the book.
In the first chapter, the reader can understand what are the prerequisites and requirements in order to work with NopCommerce. Then we learn how to install the various components, install SQL Server and Visual Studio if we want to perform any custom development. We also learn how to install NopCommerce and set the necessary permissions.
In the next chapter we are introduced to the storefront and the customer experience. Everything is explained thoroughly and there are so many screenshots in this chapter that make the learning experience smooth and fun. Category, manufacturer and product detail pages are explained. Shopping cart,one-page checkout process are also demonstrated.
In the third chapter an overview of the administration site in NopCommerce is provided. We learn how to create categories ,manufacturers, add new products, set up product attributes and variants.
In the fourth chapter we learn about the various configuration settings and how we can tweak them to have our store operate in the way we want. We learn how to set up payment methods, shipping methods, manage taxes, edit topics and install plugins.
In the fifth chapter we learn how to process orders. We learn to look into the various components of a customerʼs order, how to manipulate orders and how to process orders.
I found the book fairly straightforward to read and simple enough for me to understand.
The layout of the information is simple to follow and the chapter structure makes it easy for you to skip to and focus on the features you want to most understand and use, rather than being restricted to a ‘beginning to end’ approach.
It is a practical guide to get your first NopCommerce e-commerce site up and running very quickly. So If you are planning to use NopCommerce, I would highly recommend it.
I have been using JQuery for a couple of years now and it has helped me to solve many problems on the client side of web development.
You can find all my posts about JQuery in this link. In this post I will be providing you with a hands-on example on how to create a stylish tooltip using JQuery.
In this hands-on example I will be using Expression Web 4.0.This application is not a free application. You can use any HTML editor you like.You can use Visual Studio 2012 Express edition. You can download it here.
We need to download the latest version of JQuery. You can download it here.
We will need some markup first.This is the sample HTML 5 page
Type or (copy paste) the markup in your favorite HTML editor (VS, Expression Web,Notepad++)
<!DOCTYPE html>
<html lang="en">
<head>
<title>Liverpool Legends</title>
<script type="text/javascript" src="jquery-1.8.3.min.js"></script>
<link rel="stylesheet" type="text/css" href="mystyle.css">
<script type="text/javascript" src="tooltip.js"></script>
</head>
<body>
<header>
<h1>Liverpool Legends</h1>
</header>
<div id="main">
<a class="liverpool" href="http://en.wikipedia.org/wiki/John_Barnes_%28footballer%29" target="_blank" Tooltip="One of the greatest midfielders to wear the Liverpool shirt">John Barnes</a>
<br/>
<a class="liverpool" href="http://en.wikipedia.org/wiki/Kenny_Dalglish" target="_blank" Tooltip="The greatest ever player that has played for Liverpool">Kenny Dalglish</a>
<br/>
<a class="liverpool" href="http://en.wikipedia.org/wiki/Steven_Gerrard" target="_blank" Tooltip="A liverpool legend and the captain of the team">Steven Gerrard</a>
</div>
<footer>
<p>All Rights Reserved</p>
</footer>
</body>
</html>
I have some links in this simple html page. When I hover over the links I want the the contents of the Tooltip attribute to appear on the right of the links as a tooltip. When I mouse out of the links then the tooltip contents should disappear.
I am including a link to the JQuery library in the head section of the HTML markup.
I will also include the external .css stylesheet file with the various styles for the HTML elements in the head section.
You must create another file first e.g mystyle.css and copy-paste in it the code below
body
{
background-color:#efefef;
}
header
{
font-family:Tahoma;
font-size:1.3em;
color:#505050;
text-align:center;
}
a:link {color:#64000; text-decoration:none;}
a:hover {color:#FF704D; text-decoration:none;}
.tooltip {
display: none;
font-size: 12pt;
position: absolute;
border: 2px solid #000000;
background-color: #b13c3c;
padding: 12px 16px;
color: #fff347;
}
footer
{
background-color:#999;
width:100%;
text-align:center;
font-size:1.1em;
color:#002233;
}
Have a look at the class tooltip above.
I have also included a link to the external .js javascript script (tooltip.js) file with the various styles for the HTML elements in the head section.
Type (copy-paste the following) javascript code in the tooltip.js
$(function() {
$('.liverpool').hover(function(event) {
var toolTipcontents = $(this).attr('Tooltip');
$('<p class="tooltip"></p>').text(toolTipcontents)
.appendTo('#main')
.css('top', (event.pageY - 40) + 'px')
.css('left', (event.pageX + 60) + 'px')
.fadeIn(4000);
}, function() {
$('.tooltip').remove();
}).mousemove(function(event) {
$('.tooltip')
.css('top', (event.pageY - 40) + 'px')
.css('left', (event.pageX + 60) + 'px');
});
});
Let me explain what I am doing with the code above.
- First I make sure that DOM has loaded before I do anything else.
- Then in the hover over event, I store in the variable toolTipcontents the contents of the Tooltip attribute.Have a look here for the attr() function.
- Then I create a p tag dynamically and assign the contents of the toolTipcontents variable to it.Have a look here for the text() function.
- Then I simply append this p tag to the main div of the page and then set the position (top,left) that the tooltip will appear.Have a look here for the appendTo() function. Also have a look here for the css() function.
- Then I use an effect to make the tooltip contents appear with a simple fading. .Have a look here for the fadeIn() function.
- Then in the hover out event I simply remove the p tag.Have a look here for the remove() function.
- Finally because I want the tooltip contents to move along as the mouse moves I add some code to the mousemove() event. Have a look here for the mousemove() event.
Make sure you view your page in you browser of preference.
Have a look at the picture below to see what I see when I view this page on the browser and hover over a link.
Hope it helps !!!

In this post I will demonstrate with a hands-on example the various ways content can be shared across many pages in a DotNetNuke site.
I will continue writing posts about DotNetNuke because it is my favourite CMS,based on ASP.Net and I use it a lot.
I have installed DNN 7.0 in a web server. You can see the default installation and site -http://dnn7.nopservices.com/
Bear in mind that this is the community edition of DotNetNuke
1) I am logging into my site as a host - power user.
2) I am going to add a Text/HTML module to the Home.aspx page.
3) I am navigating to Modules -> Add New Module. From the available modules I choose HTML module.This is the most commonly used module in DNN sites. We can add content, images, flash files into this module.
4) I am adding this module to the ContentPane of the Home page
Have a look at the picture below

5) Now, that I have the module in my pane, I must add some content to it.I just click on the Edit Content
Have a look at the picture below
6) I add some sample content (inside the HTML editor) on the page and click Save.My content has been added.
Have a look at the picture below

7) Now what if I wanted to share the contents of the the Text/HTML module across other pages of the site?
I navigate to the http://dnn7.nopservices.com/AboutUs.aspx page,then Modules -> Add Existing module. Then I select the Home page, the Text/HTML module I added in the Home page (I have titled it DNN) and then I add it in the new page (AboutUs) in the ContentPane
Have a look at the picture below

8) The module and its contents are inserted in the AboutUs page. Have a look at the picture below

9) Now if I go back to the Home page and I add some more content.Have a look at the picture below

I have added "The main site where you can download everything is http://www.dotnetnuke.com". If you navigate to the AboutUs page you will see that those changes were reflected to that page as well.
10) But what if I did not want this to happen? I mean what if we wanted to copy a module across one or more pages but didn't want to have the content changes of one module reflected to the others in the other pages.
First I am going to delete the Text/HTML module (titled DNN) from the AboutUs page.
Have a look at the picture below

11) Now I am going to add the Text/HTML module (titled DNN) from the Home page to the AboutUs page again.I navigate to the http://dnn7.nopservices.com/AboutUs.aspx page,then Modules -> Add Existing module. Then I select the Home page, the Text/HTML module I added in the Home page (I have titled it DNN) and then I add it in the new page (AboutUs) in the ContentPane.Please note that I have checked the option Make a Copy
Have a look at the picture below

The Text/HTML module is added to this page as well. Now if I navigate to the Home page and add another line of content in the Text/HTML module e.g
You can download the latest version of DotNetnuke and very useful manuals.
and then move back to the AboutUs page, we will see that this new change did not reflect on the AboutUs page.
12) Finally I would like to show you another way to share content across multiple pages in a DNN site.
I am adding a new module to the Home page. I am navigating to Modules -> Add New Module from the control panel. From the
available modules I choose HTML module.I add some sample content to this module. You can add anything you like. I have titled this module DNN RoadMap by going to the module Settings.
Have a look at the picture below

Then I add the module title and in Advanced Settings, I check the option Display Module on All Pages. By doing that this module will appear in the same position in all pages of the site.
I have the option to add this module only to the pages ( Add to new pages only? ) that will be created in the future (new pages) but I will not do that right now.
Then I hit the Update button. This module will be added to all pages.
Have a look at the picture below.

Please note that by using this setting we have the following behavior
- If you change the contents of the module titled DNN RoadMap that was added to all pages, those changes will be reflected across the site.
- If you delete the module from one page, that does not mean that all modules from all the pages will be deleted.
- If you go to any page that the module DNN RoadMap was added and then go to Settings and then uncheck the option Display Module On All Pages , then this module will disappear from all the pages except the current one.
Hope it helps!!!
