Παρουσίαση με Ετικέτες
Όλες οι Ετικέτε... »
html5 »
jquery (RSS)
In this post I will show you how to create a simple tabbed interface using JQuery,HTML 5 and CSS.
Make sure you have downloaded the latest version of JQuery (minified version) from http://jquery.com/download.
Please find here all my posts regarding JQuery.Also have a look at my posts regarding HTML 5.
In order to be absolutely clear this is not (and could not be) a detailed tutorial on HTML 5. There are other great resources for that.Navigate to the excellent interactive tutorials of W3School.
Another excellent resource is HTML 5 Doctor.
Two very nice sites that show you what features and specifications are implemented by various browsers and their versions are http://caniuse.com/ and http://html5test.com/. At this times Chrome seems to support most of HTML 5 specifications.Another excellent way to find out if the browser supports HTML 5 and CSS 3 features is to use the Javascript lightweight library Modernizr.
In this hands-on example I will be using Expression Web 4.0.This application is not a free application. You can use any HTML editor you like.You can use Visual Studio 2012 Express edition. You can download it here.
Let me move on to the actual example.
This is the sample HTML 5 page
<!DOCTYPE html>
<html lang="en">
<head>
<title>Liverpool Legends</title>
<meta http-equiv="Content-Type" content="text/html;charset=utf-8" >
<link rel="stylesheet" type="text/css" href="style.css">
<script type="text/javascript" src="jquery-1.8.2.min.js"> </script>
<script type="text/javascript" src="tabs.js"></script>
</head>
<body>
<header>
<h1>Liverpool Legends</h1>
</header>
<section id="tabs">
<ul>
<li><a href="http://weblogs.asp.net/controlpanel/blogs/posteditor.aspx?SelectedNavItem=Posts§ionid=1153&postid=9143136#first-tab">Defenders</a></li>
<li><a href="http://weblogs.asp.net/controlpanel/blogs/posteditor.aspx?SelectedNavItem=Posts§ionid=1153&postid=9143136#second-tab">Midfielders</a></li>
<li><a href="http://weblogs.asp.net/controlpanel/blogs/posteditor.aspx?SelectedNavItem=Posts§ionid=1153&postid=9143136#third-tab">Strikers</a></li>
</ul>
<div id="first-tab">
<h3>Liverpool Defenders</h3>
<p> The best defenders that played for Liverpool are Jamie Carragher, Sami Hyypia , Ron Yeats and Alan Hansen.</p>
</div>
<div id="second-tab">
<h3>Liverpool Midfielders</h3>
<p> The best midfielders that played for Liverpool are Kenny Dalglish, John Barnes,Ian Callaghan,Steven Gerrard and Jan Molby.
</p>
</div>
<div id="third-tab">
<h3>Liverpool Strikers</h3>
<p>The best strikers that played for Liverpool are Ian Rush,Roger Hunt,Robbie Fowler and Fernando Torres.<br/>
</p>
</div>
</div>
</section>
<footer>
<p>All Rights Reserved</p>
</footer>
</body>
</html>
This is very simple HTML markup.
I have styled this markup using CSS.
The contents of the style.css file follow
* {
margin: 0;
padding: 0;
}
header
{
font-family:Tahoma;
font-size:1.3em;
color:#505050;
text-align:center;
}
#tabs {
font-size: 0.9em;
margin: 20px 0;
}
#tabs ul {
float: left;
background: #777;
width: 260px;
padding-top: 24px;
}
#tabs li {
margin-left: 8px;
list-style: none;
}
* html #tabs li {
display: inline;
}
#tabs li, #tabs li a {
float: left;
}
#tabs ul li.active {
border-top:2px red solid;
background: #15ADFF;
}
#tabs ul li.active a {
color: #333333;
}
#tabs div {
background: #15ADFF;
clear: both;
padding: 15px;
min-height: 200px;
}
#tabs div h3 {
margin-bottom: 12px;
}
#tabs div p {
line-height: 26px;
}
#tabs ul li a {
text-decoration: none;
padding: 8px;
color:#0b2f20;
font-weight: bold;
}
footer
{
background-color:#999;
width:100%;
text-align:center;
font-size:1.1em;
color:#002233;
}
There are some CSS rules that style the various elements in the HTML 5 file. These are straight-forward rules.
The JQuery code lives inside the tabs.js file
$(document).ready(function(){
$('#tabs div').hide();
$('#tabs div:first').show();
$('#tabs ul li:first').addClass('active');
$('#tabs ul li a').click(function(){
$('#tabs ul li').removeClass('active');
$(this).parent().addClass('active');
var currentTab = $(this).attr('href');
$('#tabs div').hide();
$(currentTab).show();
return false;
});
});
I am using some of the most commonly used JQuery functions like hide , show, addclass , removeClass
I hide and show the tabs when the tab becomes the active tab.
When I view my page I get the following result

Hope it helps!!!!!

In this post I will show you how to use JQuery to scroll through an HTML 5 page.I had to help a friend of mine to implement this functionality and I thought it would be a good idea to write a post.
I will not use any JQuery scrollbar plugin,I will just use the very popular JQuery Library. Please download the library (minified version) from http://jquery.com/download.
Please find here all my posts regarding JQuery.Also have a look at my posts regarding HTML 5.
In
order to be absolutely clear this is not (and could not be) a detailed
tutorial on HTML 5. There are other great resources for that.Navigate to
the excellent interactive tutorials of W3School.
Another excellent resource is HTML 5 Doctor.
Two very nice sites that show you what features and specifications are implemented by various browsers and their versions are http://caniuse.com/ and http://html5test.com/. At this times Chrome seems
to support most of HTML 5 specifications.Another excellent way to find
out if the browser supports HTML 5 and CSS 3 features is to use the
Javascript lightweight library Modernizr.
In this hands-on example I will be using Expression Web 4.0.This application is not a free application. You can use any HTML editor you like.You can use Visual Studio 2012 Express edition. You can download it here.
Let me move on to the actual example.
This is the sample HTML 5 page
<!DOCTYPE html>
<html lang="en">
<head>
<title>Liverpool Legends</title>
<meta http-equiv="Content-Type" content="text/html;charset=utf-8" >
<link rel="stylesheet" type="text/css" href="style.css">
<script type="text/javascript" src="jquery-1.8.2.min.js"> </script>
<script type="text/javascript" src="scroll.js">
</script>
</head>
<body>
<header>
<h1>Liverpool Legends</h1>
</header>
<div id="main">
<table>
<caption>Liverpool Players</caption>
<thead>
<tr>
<th>Name</th>
<th>Photo</th>
<th>Position</th>
<th>Age</th>
<th>Scroll</th>
</tr>
</thead>
<tfoot class="footnote">
<tr>
<td colspan="4">We will add more photos soon</td>
</tr>
</tfoot>
<tbody>
<tr class="maintop">
<td>Alan Hansen</td>
<td>
<figure>
<img src="images\Alan-hansen-large.jpg" alt="Alan Hansen">
<figcaption>The best Liverpool Defender <a href="http://en.wikipedia.org/wiki/Alan_Hansen">Alan Hansen</a></figcaption>
</figure>
</td>
<td>Defender</td>
<td>57</td>
<td class="top">Middle</td>
</tr>
<tr>
<td>Graeme Souness</td>
<td>
<figure>
<img src="images\graeme-souness-large.jpg" alt="Graeme Souness">
<figcaption>Souness was the captain of the successful Liverpool team of the early 1980s <a href="http://en.wikipedia.org/wiki/Graeme_Souness">Graeme Souness</a></figcaption>
</figure>
</td>
<td>MidFielder</td>
<td>59</td>
</tr>
<tr>
<td>Ian Rush</td>
<td>
<figure>
<img src="images\ian-rush-large.jpg" alt="Ian Rush">
<figcaption>The deadliest Liverpool Striker <a href="http://it.wikipedia.org/wiki/Ian_Rush">Ian Rush</a></figcaption>
</figure>
</td>
<td>Striker</td>
<td>51</td>
</tr>
<tr class="mainmiddle">
<td>John Barnes</td>
<td>
<figure>
<img src="images\john-barnes-large.jpg" alt="John Barnes">
<figcaption>The best Liverpool Defender <a href="http://en.wikipedia.org/wiki/John_Barnes_(footballer)">John Barnes</a></figcaption>
</figure>
</td>
<td>MidFielder</td>
<td>49</td>
<td class="middle">Bottom</td>
</tr>
<tr>
<td>Kenny Dalglish</td>
<td>
<figure>
<img src="images\kenny-dalglish-large.jpg" alt="Kenny Dalglish">
<figcaption>King Kenny <a href="http://en.wikipedia.org/wiki/Kenny_Dalglish">Kenny Dalglish</a></figcaption>
</figure>
</td>
<td>Midfielder</td>
<td>61</td>
</tr>
<tr>
<td>Michael Owen</td>
<td>
<figure>
<img src="images\michael-owen-large.jpg" alt="Michael Owen">
<figcaption>Michael was Liverpool's top goal scorer from 1997–2004 <a href="http://www.michaelowen.com/">Michael Owen</a></figcaption>
</figure>
</td>
<td>Striker</td>
<td>33</td>
</tr>
<tr>
<td>Robbie Fowler</td>
<td>
<figure>
<img src="images\robbie-fowler-large.jpg" alt="Robbie Fowler">
<figcaption>Fowler scored 183 goals in total for Liverpool <a href="http://en.wikipedia.org/wiki/Robbie_Fowler">Robbie Fowler</a></figcaption>
</figure>
</td>
<td>Striker</td>
<td>38</td>
</tr>
<tr class="mainbottom">
<td>Steven Gerrard</td>
<td>
<figure>
<img src="images\steven-gerrard-large.jpg" alt="Steven Gerrard">
<figcaption>Liverpool's captain <a href="http://en.wikipedia.org/wiki/Steven_Gerrard">Steven Gerrard</a></figcaption>
</figure>
</td>
<td>Midfielder</td>
<td>32</td>
<td class="bottom">Top</td>
</tr>
</tbody>
</table>
</div>
<footer>
<p>All Rights Reserved</p>
</footer>
</body>
</html>
The markup is very easy to follow and understand. You do not have to type all the code,simply copy and paste it.For those that you are not familiar with HTML 5, please take a closer look at the new tags/elements introduced with HTML 5.
When I view the HTML 5 page with Firefox I see the following result.

I have also an external stylesheet (style.css).
body{
background-color:#efefef;
}
h1{
font-size:2.3em;
}
table {
border-collapse: collapse;
font-family: Futura, Arial, sans-serif;
}
caption {
font-size: 1.2em;
margin: 1em auto;
}
th, td {
padding: .65em;
}
th, thead {
background: #000;
color: #fff;
border: 1px solid #000;
}
tr:nth-child(odd)
{
background: #ccc;
}
tr:nth-child(even)
{
background: #404040;
}
td
{
border-right: 1px solid #777;
}
table
{
border: 1px solid #777;
}
.top, .middle, .bottom
{
cursor: pointer;
font-size: 22px;
font-weight: bold;
text-align: center;
}
.footnote
{
text-align:center;
font-family:Tahoma;
color:#EB7515;
}
a{color:#22577a;text-decoration:none;}
a:hover {color:#125949; text-decoration:none;}
footer
{
background-color:#505050;
width:1150px;
}
These are just simple CSS Rules that style the various HTML 5 tags,classes.
The jQuery code that makes it all possible resides inside the scroll.js file.Make sure you type everything correctly.
$(document).ready(function() {
$('.top').click(function(){
$('html, body').animate({
scrollTop: $(".mainmiddle").offset().top
},4000 );
});
$('.middle').click(function(){
$('html, body').animate({
scrollTop: $(".mainbottom").offset().top
},4000);
});
$('.bottom').click(function(){
$('html, body').animate({
scrollTop: $(".maintop").offset().top
},4000);
});
});
Let me explain what I am doing here.When I click on the Middle word ( $('.top').click(function(){ ) this relates to the top class that is clicked.
Then we declare the elements that we want to participate in the scrolling. In this case is html,body ( $('html, body').animate).These elements will be part of the vertical scrolling.
In the next line of code we simply move (navigate) to the element (class mainmiddle that is attached to a tr element.)
scrollTop: $(".mainmiddle").offset().top
Make sure you type all the code correctly and try it for yourself. I have tested this solution will all 4-5 major browsers.
Hope it helps!!!

Recently I needed to disable the right-click contextual menu in an HTML page for a very simple HTML application I was creating for a friend.
This is going to be a short post where I will demonstrate how to disable the right-click contextual menu.
I will use the very popular JQuery Library. Please download the library (minified version) from http://jquery.com/download
Please find here all my posts regarding JQuery.
In this hands-on example I will be using Expression Web 4.0.This application is not a free application. You can use any HTML editor you like.You can use Visual Studio 2012 Express edition. You can download it here.
I am going to create a very simple HTML 5 page with some text and an image.
The HTML markup for the page follows.
<!DOCTYPE html>
<html lang="en">
<head>
<title>HTML 5, CSS3 and JQuery</title>
<meta http-equiv="Content-Type" content="text/html;charset=utf-8" >
<link rel="stylesheet" type="text/css" href="style.css">
<script type="text/javascript" src="jquery-1.8.2.min.js">
</script>
<script type="text/javascript">
(function ($) { $(document).bind('contextmenu', function () { return false;
}); })(jQuery);
</script>
</head>
<body>
<div id="header">
<h1>Learn cutting edge technologies</h1>
<h2>HTML 5, JQuery, CSS3</h2>
</div>
<figure>
<img src="html5.png" alt="HTML 5">
</figure>
<div id="main">
<h2>HTML 5</h2>
<article>
<p>
HTML5 is the latest version of HTML and XHTML. The HTML standard defines a single language that can be written in HTML and XML. It attempts to solve issues found in previous iterations of HTML and addresses the needs of Web Applications, an area previously not adequately covered by HTML.
</p>
</article>
</div>
</body>
</html>
This is the JQuery code, I use
(function ($) { $(document).bind('contextmenu', function () { return false;
}); })(jQuery);
I simply disable/cancel the contextmenu event.When I load the simple page on the browser and I right-click the context menu does not appear.
Hope it helps!!!

This is going to be the ninth post in a series of posts regarding HTML 5. You can find the other posts here, here , here , here, here , here , here and here.
In this post I will demonstrate how to implement a very common feature found in websites today, enabling the visitor to increase or decrease the font size of a page.
You can use the JQuery code I will write in this post for HTML pages which do not follow the HTML 5 standard.
As I said earlier we need to write JavaScript to implement this functionality.
I will use the very popular JQuery Library. Please download the library (minified version) from http://jquery.com/download
In this hands-on example I will be using Expression Web 4.0.This application is not a free application. You can use any HTML editor you like.You can use Visual Studio 2012 Express edition. You can download it here.
The HTML markup for the page follows.
<!DOCTYPE html>
<html lang="en">
<head>
<title>HTML 5, CSS3 and JQuery</title>
<meta http-equiv="Content-Type" content="text/html;charset=utf-8" >
<link rel="stylesheet" type="text/css" href="style.css">
<script type="text/javascript" src="jquery-1.8.2.min.js">
</script>
<script type="text/javascript">
$(function() {
$('a').click(function() {
var getfont = $('p').css('font-size');
var mynum = parseFloat(getfont, 10);
var newmwasure = getfont.slice(-2);
$('p').css('font-size', mynum / 1.2 + newmwasure);
if(this.id == 'increase') {
$('p').css('font-size', mynum * 1.4 + newmwasure);
}
})
})
</script>
</head>
<body>
<div id="header">
<h1>Learn cutting edge technologies</h1>
<h2>HTML 5, JQuery, CSS3</h2>
</div>
<div id="resize">
<a href="" id="increase">Increase Font</a>
|
<a href="" id="decrease">Decrease Font</a>
</div>
<div id="main">
<h2>HTML 5</h2>
<article>
<p>
HTML5 is the latest version of HTML and XHTML. The HTML standard defines a single language that can be written in HTML and XML. It attempts to solve issues found in previous iterations of HTML and addresses the needs of Web Applications, an area previously not adequately covered by HTML.
</p>
</article>
</div>
</body>
</html>
There is nothing difficult or fancy in the HTML markup above. I have a link to the external JQuery library and the JQuery code is included inside the .html page.
I have two links on this page that will increase/decrease the font size of the contents enclosed inside the <p></p> tags.
Let me explain what the JQuery code does.
When the user clicks on the link, I store in a variable the current font size of the <p> element that I get back from the CSS function.
var getfont = $('p').css('font-size');
So now we have the original value. That will return a value like "16px" "1.2em".
Then I need to get the unit of measurement (px,em).I use the slice() function.
var newmwasure = getfont.slice(-2);
Then I want to get only the numeric part of the returning value.I do that using the parseFloat() function.
Have a look at the parseFloat() function.
Finally with this bit of code I choose a ratio (I am devising a very simple algorithm for increasing and decreasing) and apply it to the <p> element. I still use the CSS function. You can get but also set the font size for a particular element with the CSS function.
So I check for the id=increase and if this matches I will increase the font size of the <p> element.If it does not match we will decrease the font size.
$('p').css('font-size', mynum / 1.2 + newmwasure);
if(this.id == 'increase') {
$('p').css('font-size', mynum * 1.4 + newmwasure);
The code for the css file (style.css) follows
body
{
background-color:#eaeaea;
}
p{
font-size:0.8em;
font-family:Tahoma;
}
#resize
{
width:200px;
background-color:#dadada;
}
#resize a {
text-decoration:none;
}
The above CSS rules are very easy to understand. Now I save all my work.
I view my page on the browser for the first time.Have a look at the picture below

Now I increase the font size by clicking the respective link
Have a look at the picture below

Finally I decrease the font size by clicking on the respective link
Have a look at the picture below

Once more we see that the power and simplicity of JQuery library enables us to write less code but accomplish a lot at the same time.
Hope it helps!!

I am going to start a new series of posts on how to build an application using ASP.Net 4.5 Web forms.A few days back I have been asked to present a number of presentations on ASP.Net 4.5.
Ι will demonstrate how to create a website that sells posters on line.In this web forms application I will design and implement the main functionality that is needed in order to have an operational e-shop. I will also use this series of posts to highlight the various features in ASP.Net and most particularly the new features available in ASP.Net 4.5.
This is going to be part 1 of the application where I will explain what I am going to do.In the final post on this series of posts I will demonstrate on how to deploy the web site to Windows Azure.
I will use Visual Studio 2012 Ultimate edition but you can use the Visual Studio Express 2012 for Web.You can download it here.The .Net framework will be installed automatically.
In case you have trouble installing Visual Studio please have a look at this link.
You can download everything you will need for this project if you use the Web Platform Installer. You must be administrator in your machine to run the Web Platform Installer.
I will try to explain everything in detail and with many screenshots. I would say that it would be very helpful if one has some knowledge of HTML, CSS, Javascript, relational databases,Object- oriented concepts.
This is not going to be a 100-level (beginner level tutorial) and very experienced developers will lot not gain much from this series of posts.
The development language will be C#. I will create a Web Application Project and not a Web Site Project.
There are a lot of web developers out there that use ASP.Net MVC.ASP.Net MVC provide us with a new way of writing ASP.Net applications.It does not replace web forms. It is just an alternative project type.It still runs on ASP.Net and supports caching,sesions and master pages.There is more emphasis on test-driven development and separation of concerns with ASP.Net MVC.
If I have time I will create another series of posts where I will create the exact same application using ASP.Net MVC 4.0.
There are two posts in my blog regarding ASP.Net MVC.You can find them here and here . I always thought that people who are familiar with RAD tools, the best way to learn web applications on the .Net framework is the ASP.Net Web forms paradigm.It is a control based, event-driven development model that suits most people that know how to create Windows Forms Applications or WPF applications.
Let's start with the actual demo-application.
1) Launch Visual Studio. Create a New Project (File->New Project).From the available templates choose ASP.Net Web Forms Application. Have a look at the picture below

2) Make sure that you spend some time reviewing the structure of the application and the files in the Solution Explorer. We have .aspx files,.js files (including the JQuery library), .css files e.t.c.Make sure you run the application and navigate to the various pages.Make sure you realise that ASP.Net is a server side technology.The built-in web server dynamically generates the HTML that is rendered on the browser. If you want to learn more about Page-lifecycle events have a look at this post of mine.We have a functional web application out of the box.There is common
structure-layout in this web application. This feature is known as Master Pages.
Please have a look at the HTML rendered in your browser.The ASP.Net application template uses HTML 5.Modernizr (open source javscript Library) is also included for browsers that do not support HTML 5. If you want to find more about HTML 5, have a look at these posts.
Have a look at the picture below

You can also use register and log in to the web site. If you want to learn more about membership controls and the Membership provider in ASP.Net have a look here.
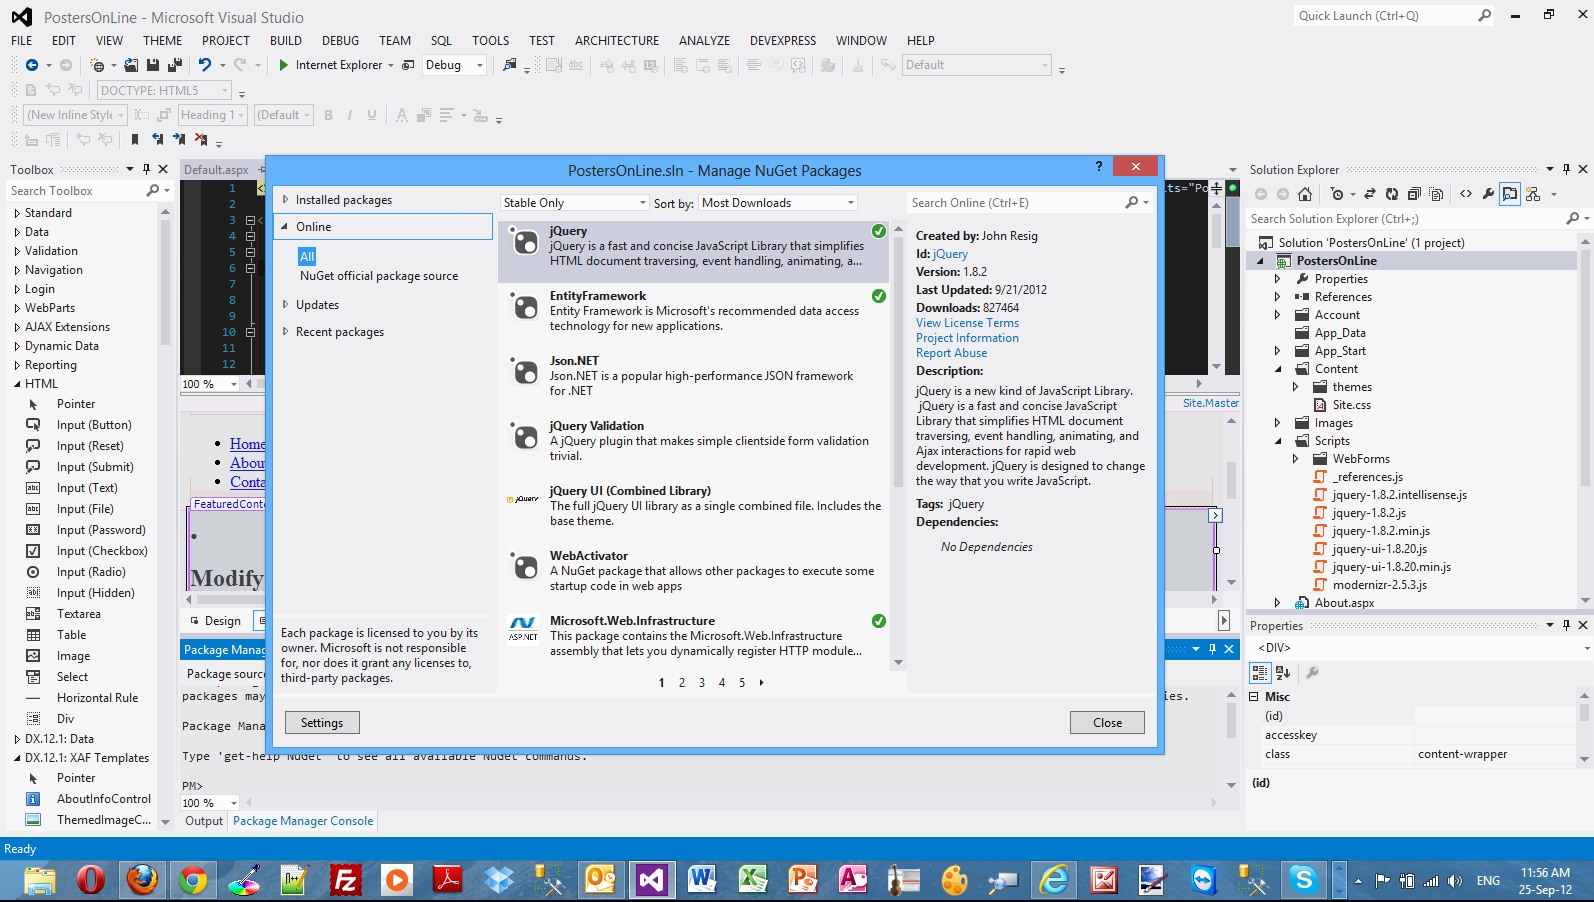
Another important feature I want to highlight is NuGet and Nuget packages.If you have a look at the JQuery .js files that are included in the web site out of the box, you will notice that this is not the latest version.
We can download the latest version of JQuery Library using Nuget.If you go to Tools->Library Package Manager->Manage NuGet Packages For Solution you can locate the latest version of JQuery and download it in your solution. You can also do with the other libraries and tools.NuGet is really great because when you install a package through NuGet it copies all the files to the solution,adding references and making changes to the web.config.Find more about Nuget in this post.
Please have a look at the picture below.
In the next post I will make some changes in the .css files and .master pages to give a unique look and feel to our site.
Hope it helps!!!
