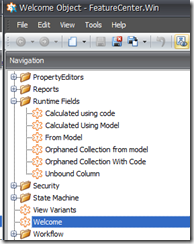
As promised in the previous post I will now attempt to provide a concise yet comprehensive look at the 5 possibilities that Xpand gives us when we want to create a calculated member. I will also provide discussion of the relative advantages and disadvantages of each approach. We can see all of them in action in Xpand FeatureCenter application. Remember it is only thanks to the fact that XAF/XPO have such a strong and flexible architecture that this is possible! We must also acknowledge that these approaches have evolved as a direct result of contributions from the XAF team and community.
1. The XPO way –>Using Code
Take a look at the CreateCalculabeMember extension method in the code below,
public class CreateRuntimeCalculatedFieldController : ViewController {
public override void CustomizeTypesInfo(DevExpress.ExpressApp.DC.ITypesInfo typesInfo) {
base.CustomizeTypesInfo(typesInfo);
XPClassInfo classInfo = XafTypesInfo.XpoTypeInfoSource.XPDictionary.GetClassInfo(typeof(Customer));
if (classInfo.FindMember("SumOfOrderTotals")==null) {
var attributes = new Attribute[] {new PersistentAliasAttribute("Orders.Sum(Total)")};
XPCustomMemberInfo calculabeMember = classInfo.CreateCalculabeMember("SumOfOrderTotals", typeof(float), attributes);
typesInfo.RefreshInfo(typeof(Customer));
}
}
}
XPO has a dictionary of domain metadata. The metadata of each persistent object is stored in XPClassInfo classes and the metadata of their properties is stored in XPMemberInfo classes. One of the main advantages of this approach is that it adds a new member to the XPO dictionary and therefore follows XAF to the letter. This is because in order to form the model XAF first queries the XPO dictionary and finally in order to configure the views it queries the model. Since we have worked in the data layer our calculated values will be sent to any data bound enabled control for rendering. The other benefit is that if we code there are no restrictions on what we can do, for example we can create members calling a WCF service. The sky’s the limit!
On the other hand each time we write new code we need to spend time testing and distributing it. Furthermore in certain scenarios problems can occur due to the fact that we add a new member to the object. For each new member we add to an object we are forced to deal with long properties lists in our model which can be somewhat unwieldy – imagine an object with 200 properties.
Note; XAF is smart enough to manage all of this without even breaking a sweat. This means that its performance does not suffer in any way. It is simply that this approach can leave the user with a bit of a headache!
2. Using the model
We have extended our model in order to describe all types of calculated and runtime properties.

Having done this makes it pretty easy to utilize the powerful XPO and add members in its dictionary as with the previous approach. This means this method shares some of the benefits we mentioned above. However as we are not writing code we can’t enjoy the same level of flexibility unless we utilize ModelUpdaters. Also as the columns can only be created using model editor they are only useful in situations when we have permission to modify the model. Finally we could end up with a huge number of properties here too for the same reason we identified previously.
All this is not to say that this approach doesn’t have its own unique advantages. For example the model difference can be stored in a database or xml file making it easy to distribute. To this end we can use the build in API or a specialized module like IO. Moreover it is possible to develop on site (client). Of course working at the model level allows us to use a model manager module like ModelDifference which is a great aid. It can be used to distribute the unbound columns to users, roles and even to other applications. In addition since ModelDifference supports both platforms it is possible to create calculated members without restarting the application or IIS.
3.WorldCreator extended members
This module maps the structure of the XPMemberInfo class to a persistent object. This approach is again similar to model approach (and once again has similar benefits) however there is a crucial difference. Instead of using the model to gather data to form the calculated members we use the input taken from the UI.
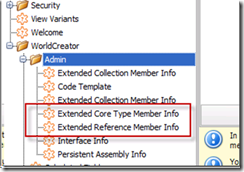
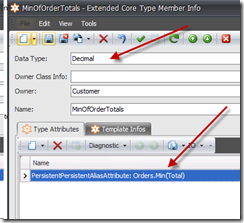
Using the UI is simplicity itself! It requires no technical knowledge whatsoever as the user is only required to choose from a set of basic options. We can still code if we wish, this time by creating persistent objects and then leaving eXpand to take care of the rest. That being said the real beauty of this approach is that the product can be developed on site without the user having to write a single line of code or using a sophisticated tool like Model Editor. Moreover we can enjoy ease of distribution due to the fact that our objects are stored in the database. As the metadata is now in the form of persistent objects locating it and working with it is as easy as ever.
By now it should be clear that as we are still relying on XPO we are faced with the same old problem regarding multiple views.
4. Using a WordCreator Dynamic Assembly
Our fourth approach uses the same module to create dynamic persistent assemblies using code generation templates. XAF is the best framework to describe domains which is evidenced by the way that WorldCreator maps the Assembly structure to persistent objects and auto generates a flexible UI.
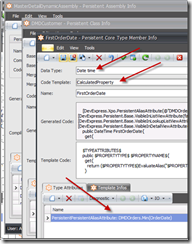
Using the templates will create a dynamic assembly with exactly the same code and structure as if we had taken the time to design it ourselves inside VS. Distribution is still easy since is everything is in the database. The fact that we script at runtime means that our options are almost unlimited when taking this approach.
5. The Unbound Column
Extending the model with an Unbound column node as shown makes it possible to create Unbound grid columns and set their unbound expressions.


This is the only approach that allows us to work directly on views without utilizing XPO. This means that we gain the maximum level of flexibility since it is possible to have different columns for the same object views. Therefore we can work on this column independently. At the same time the end user can change the UnboundExpression at runtime using expression editor (windows only). When it comes to distribution we find the same advantages as we do whenever we deal with the model.
As with the second approach we lose some flexibility because we are not writing code but again we can get round this using ModelUpdaters. In addition our columns still cannot be used when we do not have permission to modify the model. Another disadvantage concerns the fact that XAF is designed to make all calculations in the data layer and send the values to controls by applying an MVC pattern. A few years after XAF was released, Microsoft built Silverlight featuring very similar architecture. Taking into account the various factors this has been recognized as the optimal approach. Although using Unbound columns allows us to work in a different way we need to write extra code to support each control (Tree, Pivot etc) because the calculations are performed in the UI.
We are happy to read your feedback about this!. Remember that your questions are the best candidates for future posts.


Recently in Xpand forums Dionisis Soldatos raised a question about how unbound columns can be implemented with XAF. Unbound columns along with their UnboundExpression can be used for creating calculated fields even at runtime. Since we are talking about unbound grid columns it should be obvious that we will operate at the UI level by modifying the grid control columns. However lets do a deep dive inside XAF model to extend it as needed!
The Model
By now we are all used to XAF providing us with excellent out of the box solutions which negate the need for us to write hundredths of lines of code. This of course means money saved during developing and ultimately your product hits the market faster. Why spend time reinventing the wheel when the XAF team have already done the hard work for you?
XAF creates the model by reading the metadata of our classes, this model has 3 types of view. One of these is the ListView which can be displayed with data source enabled controls like Grid controls. ListView has columns which correspond to existing object properties metadata and when XAF creates a Grid at runtime it queries model’s ListView columns. It then creates and configures Grid columns from their attributes. These stages are well tested and it is preferable to use them in our solution and override the unnecessary stages. For example we could create a normal model column node using XAF default Add/Column menu. After the Grid column is created it we simply need a few lines of code to make it unbound and set its Unbound Expression.

In order to store this expression we still need to extend model’s ListView with an attribute. The model can be extended either by registering an interface at ModuleBase.ExtendModelInterfaces or by deriving it from an already registered interface. I am going to take the latter options by deriving from IModelColumn interface which I will explain as we go.
public interface IModelColumnUnbound : IModelColumn {
[Category("eXpand")]
bool ShowUnboundExpressionMenu { get; set; }
[Category("eXpand")]
[Required]
string UnboundExpression { get; set; }
}
XAF model editor is a highly sophisticated tool which has the capability to recognize that we extended the model. It then takes care of the vital step of adding an entry to the Add menu for creating Unbound columns.

Now it is possible to create a new type of column with 2 extra attributes as shown,

Moving on we need to set the mandatory PropertyName attribute shown above to an always existing object property name. Remember XAF requires this in order to behave as designed. To this end we are going to set as PropertyName the object’s key property name using this simple DomainLogic class,
[DomainLogic(typeof(IModelColumnUnbound))]
public class IModelColumnUnboundLogic {
public static string Get_PropertyName(IModelColumnUnbound columnUnbound) {
return ((IModelListView)columnUnbound.Parent.Parent).ModelClass.KeyProperty;
}
As a result (PropertyName, PropertyEditorType and Caption) attributes will be populated the next time we create a ColumnUnbound Node. However these will be fixed values and it is preferable to hide them from the end user. At the same time we need to mark Caption attribute as required and remove its default value. To do all of this we just need to extend our IModelColumnUnbound interface like this,

Note; Although PropertyName and Caption belong to IModelColumn using the new operator it is possible to override them!
We have now finished with the model modifications and for our ColumnUnbound nodes XAF by design will create a new column pointing back to object’s key property metadata.
The UI
A key benefit of XAF’s commitment to design patterns, specifically to the Single responsibility principle, is that it provides us with the model’s synchronizer classes. These can be used to synchronize our model with the control and vice versa. It is only necessary to derive from the abstract ModelSyncroniser<T,V> and implement ApplyModeCore method to synchronize the control and from SynchronizeModel to do the same with the model.
public class UnboundColumnSynchronizer: ModelSynchronizer<GridListEditor, IModelListView> {
public UnboundColumnSynchronizer(GridListEditor control, IModelListView model)
: base(control, model) {
}
protected override void ApplyModelCore() {
var xafGridColumns = GetXafGridColumns();
foreach (var column in xafGridColumns) {
var modelColumnUnbound = (IModelColumnUnbound)column.Model;
column.FieldName = modelColumnUnbound.Id;
column.UnboundType = UnboundColumnType.Object;
column.OptionsColumn.AllowEdit = false;
column.ShowUnboundExpressionMenu = modelColumnUnbound.ShowUnboundExpressionMenu;
column.UnboundExpression = modelColumnUnbound.UnboundExpression;
}
}
IEnumerable<XafGridColumn> GetXafGridColumns() {
IEnumerable<XafGridColumn> xafGridColumns =
Model.Columns.OfType<IModelColumnUnbound>().Select(
unbound => Control.GridView.Columns[unbound.PropertyName] as XafGridColumn).Where(column => column != null);
return xafGridColumns;
}
public override void SynchronizeModel() {
var xafGridColumns = GetXafGridColumns();
foreach (var xafGridColumn in xafGridColumns) {
((IModelColumnUnbound) xafGridColumn.Model).UnboundExpression = xafGridColumn.UnboundExpression;
}
}
}
The above code uses the GetXafGridColumns method to return the grid columns that correspond to IModelColumnUnbound nodes. The web implementation is very similar and can be found here.
All that is left is to register our UnboundColumnSynchronizer like this,
public class UnboundColumnController : ViewController<ListView> {
protected override void OnActivated() {
base.OnActivated();
var gridListEditor = View.Editor as GridListEditor;
if (gridListEditor != null)
gridListEditor.CreateCustomModelSynchronizer += GridListEditorOnCreateCustomModelSynchronizer;
}
void GridListEditorOnCreateCustomModelSynchronizer(object sender, CreateCustomModelSynchronizerEventArgs createCustomModelSynchronizerEventArgs) {
createCustomModelSynchronizerEventArgs.ModelSynchronizer = new UnboundColumnSynchronizer((GridListEditor)sender, View.Model);
}
}
Note; Setting ShowUnboundExpressionMenu to true is only supported by Windows platform. There, an end user can modify the UnBoundExpression by invoking Grid’s expression editor
Together with the unbound column Xpand allows for up to 5 different approaches to creating calculated fields. In the next post we will discuss the pros and cons of each approach so stay tuned!


In version 11.1.7 our team now provides workflow instance support outside XAF borders! With a few lines of code, it is now possible to store our workflows in any of the 14 database systems described in this post.
Durability is a key benefit of the Workflow Foundation and it is based on the ability to store a running workflow instance on the fly at almost any time.
To this end Microsoft workflow team implemented the SqlWokflowInstanceStore class. Using this class and a few lines is possible to store workflow instances in SQL Server as shown,
// Define SqlWorkflowInstanceStoreBehavior:
// Set interval to renew instance lock to 5 seconds.
// Set interval to check for runnable instances to 2 seconds.
// Instance Store does not keep instances after it is completed.
// Select exponential back-off algorithm when retrying to load a locked instance.
// Instance state information is compressed using the GZip compressing algorithm.
SqlWorkflowInstanceStoreBehavior instanceStoreBehavior = new SqlWorkflowInstanceStoreBehavior(connectionString);
instanceStoreBehavior.HostLockRenewalPeriod = new TimeSpan(0, 0, 5);
instanceStoreBehavior.RunnableInstancesDetectionPeriod = new TimeSpan(0, 0, 2);
instanceStoreBehavior.InstanceCompletionAction = InstanceCompletionAction.DeleteAll;
instanceStoreBehavior.InstanceLockedExceptionAction = InstanceLockedExceptionAction.AggressiveRetry;
instanceStoreBehavior.InstanceEncodingOption = InstanceEncodingOption.GZip;
host.Description.Behaviors.Add(instanceStoreBehavior);
The above code was copied from the "BuiltInConfiguration" demo, "InstanceStore1" project. This demo is described at "Built-in Configuration"
(http://msdn.microsoft.com/en-us/library/ee622978.aspx). You can download full sources of this demo and many others at "WCF and WF Samples for .NET Framework 4"
(http://www.microsoft.com/download/en/details.aspx?id=21459).
Following the same architecture our team implemented the DX WorkFlow Instance Store. eXpress Persistent Objects (XPO) is used for common objects storage and is fully capable of working transparently with 14 different database systems. For example to provide support for an Oracle database we could write,
//We create or connect to a database by setting the connectionstring
//This code will create 2 tables (XpoWorkflowInstance, XpoInstanceKeyc) in the database
using (var session = new Session()) {
session.ConnectionString = "Data Source=DevExpressInstanceStore;User Id=myUsername;Password=myPassword";
session.UpdateSchema(typeof(XpoWorkflowInstance), typeof(XpoInstanceKey));
session.CreateObjectTypeRecords(typeof(XpoWorkflowInstance), typeof(XpoInstanceKey));
}
// Define WorkflowInstanceStoreBehavior:
var dxInstanceStoreBehavior = new WorkflowInstanceStoreBehavior(
typeof(XpoWorkflowInstance), typeof(XpoInstanceKey), DevExpressConnectionString);
host.Description.Behaviors.Add(dxInstanceStoreBehavior);
dxInstanceStoreBehavior.RunnableInstancesDetectionPeriod = new TimeSpan(0, 0, 2);
dxInstanceStoreBehavior.InstanceCompletionAction = InstanceCompletionAction.DeleteAll;
You can download a modified version of the “BuiltInConfiguration” solution here. The console application starts a long running workflow that implements a counting service. Once the service’s start method is invoked, the service counts from 0 to 59. The counter is incremented every 2 seconds. After each count the workflow persists so you can close the application at any time and when you start it next time it will continue. A new one will be started from '0' value in addition to the loaded instances. The second project “InstanceStore2” in the solution provides the same functionality, however it is configured using the app.config file as shown,
<system.serviceModel>
<extensions>
<behaviorExtensions>
<add name="DevExpressWorkflowInstanceStore" type="DevExpress.Workflow.Store.WorkflowInstanceStoreElement, DevExpress.Workflow.Activities.v11.1"/>
</behaviorExtensions>
</extensions>
<services>
<service name="CountingWorkflow" behaviorConfiguration="">
</service>
</services>
<behaviors>
<serviceBehaviors>
<behavior name="">
<!--<sqlWorkflowInstanceStore
connectionString="Data Source=.\SQLEXPRESS;Initial Catalog=InstanceStore;Integrated Security=True;Asynchronous Processing=True"
hostLockRenewalPeriod="00:00:05" runnableInstancesDetectionPeriod="00:00:02" instanceCompletionAction="DeleteAll"
instanceLockedExceptionAction="AggressiveRetry" instanceEncodingOption="GZip"
/>-->
<DevExpressWorkflowInstanceStore
connectionString="Data Source=DevExpressInstanceStore;User Id=myUsername;Password=myPassword"
runnableInstancesDetectionPeriod="00:00:02" instanceCompletionAction="DeleteAll"/>
</behavior>
</serviceBehaviors>
</behaviors>
</system.serviceModel>
Note; All we need to do to use these code snippets in our code is to reference 'DevExpress.ExpressApp.v11.1.dll' and 'DevExpress.Workflow.Activities.v11.1.dl assemblies. Even though these assemblies are part of our eXpressApp framework they can also be used to support any other type of .NET application!
We are waiting to read your feedback about this. Remember that your questions are the best candidates for future posts.
Related Links
Blog posts
Online documentation
Videos


In this post we are going to extend the functionality of the workflow module. to create a UI that will help us to schedule workflows. Some of you may recall that we looked at using a Delay inside a While activity in Working with CRUD activities – Short Transactions. Recently, DX-Squad member Martin Praxmarer raised an interesting question relating to this topic:
I have the requirement to do a workflow which starts each day on 6 clock - searches for orderdocuments where a specific date is less then X days. I know I will do an do while loop, but workflow definition has 2 options, start when new object, start when criteria, so when do i start this Workflow?
In order to achieve this we will use the WorkFlow demo that ships with our framework. The first thing is to design our custom ScheduledWorkflow persistent object by implementing IWorkflowDefinition. We didn’t derive it from the existing WorkFlowDefinition object because it has properties like TargetObjectType and start up conditions.
public enum StartMode {
OneTime,
Daily,
Weekly
}
[DefaultClassOptions]
[Appearance("WeekDays", "StartMode <> 'Weekly'",
TargetItems = "RecurEveryWeeks;Moday;Tuesday;Wednesday;Thursday;Friday;Saturday;Sunday",
Visibility = ViewItemVisibility.Hide)]
public class ScheduledWorkflow : BaseObject, IWorkflowDefinition {
public ScheduledWorkflow(Session session)
: base(session) {
}
public bool IsActive {
get { return GetPropertyValue<bool>("IsActive"); }
set { SetPropertyValue("IsActive", value); }
}
public bool RuntASAPIfScheduledStartIsMissed {
get { return GetPropertyValue<bool>("RuntASAPIfScheduledStartIsMissed"); }
set { SetPropertyValue("RuntASAPIfScheduledStartIsMissed", value); }
}
[Association]
public XPCollection<ScheduledWorkflowLaunchHistory> LaunchHistoryItems {
get { return GetCollection<ScheduledWorkflowLaunchHistory>("LaunchHistoryItems"); }
}
[ImmediatePostData]
public StartMode StartMode {
get { return GetPropertyValue<StartMode>("StartMode"); }
set { SetPropertyValue("StartMode", value); }
}
public TimeSpan StartTime {
get { return GetPropertyValue<TimeSpan>("StartTime"); }
set { SetPropertyValue("StartTime", value); }
}
[Appearance("RecurEveryDays", "StartMode <> 'Daily'", Visibility = ViewItemVisibility.Hide)]
public int RecurEveryDays {
get { return GetPropertyValue<int>("RecurEveryDays"); }
set { SetPropertyValue("RecurEveryDays", value); }
}
public int RecurEveryWeeks {
get { return GetPropertyValue<int>("RecurEveryWeeks"); }
set { SetPropertyValue("RecurEveryWeeks", value); }
}
public bool Moday {
get { return GetPropertyValue<bool>("Moday"); }
set { SetPropertyValue("Moday", value); }
}
public bool Tuesday {
get { return GetPropertyValue<bool>("Tuesday"); }
set { SetPropertyValue("Tuesday", value); }
}
public bool Wednesday {
get { return GetPropertyValue<bool>("Wednesday"); }
set { SetPropertyValue("Wednesday", value); }
}
public bool Thursday {
get { return GetPropertyValue<bool>("Thursday"); }
set { SetPropertyValue("Thursday", value); }
}
public bool Friday {
get { return GetPropertyValue<bool>("Friday"); }
set { SetPropertyValue("Friday", value); }
}
public bool Saturday {
get { return GetPropertyValue<bool>("Moday"); }
set { SetPropertyValue("Saturday", value); }
}
public bool Sunday {
get { return GetPropertyValue<bool>("Sunday"); }
set { SetPropertyValue("Sunday", value); }
}
#region IWorkflowDefinition Members
public string GetActivityTypeName() {
return GetUniqueId();
}
public IList<IStartWorkflowCondition> GetConditions() {
return new IStartWorkflowCondition[0];
}
public string GetUniqueId() {
if (Session.IsNewObject(this)) {
throw new InvalidOperationException();
}
return "ScheduledWorkflow" + Oid.ToString().ToUpper().Replace("-", "_");
}
[Browsable(false)]
public bool CanCompile {
get { return false; }
}
[Browsable(false)]
public bool CanOpenHost {
get { return IsActive && !string.IsNullOrEmpty(Name); }
}
public string Name {
get { return GetPropertyValue<string>("Name"); }
set { SetPropertyValue("Name", value); }
}
[Size(SizeAttribute.Unlimited)]
public string Xaml {
get { return GetPropertyValue<string>("Xaml"); }
set { SetPropertyValue("Xaml", value); }
}
#endregion
public override void AfterConstruction() {
base.AfterConstruction();
Xaml = DCWorkflowDefinitionLogic.InitialXaml;
}
}
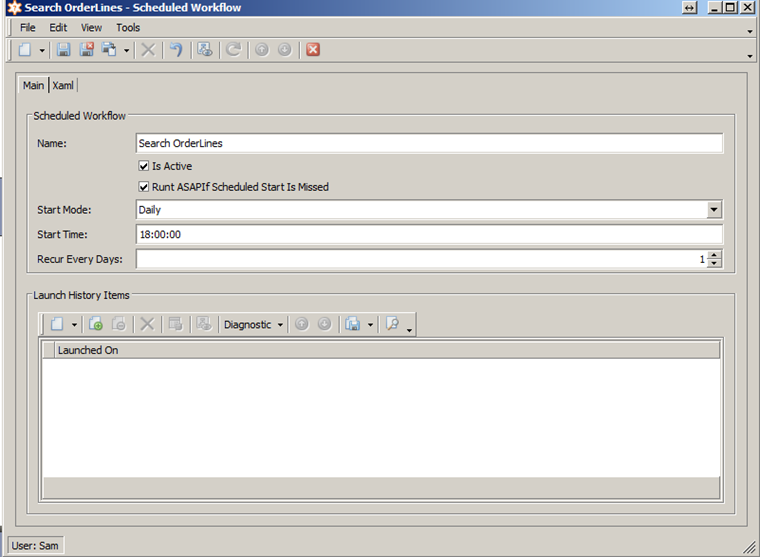
In the above class we have added some scheduled specific properties such as StartMode, StartTime, RecurEveryDays etc. The class has been decorated with the Appearance attribute to control the visibility of the Day properties. This means when StartMode <> 'Weekly these properties will be hidden.
Moreover there is a collection LaunchHistoryItems of ScheduledWorkflowLaunchHistory objects, which will be used later to check if the workflow has been launched.
public class ScheduledWorkflowLaunchHistory : BaseObject {
public ScheduledWorkflowLaunchHistory(Session session) : base(session) {}
public DateTime LaunchedOn {
get { return GetPropertyValue<DateTime>("LaunchedOn"); }
set { SetPropertyValue<DateTime>("LaunchedOn", value); }
}
[Association]
public ScheduledWorkflow Workflow {
get { return GetPropertyValue<ScheduledWorkflow>("Workflow"); }
set { SetPropertyValue<ScheduledWorkflow>("Workflow", value); }
}
}
After designing these classes, we now have all the required input in order to schedule our workflows.
The next step is to load our custom workflows by extending the workflow provider service as shown,
public class ScheduledWorkflowDefinitionProvider : WorkflowDefinitionProvider {
public ScheduledWorkflowDefinitionProvider(Type workflowDefinitionType) : base(workflowDefinitionType) { }
public ScheduledWorkflowDefinitionProvider(Type workflowDefinitionType, IObjectSpaceProvider objectSpaceProvider) : base(workflowDefinitionType, objectSpaceProvider) { }
public override IList<IWorkflowDefinition> GetDefinitions() {
IList<IWorkflowDefinition> result = base.GetDefinitions();
IObjectSpace objectSpace = ObjectSpaceProvider.CreateObjectSpace(); //don't dispose immediately
foreach(ScheduledWorkflow workflow in objectSpace.GetObjects<ScheduledWorkflow>()) {
result.Add(workflow);
}
return result;
}
}
After this we are ready to implement our final service that will schedule our workflows,
public class ScheduledWorkflowStartService : BaseTimerService {
private bool NeedToStartWorkflow(IObjectSpace objectSpace, ScheduledWorkflow workflow) {
if (workflow.StartMode == StartMode.OneTime) {
if (workflow.LaunchHistoryItems.Count == 0) {
return true;
}
} else if (workflow.StartMode == StartMode.Daily) {
var historyItem = objectSpace.FindObject<ScheduledWorkflowLaunchHistory>(CriteriaOperator.Parse("GetDate(LaunchedOn) = ?", DateTime.Today));
if (historyItem == null && DateTime.Now.TimeOfDay > workflow.StartTime) {
return true;
}
} else if (workflow.StartMode == StartMode.Weekly) {
throw new NotImplementedException();
}
return false;
}
public ScheduledWorkflowStartService()
: base(TimeSpan.FromMinutes(1)) {
}
public ScheduledWorkflowStartService(TimeSpan requestsDetectionPeriod) : base(requestsDetectionPeriod) { }
public override void OnTimer() {
using (IObjectSpace objectSpace = ObjectSpaceProvider.CreateObjectSpace()) {
foreach (ScheduledWorkflow workflow in objectSpace.GetObjects<ScheduledWorkflow>(new BinaryOperator("IsActive", true))) {
WorkflowHost host;
if (HostManager.Hosts.TryGetValue(workflow.GetUniqueId(), out host)) {
if (NeedToStartWorkflow(objectSpace, workflow)) {
host.StartWorkflow(new Dictionary<string, object>());
var historyItem = objectSpace.CreateObject<ScheduledWorkflowLaunchHistory>();
historyItem.Workflow = workflow;
historyItem.LaunchedOn = DateTime.Now;
objectSpace.CommitChanges();
}
}
}
}
}
}
Note; the service is not fully implemented, however its very easy to continue from this point. This code will live in the new Xpand.ExpressApp.Workflow module. Now, for the rest of the implementation I would like to ask the help of our community. Anyone that wants to finish it contribute it is most welcome!
Finally we modify the WorkflowServerStarter class and add this service,
private void Start_(string connectionString, string applicationName) {
ServerApplication serverApplication = new ServerApplication();
serverApplication.ApplicationName = applicationName;
serverApplication.Modules.Add(new WorkflowDemoModule());
serverApplication.ConnectionString = connectionString;
serverApplication.Security = new SecurityComplex<User, Role>(
new WorkflowServerAuthentication(new BinaryOperator("UserName", "WorkflowService")));
serverApplication.Setup();
serverApplication.Logon();
IObjectSpaceProvider objectSpaceProvider = serverApplication.ObjectSpaceProvider;
server = new WorkflowServer("http://localhost:46232", objectSpaceProvider, objectSpaceProvider);
server.WorkflowDefinitionProvider = new ScheduledWorkflowDefinitionProvider(typeof(XpoWorkflowDefinition));
//Add the service
server.ServiceProvider.AddService(new ScheduledWorkflowStartService());
We are now ready to go!
Related Links
Blog posts
Online documentation
Videos


