-
13.2 was a great release and many of you already upgraded your applications. For everyone else I am here to help you make that decision sooner and easier, by reminding you what our reviewers had to say, when they upgraded their apps to our latest major release.
These are real world feedback without any kind of interaction from us.
Gustavo Marzioni
Making Business Applications Easier
Gustavo is a veteran programmer (20 years+) with a great presence in our community (most active user in eXpandFramework). He posted a very complete review of all new XAF features and a few other interesting things we released with 13.2 as part of our DXperience subscription. In addition you can find a performance comparison for our new ReportsV2 module.
Mario Blataric
Dungeons of XAF and Magic 13.2
Mario reviews v13.2 and explains how XAF helps him to fight monsters in today’s modern dungeon of dev technologies and platforms. His XAF app has more than 1500 reports so he focuses on the ReportsV2 module.
Martynas Dauciunas
Devexpress 13.2 Review - why bother upgrading ?
Martynas known from his very useful Excel Import Wizard module wrote an extensive review of all new features and problems encountered when he updated his 12.x ERP/CMMS application to v13.2.
Manuel Gunder
DevExpress 13.2 Review Part 1
DevExpress 13.2 Review Part 2
DevExpress 13.2 Review Part 3
Manuel has already contributed many solutions. This time he wrote a great review for all new XAF features. He also reviewed components not integrated with XAF like the new TaskBarAssistant and as a bonus in part 3 he wrote how to create a module that integrated this component with XAF. This module will soon be integrated into our community project eXpandFramework.
Robert Anderson
DevExpress 13.2 Review - Part 1
DevExpress 13.2 Review - Part 2
Robert is a casual blogger and community contributor. He wrote about all new 13.2 features along with a few more tricks and thoughts which cannot be found in our official posts.
Until next time,
Happy New Year to all!

-
Our next major release (13.2), updates our Validation Module with more features that come with different behavior rules, such as Warnings and Information. These can be applied to your existing validation rules using code or the Model Editor.
The XAF validation module is a mature and flexible validation system, which allows you to create rules that can validate any business problem, For more information, check out the module documentation.
Suppose we have a Business Object that disallows saving a Customer if the Name property is blank. If this attempted the UI should respond with a “Everybody has a name!” message.
[DefaultClassOptions]
public class Customer : BaseObject {
public Customer(Session session) : base(session) { }
[RuleRequiredField("Customer_Name_Required", DefaultContexts.Save, "Everybody has a name!")]
public string Name { get; set; }
public string City { get; set; }
public int Age { get; set; }
}
When an end user tries to save the Customer without a name, XAF will show the Validation Error listview and consequently abort.

Creating a warning rule
A common requirement for our Customer class is to warn the end user that, if possible, he/she should provide the Customer’s city. To do this, we need to mark the City property with a RuleRequiredField. However, this time we have to set the ResultType to Warning as illustrated below.
[DefaultClassOptions]
public class Customer : BaseObject {
public Customer(Session session) : base(session) { }
[RuleRequiredField("Customer_Name_Required", DefaultContexts.Save, "Everybody has a name!")]
public string Name { get; set; }
[RuleRequiredField("Customer_City_Warning", DefaultContexts.Save, "Provide the City if possible",
ResultType = ValidationResultType.Warning)]
public string City { get; set; }
public int Age { get; set; }
}
When the end user saves the Customer (in runtime) providing a Name and not a City, XAF will again show the Validation Error listview however, this time there will be an extra Ignore action.

If the end user executes the Close action, the object will not be saved however if he executes the Ignore action it will be saved. In both cases in the detailview there will be a warning action by the City textbox to draw the end user’s attention.

Creating an Information rule
XAF allows you to create validation rules even at runtime using the Model Editor. So let’s say we want to just inform the end user, if he enters a Customer Age not between 10 and 60. This means that we need to use a RuleRangeField rule as illustrated in the next two images.


When the end user saves a Customer (in runtime) with an invalid Age range, XAF will not display the Validation Error listview at all. However, it will display an Information icon to draw his/her attention to the Age property.

Where to see more examples?
You may explore our FeatureCenter application located in your C:\Users\Public\Documents\DXperience 13.2 Demos\eXpressApp Framework\FeatureCenter\CS folder to see a few rules in action.
What about the web?
The validation module as a platform agnostic module works similarly for the web.

The soft validation is in its first release (CTP), thus we look forward to your feedback as we get it ready for it’s official release. Let me know what you think.

-
With our next major release (13.2), we have simplified the manner in which you are able to add custom and computed fields to existing business models. The functionality is available to both developers and end-users.
Once beta 1 is released, you can explore this new custom member functionality by exploring the FeatureCenter solution located in the C:\Users\Public\Documents\DXperience 13.2 Demos\eXpressApp Framework\FeatureCenter\CS folder.
Design time
As you know, XAF already offered the ability to create non-calculated persistent fields at design time using the Model Editor. In 13.2, we’ve extended the Application Model with an Expression attribute as illustrated in the image below.

When the Expression attribute has a value, XAF will create a calculated member or it will default to the creation of a persistent member. Additionally, you can create a complex expression such as the Sum of another custom field as illustrated below.

By design, XAF will not display these custom fields in any view since they were created manually after the Application Model was generated.
Runtime
The great thing is that in 13.2, end-users can use the runtime version of the Model Editor to create custom members and extend the business domain as discussed in the previous section.
The image below illustrates where to locate the custom member in the Windows version of our FeatureCenter (same location for the web).

To invoke the runtime Model Editor, end-users can execute the Edit Model action.

You may also want to restrict Application Model modification to certain user groups. You can do that as illustrated below.
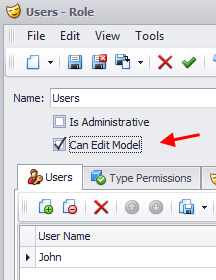
Developers can restrict end-users from creating custom members at runtime by setting the static ModelMemberRequiredCalculator.AllowPersistentCustomProperties to false.
The Web Runtime
To create a custom member for the web, you can use the Standalone Model Editor and edit the Model.xafml file located in the root of the web-site.
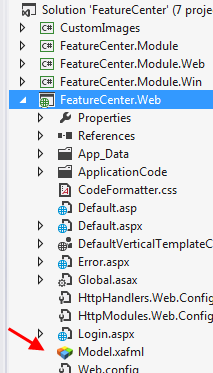
Custom members are in their first release (CTP) so we look forward to your feedback as we get it ready for the official release. Let me know what you think.

-
With the upcoming release of the eXpressApp Framework (version 13.2), we’re introducing a new way in which to create reports for your XAF powered application. Simply said, you’ll now be able to create your report using XtraReports within Visual Studio and effortlessly integrate them into your XAF applications.
This is an introductory post for the ReportsV2 module and I’ll describe it in more detail once we release. For now, please keep in mind that this will ship as a beta. We are looking forward to your feedback so we can continue to improve the module to meet your specific requirements.
To start using ReportV2, I’ll select it from the toolbox…

Because ReportsV2 integrates XtraReports at design time, you can use all the examples and documentation form our Reports Team. As you might imagine, when creating reports with this new module, you’ll be writing code and creating your own custom template within Visual Studio using your language of choice (C#, VB.Net). XAF will allow you to preview and print these new templates at runtime much like the existing Reports module. Since the design time report is a template, it is not editable at runtime, however, it is possible to clone it, make an editable copy and continue designing at runtime. In addition to native integration, ReportsV2 should make it easier for you to work with Stored Procedures, SubReports and hosting of custom components (this will be the subject of a dedicated blog post)..
To integrate XtraReports at design time, our team introduced two new components: the CollectionDataSource and the ViewDataSource. In the first beta release, you will need to add them to your toolbox manually.

The CollectionDataSource component
Drag and drop the component from the VS toolbox to the designer template of an XtraReport class. To create the XtraReports class, use existing XtraReports documentation. After setting up the ObjectTypeName to one of your domain objects the CollectionDataSource will load all objects properties as is.
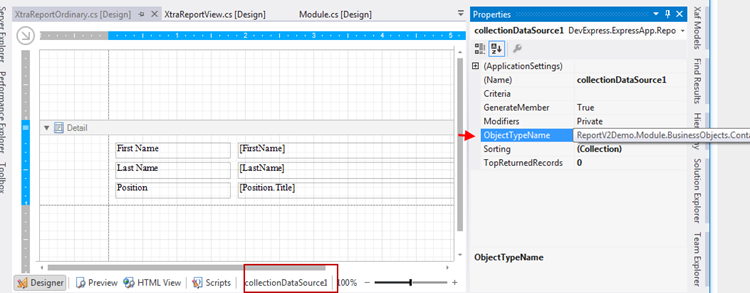
The ViewDataSource component
Much like CollectionDataSource, you will need to set the ObjectTypeName property. Note that the ViewDataSource component is designed to load only required plain data properties or aggregated calculations instead of the entire object hierarchy. As a result, you will get better performance and less memory consumption when you are dealing with thousands of records and complex data models. To configure the properties or expressions that will be used as a datasource, you can use the Properties collection as illustrated below.
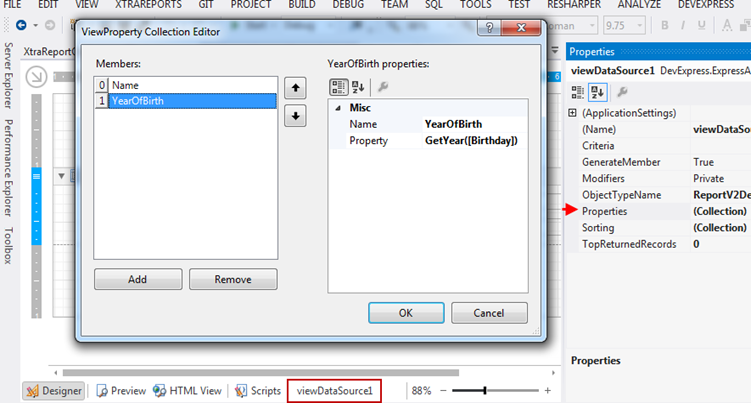
Runtime integration
To load the report you created at design time with the new module, we provide a ModuleUpdater subclass -PredefinedReportsUpdater - which can be used as shown in the snippet below.
public override IEnumerable<ModuleUpdater> GetModuleUpdaters(IObjectSpace objectSpace, Version versionFromDB) {
ModuleUpdater updater = new DatabaseUpdate.Updater(objectSpace, versionFromDB);
PredefinedReportsUpdater predefinedReportsUpdater = new PredefinedReportsUpdater(Application, objectSpace, versionFromDB);
predefinedReportsUpdater.AddPredefinedReport<XtraReportOrdinary>("Inplace Report", typeof(Contact), isInplaceReport: true);
predefinedReportsUpdater.AddPredefinedReport<XtraReportView>("Report with ViewDataSource", null);
return new ModuleUpdater[] { updater, predefinedReportsUpdater };
}
We’ve created a specific demo for the ReportsV2 module. It is located in your C:\Users\Public\Documents\DXperience 13.2 Demos\eXpressApp Framework\ReportsV2Demo folder.
Because ReportsV2 will ship as a beta, we do not recommend its use in production code. We do want to hear your thoughts on ReportsV2 and are looking forward to incorporate your feedback…so please let us know what you think…
!

-
Last week I had the privilege to join many of our customers at Oliver’s XAF Training Class in Germany. I wanted to take the time and share with you what happened at the event – as it was an amazing week and highly recommend it to all XAF users.
The location
The hotel is located high in the mountains and the above an amazing landscape…a simply beautiful location.

The agenda
Day 1:
The organizers (Oliver and John) did a great job with course content. You can see all the XAF courseware below.

Day 1 started with XPO and how it works independent of XAF. Oliver is an XPO legend so the introduction was amazing and even I learned some new stuff. Oliver then took the time to describe XAF Domain Components and other data layer related subjects.
The day continued with a number of hands on labs so everyone can learn by actually doing.
To help get relaxed after a busy day of learning, we spent some time on the golf course.

Day 2:
The day started with instruction on editing and maintaining the model as well as standard functionality available through it. Actions, controller extensions binding business logic was also on the menu.
Oliver is an experienced instructor and did great job in this topic area as well. Like day 1, hands on labs were on day 2’s agenda.

The day ended with time at the spa and a great dinner.
Day 3:
This day involved learning about the built-in modules in XAF and so Oliver spoke to us about Security, Validation, Printing, Reporting, Auditing, State Machines. We covered all simple modules with a few hours of hands on labs.
To blow off steam, John and Oliver organized an evening at the mini-car race track. Many of us gave it our best shot to win….

Unfortunately only one person can win…  .
.

Day 4
With spirits high, Oliver moved onto more advanced modules like XAF’s Scheduler, KPI, WorkFlow and of course a few hours of hands on labs. He also took the time to go further into more difficult topics such as extending and working outside the XAF framework.
The class insisted so I also did a presentation on eXpandFramework where I described how you can use all that extended functionality in our community project.
Day 4’s final event involved alcohol, so I’m not going to post any pictures here  .
.
Day 5
Unfortunately I had a early flight on the last day and couldn’t attend however I can share the daily agenda.
• Modularizing your own functionality
• Testing
• Deployment / Update / ALM / Security Considerations
• Q&A
Way to go to John, Oliver and DevExpress for this amazing XAF training week!
Until next time, Happy XAF’ing to all!

-
XAF it’s a great platform simply because everything is pluggable and reusable! In this post I will demonstrate one more pluggable and reusable contribution – the MapView module from Sergej Derjabkin!
Scenario: We have a business object which has an Address property and we want to display them in Google maps. However we have no time to research or develop anything by ourselves.
Step1: Install the MapView module by drag & drop from the toolbox.
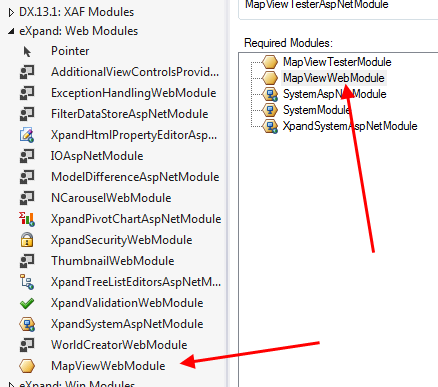
Step2: Open Application Model editor to configure from where the module will take its data. This requires that we locate the Customer in the BOModel node and simply change the attributes as illustrated below.

Step3: To display the Customer Addresses, the MapView module provides the MapListEditor. Simply install the MapViewWebModule and assign the list editor to the Customer_ListView.

Step4: Run the XAF web app and see the results in the map!

Bonus scenario: Display a detail view of the mapped address.
Sergej Derjabkin also contributed webmaster detail functionality which is available with XpandSystemAspNetModule so install it as in Step1 and set the MasterDetailMode attribute to ListViewAndDetailView. Youi ‘ll need to override the SupportMasterDetailMode of your WebApplication descendant and return true.

Simple and fast – the XAF way!
Sergej Derjabkin released his MapView module as a preview in eXpand v13.1.7.2 and asked me to get your feedback in order to develop further, so feel free to thank him personally and ask your questions or even contribute your code or ideas in eXpand forums. To see MapView module in action use the Demos/Modules/MapView/MapViewTester.sln found in eXpandFramework sources.

-
I can think many reason why Security is necessary when developing even the simplest online shop backend. I will not elaborate them but I will concentrate on how to empower the application prototype we created for our DXSK8 e-shop with a flexible Security System. Note that after this we really close to first paycheck 
I remind you that in previous post we applied a XAF layer(rich application) over an EF model located in an external lib (DSK8.Service). Now we will extend the same EF model to support XAF’s Security System.
1) Design Entity Framework Model for the Security System objects.
XAF’s Security system uses Users, Roles and Permissions to configure both the data access and the UI generation for both platforms! This is done with the help of a few system interfaces such as :
User: ISecurityUser, IAuthenticationStandardUser, IOperationPermissionProvider
Role:, IOperationPermissionProvider.
Our EF model from the DXSK8.Service project already contains an Employee entity which is perfect to take the role of XAF’s system user. Therefore, first we need to add all public properties of the user depended interfaces to our Employee entity. Do not worry XAF interfaces are well designed and its just 3 properties as you see below. The UserName in the black frame already existed in our Login entity that's why is not in the Employee entity with the rest of the new fields. However XAF has no problem to understand it as is!

Next step is to design the Roles and Permissions objects. I will go only for a Type Permission system although XAF supports member level and criteria based as well. So I only need the bellow Roles, TypePermissionObject entities.
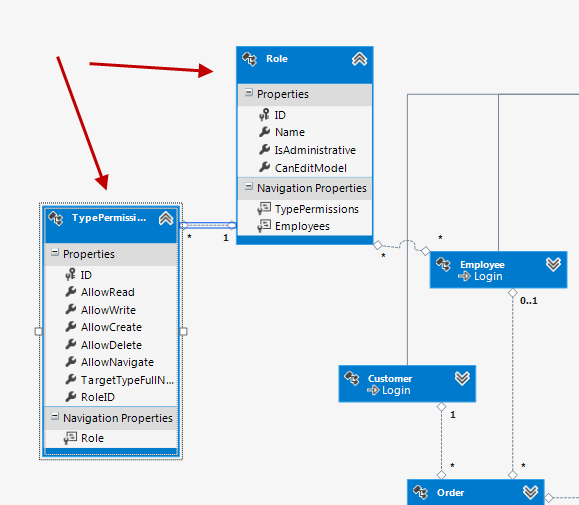
The database migration should be done as suggested from EF and I will not elaborate but I followed a standard technic as the one described in Code First Migrations.
Note: We also need to use partial classes to implement the consumed interfaces however their implementation is rather easy and reusable for example let’s see how easy it is to implement the Employee interfaces. For Role, TypePermissionObject implementation please check post’s sample (See also How to: Implement Custom Security Objects (Users, Roles, Operation Permissions))).
[ImageName("BO_User"), DefaultProperty("UserName")]
public partial class Employee : ISecurityUser, IAuthenticationStandardUser,
IOperationPermissionProvider {
#region IOperationPermissionProvider
IEnumerable<IOperationPermissionProvider> IOperationPermissionProvider.GetChildren() {
if (!Roles.IsLoaded) {
Roles.Load();
}
return new EnumerableConverter<IOperationPermissionProvider, Role>(Roles);
}
IEnumerable<IOperationPermission> IOperationPermissionProvider.GetPermissions() {
return new IOperationPermission[0];
}
#endregion
#region ISecurityUser
Boolean ISecurityUser.IsActive {
get { return IsActive.HasValue && IsActive.Value; }
}
String ISecurityUser.UserName {
get { return UserName; }
}
#endregion
#region IAuthenticationStandardUser
Boolean IAuthenticationStandardUser.ComparePassword(String password) {
var passwordCryptographer = new PasswordCryptographer();
return passwordCryptographer.AreEqual(StoredPassword, password);
}
public void SetPassword(String password) {
var passwordCryptographer = new PasswordCryptographer();
StoredPassword = passwordCryptographer.GenerateSaltedPassword(password);
}
Boolean IAuthenticationStandardUser.ChangePasswordOnFirstLogon {
get { return ChangePasswordOnFirstLogon.HasValue && ChangePasswordOnFirstLogon.Value; }
set { ChangePasswordOnFirstLogon = value; }
}
String IAuthenticationStandardUser.UserName {
get { return UserName; }
}
#endregion
}
2) Install XAF Security System
Although XAF has strong design time support I will go through this step using one line of code in both Program.cs and Global.asax.cs just before application.Setup() call.
application.Security = new SecurityStrategyComplex(typeof(DXSK8.Service.Employee), typeof(DXSK8.Service.Role), new AuthenticationStandard());
application.Setup();
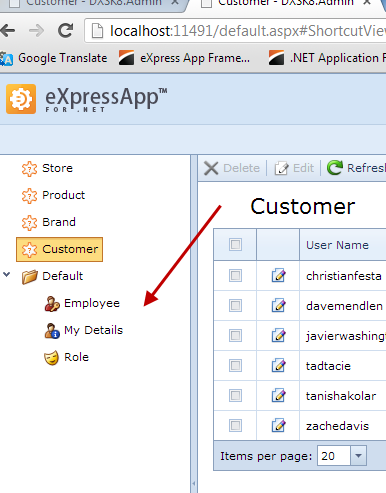
The above snippet will apply a security strategy using the Entity Framework entities located in the external DXSk8.Service lib . For this type of security strategy XAF spares our time as usual and will automatically display a customizable credentials window for both platforms,

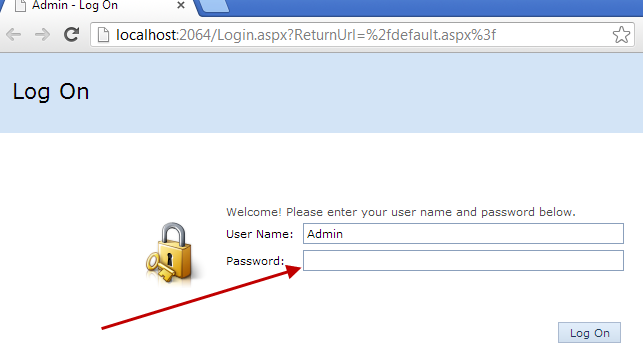
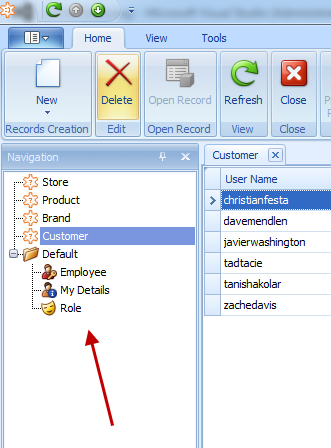
In addition XAF will detect the custom Security EF Entities we designed in step 1 and will auto populate the navigation menu.
Win
 | Web
 |
| | |
3) Supply initial data
Always when installing a security system make sure that some one knows the password  . We forgot to add at least a user with admin privileges. For this job an appropriate event to use is XafApplication’s CustomCheckCompatibility event inside our platform agnostic module.
public override void Setup(XafApplication application) {
base.Setup(application);
application.CustomCheckCompatibility+=ApplicationOnCustomCheckCompatibility;
application.CreateCustomObjectSpaceProvider += ApplicationOnCreateCustomObjectSpaceProvider;
}
void ApplicationOnCustomCheckCompatibility(object sender, CustomCheckCompatibilityEventArgs e) {
var objectSpace = e.ObjectSpaceProvider.CreateUpdatingObjectSpace(true);
var updater = new Updater(objectSpace, Version.Parse("1.0.0.0"));
updater.UpdateDatabaseAfterUpdateSchema();
}
and the UpdateDatabaseAfterUpdateSchema where we created:
a) A Content Manager role with CRUD on Product but ReadOnly on Orders/Employees
b) A Sales Manager role wirh CRUD on Order but ReadOnly on Product/Employees
public override void UpdateDatabaseAfterUpdateSchema() {
base.UpdateDatabaseAfterUpdateSchema();
if (ObjectSpace.FindObject<Employee>(CriteriaOperator.Parse("UserName=?","Admin")) == null) {
var roleAndUser = CreateRoleAndUser("Admin");
roleAndUser.IsAdministrative = true;
CreateRole("Content Manager", new[]{
CRUDPermission(typeof(Product)),
ReadOnlyPermission(typeof(Order)),
ReadOnlyPermission(typeof(Employee))
});
CreateRole("Sales Manager", new[]{
CRUDPermission(typeof(Order)),
ReadOnlyPermission(typeof(Product)),
ReadOnlyPermission(typeof(Employee))
});
var employees = ObjectSpace.GetObjects<Employee>();
foreach (var employee in employees) {
employee.IsActive = true;
employee.ChangePasswordOnFirstLogon = true;
}
ObjectSpace.CommitChanges();
}
}
In post’s sample you can explore the implementation of the rest of the methods which is really simple.
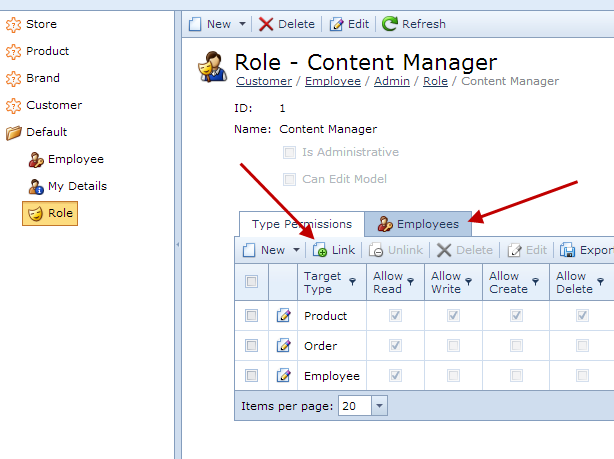
The rest of the job needs a business user to simply associate Employees with Roles using XAF’ well thought UI. For example in the next two shots we see how to assign a Content Manager Role to a list of users.

Conclusion
Trying to focus in solving business problems with the help of technology is hard. Therefore tools like XAF that bridge those two worlds are like god gifts. We saw how easy was to integrate a complex and sensitive feature like security while working with EF as datalayer. Thanks to the flexible and well designed XAF our product now can be market easier since it features a complete security system.
This time I will close with a phrase I hear constantly from our customers lately:
XAF really works!
Download sample from here and attach the mdf file found in DXSK8.Service/App_Data folder to your SQL instance. Also make sure you already visit How to: Get Started with the Entity Framework Model First in XAF to be sure you know the basics.
.

-
XAF already provides strong and flexible validation for any object that fits specified Rules with build-in the Validation Module. In this post you can find a sample XAF application which extends the Validation to provide support for Warning/Information messages.
The implementation uses any Validation Business Rule that exists in XAF’s Application Model. Below we see the default ones but its applicable to custom business rules as well.

The sample code extends the Application Model of IModelRuleBase and by using one more property like RuleType marks the rule as warning or information as shown:

When the Validation occurs this implementation will not raise exceptions for Warning and Information Rules and will change their notification icon accordingly.
Windows

Web

By default, it is also possible to create business rules that evaluated when an object is changed by using the ObjectSpaceObjectChanged custom context (see also Contextual Validation Concepts).
To use this RuleType functionality discussed today in your XAF Applications you need to download the sample from RuleType.zip. The functionality is described by just one controller in RuleTypeController.cs which is spanned across the platform agnostic and platform depended projects.
Note: I “borrow” the code for RuleType support from our community project expandframework and for one more time we clearly see how flexible is XAF and how powerful to provide reusable solutions!
P.S.: The original eXpand implementation has code support using a RuleTypeAttribute as well as ListView support and can be found in Xpand.ExpressApp.Validation, Xpand.ExpressApp.Validation.Win and Xpand.ExpressApp.Validation.Web assemblies (See also this discussion in eXpand’s forums).

-
Imagine that we have already build a mobile app using DXTREME such as the DXSK8 demo and already have a ready-to-use Entity Framework data model. Now we are faced with a task to provide a rich administrative application that will be mainly used in Intranet from the desktop (Windows) or web browser. This application should have a typical CRUD UI for managing goods in an online shop, content on our main web site, etc. and of course have potential for future extensibility and customization by a customer request. Following the instructions of this post it should be easy to do it your self from scratch in less than five minutes! (Sample app at then end of this post).
1) Create a XAF Cross-platform application
Create a new XAF solution called DXSK8.Admin by using the DXperience v12.2 XAF Cross-Platform Application project template as shown below.

Below we see the created solution which contains two ready to run XAF applications (DXSK8.Admin.Win, DXSK8.Admin.Web) and three empty XAF modules where the DXSK8.Admin.Module is the platform agnostic one. We are going to work in the platform agnostic module because we want to minimize code duplication between our Win and Web XAF applications.

2) Adding Entity Framework model types to XAF
XAF auto generates rich CRUD UI for our data using our award-winning DevExpress visual components. However our Entity Framework model is located in an external library so in our platform agnostic module we need to reference the EF model container which is the DXSK8.Service assembly along with the System.Data.Entity and DevExpress.ExpressApp.EF assemblies.

Next its time to add the all the EF model entities in our application business model by using the following code in the constructor of this platform agnostic module.

public sealed partial class AdminModule : ModuleBase {
public AdminModule() {
InitializeComponent();
AdditionalExportedTypes.Add(typeof(DXSK8.Service.Customer));
AdditionalExportedTypes.Add(typeof(DXSK8.Service.Address));
AdditionalExportedTypes.Add(typeof(DXSK8.Service.Brand));
AdditionalExportedTypes.Add(typeof(DXSK8.Service.Employee));
AdditionalExportedTypes.Add(typeof(DXSK8.Service.ImageSource));
AdditionalExportedTypes.Add(typeof(DXSK8.Service.Login));
AdditionalExportedTypes.Add(typeof(DXSK8.Service.NotificationChannel));
AdditionalExportedTypes.Add(typeof(DXSK8.Service.Order));
AdditionalExportedTypes.Add(typeof(DXSK8.Service.OrderItem));
AdditionalExportedTypes.Add(typeof(DXSK8.Service.Person));
AdditionalExportedTypes.Add(typeof(DXSK8.Service.Product));
AdditionalExportedTypes.Add(typeof(DXSK8.Service.ProductFlavor));
AdditionalExportedTypes.Add(typeof(DXSK8.Service.ProductType));
AdditionalExportedTypes.Add(typeof(DXSK8.Service.Store));
}
As a result now the XAF Application Model contains all types from the EF model and we are ready to use it we are ready to modify the auto generated Views, define the navigation structure or empower our app with built-in or open source modules.
For example in the sample app in the end of the post we used the Model Editor to modify the model of the platform agnostic module and create a Navigation menu for both platforms as shown:

Note: Creating Navigation Items is fully described in XAF docs (Add an Item to the Navigation Control). In addition you can find a detail tutorial and a big list of How To that can help you get the most out of XAF really fast!
3) Switch the Application to Using the Entity Framework
We continue to work in the platform agnostic DXSK8.Admin.Module. To use the EFObjectSpace instances to access data we need to provide an IObjectSpaceProvider implementation designed for EF and located in DevExpress.ExpressApp.EF assembly. For this we need to modify again our Module.cs codebehind class as shown. Note that EFObjectSpaceProvider’s first parameter is Entity Framework’s ObjectContext implementation from DXSK8.Service project.
public override void Setup(XafApplication application) { base.Setup(application);
application.CreateCustomObjectSpaceProvider += ApplicationOnCreateCustomObjectSpaceProvider;
}
void ApplicationOnCreateCustomObjectSpaceProvider(object sender, CreateCustomObjectSpaceProviderEventArgs e) {
var typesInfo = (TypesInfo)Application.TypesInfo;
const string metadata = "res://*/SK8Data.csdl|res://*/SK8Data.ssdl|res://*/SK8Data.msl";
const string provider = "System.Data.SqlClient";
var objectContextType = typeof(DXSK8.Service.SK8DataContainer);
e.ObjectSpaceProvider = new EFObjectSpaceProvider(objectContextType, typesInfo, null, e.ConnectionString, metadata, provider);
}
Note: XAF will not modify the schema of your existing database!
Conclusion
Microsoft recommends when accessing data to use Entity Framework, which from v5 is open sourced and has an unlimited list of add-ons and really big audience. We used this amazing technology to create the DXSK8 data service and in this post we demoed how to use XAF with three simple steps to manage its content by creating rich CRUD UI views as below on the spot. Therefore it should be clear that we can deliver app prototypes for our EF models really fast and our end users can enjoy access to their data with modern UI look & feel from day one! Note that XAF has a lot of build-in and open sourced modules that can be install with a simple drag and drop and can save you months of work.
In the next images we see two of the default auto generated XAF CRUD Views one for each platform (Win and Web).


For those of you that you have Entity Framework models and you want to try these instructions on them you may download an XAF trial from here.
Sample Download (Contains DXSK8.Service project as well).
In next post we will continue with a discussion over reusable EF models in XAF stay tuned!
We would appreciate your feedback on this post. Has it been useful to you? Feel free to contact us with any further questions.
Until next time,
Happy XAF’ing!

-
Recently we made the decision to clone our Winforms VideoRent real world application and create a new XAF application – the XVideoRental. Wearing my LEGO designer hat  I will go through all migration steps as if I were in your shoes.
XVideoRental uses only a small part of XAF tooling –>Native modules + Code Central examples + open sourced project and community resources. All the time invested was for gathering ready to use implementations and putting them in a reusable project agnostic library. In addition since all these ready to use implementations exist already in our community project (eXpand) we created a second open source version of XVideoRental where this project agnostic library does not exist so we consumed even less resources for building it!
As you can read in the overview post the XVideoRental contains almost zero designed time code and everything is described declaratively in XAF’s Application Model xafml file, allowing full customization after distribution.
Real world applications are really demanding. We spend huge times for first release and in most cases is very poor compared to the next ones. The reason is simple, we do not have enough time to prepare a domain-specific language (DSL) that will bridge business requirements with our existing technical tooling/knowledge. Therefore we try to re-invent the wheel in many areas whereas XAF exists as the most comprehensive tooling available. Using application model and the Security System, XAF fully describes and configures the behavior of platform agnostic applications. Both Application Model and Security System are the technology abstraction or in other words the DSL language we need to minimize the time to market cost of a real world application.
We recommend:
1. Watch the BUILDING A PROJECT MANAGER APPPLICATION IN 5 MIN video where we used the same LEGO designer approach as in XVideoRental in a simpler application as our MainDemo.
2. Go for a quick overview of XVideoRental by reading XVideoRental real world application (RWA) – The overview.
3. Go through the next table where from these simple statistics it should be clear the tremendous gain we get when developing with the XAF way.
| | Number of projects | Classes | Lines of code |
Legacy VideoRent
Location: | Four non reusable projects | 256 | 27965 |
| XAF XVideoRental | • 1 project agnostic library
• 1 non reusable module
• 1 front end application almost unmodified as created from VS templates | -
77
5 | -
806
126 |
| Open Sourced XVideoRental | • References open sourced libs (project agnostic lib not exist)
• 1 non reusable module
• 1 front end application almost unmodified as created from VS templates | -
36
5 | -
807
126 |
In short the legacy app is using 256 classes. The XVideoRental much less 77 and 90% or them are simply concrete implementations from the referenced project agnostic library. However in the 3rd row where this project agnostic library is replaced from a reference to our open source project that number of classes goes further down to only 36!
Legacy app location: %Public%\Documents\DXperience 12.2 Demos\Common\DevExpress.VideoRent.Win\CS\
XAF app location: %Public%\Documents\DXperience 12.2 Demos\eXpressApp Framework\XVideoRental\CS\
Open source XAF app location: http://www.expandframework.com/downloads/download.html –>Demos\XVideoRental\
4. Finally go through the list bellow where we compare the legacy and XAF application side by side.
Legacy VideoRent | XAF XVideoRental |
| Data Access | |
| • Legacy app uses ORM technology and our XPO to describe the video rent business. However special skills needed and extra efforts to create a clear separation from other layers, so many helper classes exists even for very common tasks such as database connectivity. | • XAF has built-in support for both XPO and MS Entity Framework. We can simply utilize the legacy domain model by simply copy- paste the classes. Helper classes are of no use because XAF can handle all common tasks transparently for us! |
| • A real world application requires an importing mechanism for initial data. The legacy app imports data from xml files with structure that fits exactly to the structure of the business objects. Therefore even for a small change in the BO design we need to modify and retest this mechanism. | • XVideoRental plugs-in an abstract domain agnostic importing engine from Fast prototyping requires an initial data import mechanism, allowing us to modify the structure of BO in the minimum time possible. In addition how to Supply Initial Data is well documented sparing our time for making architectural decisions. |
| • In a real world application sequential number integration is essential. However special design and knowledge is needed to be able to build something reliable. | • XVideoRental operates under a business application framework therefore a rich click and run SDK provides solutions to such common problems E2829. So the developer only needs to integrate and not to think about the technical difficulties or guess the showstoppers. |
| Architecture | |
| Legacy app has a design time modularization based on Forms/UserControls/(Bussiness Concept). However it is not possible to extended it without adding new Forms and recompiling the whole application inside VS. In addition because of the lack in documentation determining the best place to write code for a specific behavior can still cause big headaches.
Application life cycle is component centric and was invented on demand for the current application. | XVideoRental demo is using XAF’s well-documented and simple to use MVC architecture. Also, while the discussed application is a simple fat client app, demanding users looking for something more advanced may also find a ready to use client-server solutions in XAF.
• VS templates to fast create modules. which by design are reusable and independent from main application.
• Well documented Application life cycle guide us where we to write code (e.g. Setup, Login, View Activation etc.)
• Simple to follow tutorial on how to Extend Functionality.
• Detailed guide of all the main concepts for building business applications. |
| Data Validation | |
| A real world application without strong validation support is unstable and has huge support times.
Building a validation engine is not trivial at all and requires third party components which will raise the cost even further.
Therefore the legacy application time frame and budget wouldn’t allow any investment here and there is no validation support. | Creating validation rules does not require you to be a developer, even end-users can create them because it is quite easy and intuitive, not more difficult than creating a filtering rule in your Outlook. We only need to install the build-in Validation module!
|
| Data Representation | |
| The legacy application a large number of components. Therefore the developer requires A huge amount of mundane, repetitive work was invested to: | XAF has native support for a large number of DX components. Automatic UI generation (CRUD detail and list forms, navigation and menu systems - all based on data models). This is a huge time saver because almost every typical business application contains a good percentage of list and detail forms, navigation and menu systems - all linked together without any effort from your side. |
| • Create a large number of data entry forms, drag & drop numerous controls on it, arrange their positions and configure data bindings
• Providing a consistent look and feel is not an easy job and requires deep knowledge of a large number of components as well as a special design
• Interact with the database through XPO, create CRUD operations and support transactions needs careful considerations and a lot of time, so it was done as basic as possible by simply pushing non mandatory tasks such as undo operations and transaction for the next application release  . .
• In an agile real world the navigation menu system should be controlled as declaratively as possible. However legacy app does not conform this requirement resulting in huge update times for every customer request.
• Extend XtraReports for every Business object we want to create reports.
• Design reports inside VS making their support impossible in real world.
• Design analysis views inside VS making their support impossible in real world. | • We plugged-in a mechanism that allows to control any component at runtime from Dressing up our classes – Date with a model tonight!.
• A business rule driven Pivot editor borrowed from How to rule the Pivot we showed how to marry business requirements with a complex component like Pivot.
• Legacy code was converted on the spot to declarative as in Tooltips to the max - expressive UI.
• From Visiting dashboards we add a ready to use extension that provides collaboration for our views.
• We went over expectations by simply installing a community module from Dashboards in the real world – A Scotland strike. |
| Application Configuration | |
| Although most of the components can persist their state there is no application level integration by default. In addition their serialization is not designed to be human friendly and its hard to edit and support. The legacy developer had to create an integration mechanism deep in application’s infrastructure. This costly. wrap-up was as basic as possible and target only a few major forms producing a non consistent feeling. | XVideoRental is a XAF application which by design is described declaratively in XAF’s Application Model. Using Model Editor at runtime an end user can modify any part of the app.
However we didn’t spend the 10 min required to plugin the ModelDifference community module and consume the application from a persistence storage such as a database cause we were building a clone and not demo the endless features of XAF!
Zero migration resources for this one!
|
| Application Security | |
| The legacy developer tried to create a basic security implementation. However he soon realized that the efforts needed for something useful and reliable will probably exist the efforts for building the whole application. So, unfortunately due to app budget there is no investment in implementing a security system. | Our time frame here was really loosed since we already have a mature plug n’ play Security module. This flexibility allows us to plugin more goodies such as User Friendly permissions and metadata based permission policies
|
| Reporting | |
| The major goal of business applications is to be able to create and print reports.
Therefore the legacy app has a dedicated project for reporting. In which the developer had to use Visual Studio for report design. As a result he loosed any chance to update them on demand after project distribution which is a really common case.
At the same time the reports were extended and bound to VideoRent business objects making the whole implementation not reusable from any other project.
| XVideoRental uses the built-in Reports Module which natively integrates our award winning XtraReports suite and provides a runtime designer.
The module saves the reports in the database so our job was to copy paste the Reports layout from the legacy app and distribute them as discussed in Distribute the Created Reports with the Application.
Moreover we provided collaboration/filtering with other views using as usual a no code approach as discussed in Visiting dashboards. |
| Data Printing and Export | |
| The legacy developer had to write special code for each control on your forms that he wished to print or export. Although this functionality is very useful in real world again the time frame wouldn’t allow such an investment.
| XVideoRental can export data from the grid, pivot, chart, tree view, layout and others to a wide number of formats (PDF, RTF, TXT, CSV, HTML, MNT, XLS, XJSX, PNG, GIF, JPG, BMP, TIFF, WMF, EMF) without spending not even 1 minute to install or configure the system!
You probably can guess why eh? As usual XAF has a built-in generic mechanism for all controls out of the box! |
| Data Analysis | |
| Legacy app has a whole structure to support only a few data analysis views for the 4 major BO which are Customer, Movie, Receipt and Rent. Huge amount of code is located in dedicated forms for each analysis views making the solution not able to survive in real world. The reason of course is that for each new customer request the developer has to change the code inside VS recompile and redistribute the app. A common example is a calculated value where it needs a UI to define these members, special algorithms to create them | XVideoRental uses the build-in Pivot Chart Module which as usual shifts development to the runtime allowing business users to modify the analysis display at any time. Uses the extended Pivot from How to rule the Pivot. Empowering the app with the dashboard suite as in Dashboards in the real world – A Scotland strike! was as simple as drag & drop the module from VS toolbox!. Essential for data analysis runtime calculated members as in Domain Components+ Calculated properties + Application Model was in the menu as well.
|
| Localization | |
| There are technics for localizing .NET application via satellite assemblies however they do not localize application specific data and they are very time consuming, so the legacy app does not support any kind of localization
| XAF supports all standard localization approaches and also addresses the problems that occur with them. With XAF, it is always possible to localize any part of your application at runtime (e.g., correct certain values from satellite assemblies). A convenient wizard provides the capability to use online translation services from MS, Google, etc. So, it is possible to leave the localization job to non-programmers who can easily import/export data without leaving the application. |
| Customizing Controls Appearance | |
| Even for the simplest operation like making bold a grid column or hiding a control from a view developer time is needed as long as recompilation and redistribution of the application | XVideoRental addresses this declaratively using the Conditional appearance module and the technic described in Dressing up our classes – Date with a model tonight! where any component can be serialized and controlled declaratively from XAF’s application model using the runtime Model editor.
This is control-agnostic and we spared our time digging into the specifics of each control – XAF did everything for us!
|
| Implementing Custom Business Requirements | |
| Lets talk a concrete example here. The legacy app uses tooltips to create a more expressive UI. However even if the developer wrote a decoupled class at the end he has to attach it to various controls and forms. This makes the whole design not flexible since changes require developer presence. | XVideoRental can use the same decoupled class from the legacy application. However it simply attaches the behavior to application model instead of attaching it to controls and forms. This solution is project agnostic and allows later changes from a non programmer at runtime! This process is discussed in details in Tooltips to the max - expressive UI.
|
| Getting Help and Support | |
| Application and developer are simply married. If for any reason they divorced then everything becomes very unstable and tricky. It is really hard to find another developer to continue support a legacy app. Even if we manage to do so the cost will be extremely high since there are no docs, support etc. | XVideoRental uses bricks/samples from XAF’s code central and community project. Thus by design there is a large number of developers that can support its code base. Not to forget the unmatched documentation and support we can get from the XAF team.
|
| | |
Conclusion
Even thought XAF does not contain solutions to each and every business problem in the world, the framework is very strong in providing its own extensibility ( "preventing the lock-in effect"). It is fast and easy to plugin solutions to common business problems, at the end XAF is a Domain Specific Language that that can bridge business requirements with our existing technical tooling/knowledge!
Until next time,
Happy XAF’ing!

-
XAF community is really active, there are many places where you can participate in XAF related conversations, ask for dedicated help from other devs etc. Depending on your choice, to follow anything new comes along you can subscribe to your favorite RSS or site for the following list.
| XAF official RSS | Posts from our blog. |
| XAF Facebook page | Official XAF Facebook page (includes blog posts). |
| XAF Facebook group | Join other XAF users there and discuss anything XAF related with them. |
| XAF LinkedIn group | A XAF dedicated group on Linked. |
| XAF twitter | Tweets new posts. releases etc. (Follow us to get notified). |
| Other XAF bloggers RSS | A list of several personal XAF related posts. (Apostolis Bekiaris, Dennis Garavsky, Manuel Grundner, Mike Calvert:, Nathanial Wools, Robert Anderson, Martynas Dauciunas and more.
Let me know at [email protected] if you want to ride this feed as well. |
| | |
| eXpand Twitter or Tweeterfeed | Tweets everything in this list plus new eXpand releases plus new Git commits. |
| eXpand’s main RSS | The most complete XAF info source currently available. Contains everything is XAF/eXpand related from official XAF and community sites. |
| Samples’s forum | A forum dedicated to community samples/ideas. Feel free to post anything interesting there. We will review it and add it to eXpand’s code base. |
In addition if you or your company are doing XAF consultancy or trainings, feel free to contact us to get you listed in our XAF consultancy page.

-
The DevExpress Universal Subscription now includes an interactive data visualization Dashboard for Windows, the Web and Mobile devices. DevExpress Dashboard helps you deliver solutions that allow any enterprise to visually explore business trends using stunning and easily understood performance indicators.
If you are an XAF user, you already know that a framework such as XAF provides reusable building blocks to quickly build feature-rich business applications for Windows or the Web. In this post, I’ll discuss how Stephen Manderson, an XAF user from Scotland merged the capabilities of XAF and DevExpress Dashboard to create a new reusable XAF Dashboard module.
To best demo this Dashboard integration, we’ll use our XVideoRental RWA demo. The sample is available for your review at the bottom of this post.
XAF users already know that dashboard support is part of the shipping product. A few days ago I posted Visiting Dashboards where I discussed possible use case scenarios and extensions of the native implementation in order to deliver dashboard solutions to address real problems without writing any code!
Stephen Manderson was recently asked by a customer if it was possible for end users to create dashboards without going through IT to request changes and modifications to their system. The solution as you can imagine was the migration of the Dashboard Suite to his XAF application.
Stephen’s goals were simple.
- Create dashboards like any other BO at runtime.
- Pass any number of Target Persistent Object as data sources.
- Restrict access to dashboards based on Roles.
The DashboardDesigner
This step is really easy, we only need to drag this DashboardDesigner component into a simple empty windows form:
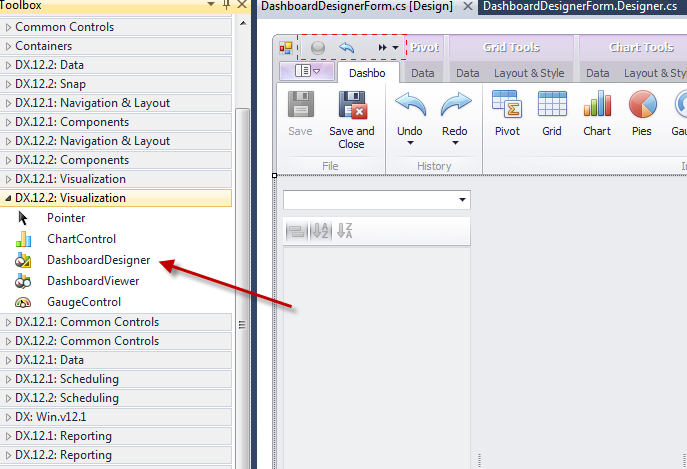
Displaying custom forms in XAF requires no special skills and is well documented: How do I show a custom window?
Create dashboards like any other BO at runtime
Working with XAF is straight forward. We have a DX component (DashboardDesigner) and we want to integrate it. Almost all our components are serializable and the DashboardDesigner is no exception. This means that we need a Persistent object to host the Xml for the layout and a collection of XAF BO Types that will be assigned as data sources.
To start we can use the following interface:
public interface IDashboardDefinition {
int Index { get; set; }
string Name { get; set; }
Image Icon { get; set; }
bool Active { get; set; }
string Xml { get; set; }
IList<ITypeWrapper> DashboardTypes { get; }
}
For the sake of simplicity I wont post the full implementation however you can grab it and follow its history in eXpand’s github repo or in the sample at the end of this post.
The Xml property along with the Designer’s LoadFromXml method can be used to load the Designer’s layout. So we need:
- To create a SimpleAction in a ViewController. We choose a ViewController instead of any other Controller simply because targeting a certain view and not the whole app.
- Then we configure the controller a bit further, to activate it only for BO that implements IDashboardDefinition.
- Finally we subscribe to SimpleAction’s Execute event, and we load the Windows form with the Dashboard designer component.
public class DashboardDesignerController : ViewController {
readonly SimpleAction _dashboardEdit;
public DashboardDesignerController() {
_dashboardEdit = new SimpleAction(this, "DashboardEdit", PredefinedCategory.Edit);
TargetObjectType = typeof(IDashboardDefinition);
_dashboardEdit.Execute += dashboardEdit_Execute;
}
public SimpleAction DashboardEditAction {
get { return _dashboardEdit; }
}
void dashboardEdit_Execute(object sender, SimpleActionExecuteEventArgs e) {
using (var form = new DashboardDesignerForm()) {
new XPObjectSpaceAwareControlInitializer(form, Application);
form.LoadTemplate(View.CurrentObject as IDashboardDefinition);
form.ShowDialog();
}
}
In the above snippet we chose to implement the LoadTemplate method in the DashboardDesignerForm because the Dashboard’s XML loading is not of XAF concern. This form is simply another separate windows based layer.
Visualizing our business data in the designer
The dashboard designer allows for us to see our XAF data and shape our dashboards in real time as shown:
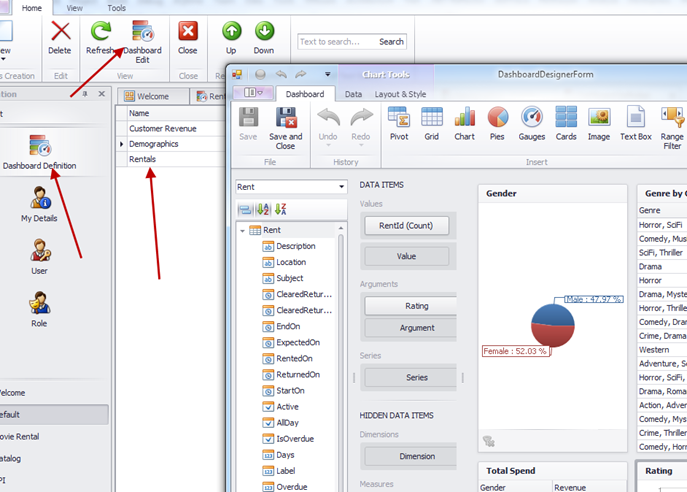
This designer is similar to our Reports designer but does not offer support for dynamic members aliases. However we covered them in depth in Dynamic member aliases from Application Model.
Dashboards in action
To visualize our dashboards we have to:
-
Dynamically populate the navigation menu items
We want to extend XAF’s functionality therefore we need to find the responsible
built-in controller. This leads to
ShowNavigationItemController where we can subscribe to its
events and populate the navigation items from
DashboardDefinition persistent objects. A possible implementation can be found in sample in
WinDashboardNavigationController.cs or you can follow its history
online.
-
-
Our active dashboards are linked in the “Dashboards” navigation group; this can be renamed and reordered so all changes are reflected within this group. The end result in post’s sample looks like:
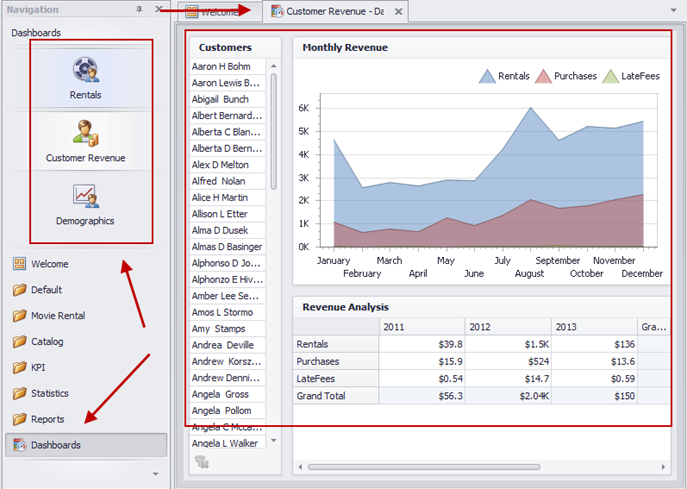
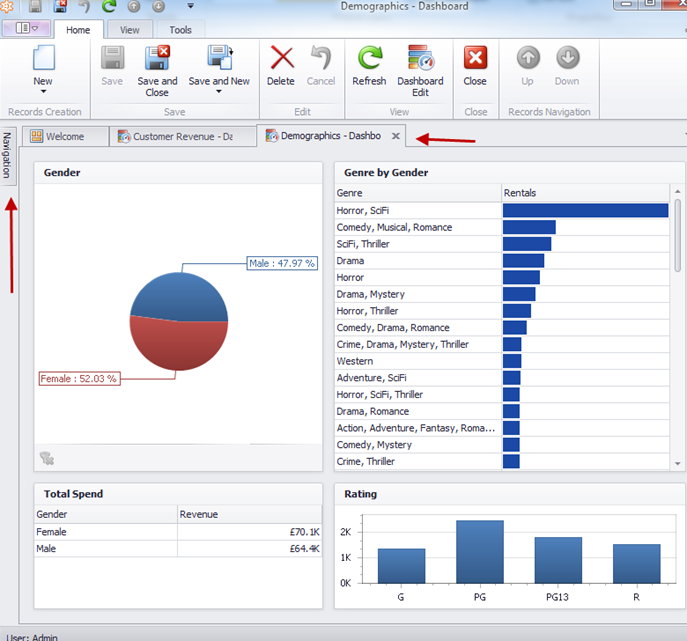
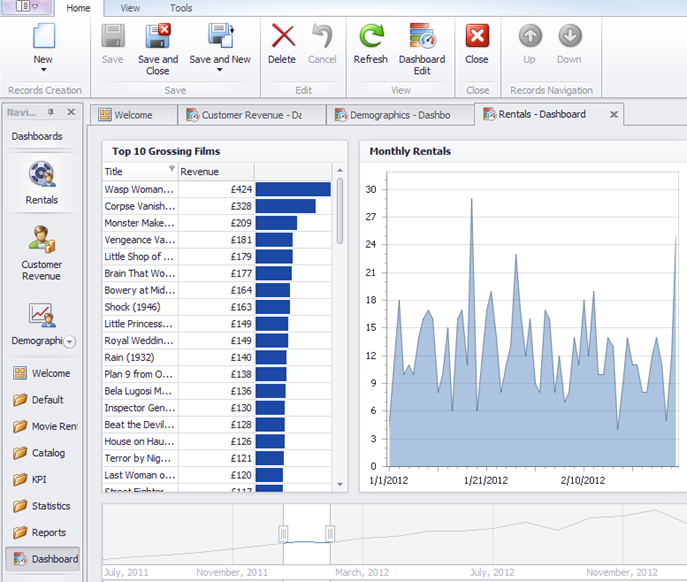
What’s next?
Stephen is already working in a State Machine designer plus an integration with XAF’s KPI module which gives dashboard its full power according to his words! Forgot to mention that a web version of Dashboards is coming soon!
Big thanks to Stephen Manderson for sharing this cool XAF implementation with us, I am sure this post/contribution will boost his spirit/cv/carrier a bit  , We welcome any of you that wants to share it’s cool XAF stuff with the rest of us. Feel free to use our Support Center for this or our community project.
Please do not forget your feedback about what we discussed today.
Unit next time Happy XAF’ing as always!
Download XVideoRental sample here. The sample contains the following modification
- User friendly way to add permission migrated in Common.Win.General namespace.
- XVideorental references DynamicMemberAliases.Module from Domain Components+ Calculated properties + Application Model.
- XVideorental references ProvidedAssociation.Module from Modifying Business Objects using Attributes.
- XVideorental references eXpand’s/Stephen's Dashboard module.

-
There is no official support for this scenario, however this does not mean that XAF is not designed with the highest standards. It means that we do not have docs and tests that can cover all possible combinations. However XAF is a flexible beast and we will go for supporting this case as short as possible.
Domain Components
With XAF it is possible to design business objects from interfaces! Given those interface DC with smart algorithms create concrete persistent class at runtime. It is possible to explore the DC dynamic assembly by overriding the in solution’s WinApplication descendant as shown:
public partial class DynamicMemberAliases2WindowsFormsApplication : WinApplication {
protected override string GetDcAssemblyFilePath() {
return Path.Combine(AppDomain.CurrentDomain.SetupInformation.ApplicationBase, DcAssemblyFileName);
}
Exploring the DC assembly for the following DomainComponent1
[DomainComponent]
public interface DomainComponent1 {
string Email { get; set; }
string Twitter { get; set; }
}
public override void Setup(XafApplication application) {
base.Setup(application);
XafTypesInfo.Instance.RegisterEntity("Manager", typeof(DomainComponent1));
We find out that XAF creates on the fly the next Manager class which is a simple XPO persistent object and is specific to our DomainComponent1 (see RegisterEntity method above).

This is really great! We already know how to Dynamic member aliases from Application Model and we can apply the same technic to the Manager class which very conveniently is related only with DomainComponent1. However there is a small problem, although the Dynamic member aliases from Application Model will successfully create the members in the Manager class, XAF does not know their existence. In next section we will discuss how to workaround this.
The TypesInfo system
- XAF works with object types, so the XAF team introduced the TypesInfo, a wrapper around .NET Reflection. For UI creation and for all metadata operations XAF uses the TypesInfo system. In addition the TypesInfo system allows metadata modification with code as easy as it can be! The power is there my friends, because the UI is automatically generated by querying types and members from TypesInfo.
- XAF supports by default XPO and Entity Framework but is possible to support a custom ORM as well. To make this possible XAF team architecture a separate interface the ITypeInfoSource, which holds all Type metadata (e.g. for XPO-> XpoTypeInfoSource).
UI + business logic <— TypesInfo –> XpoTypeInfoSource OR EFTypeInfoSource OR any ITypeInfoSource.
In short the above theory leads to the conclusion that the XpoTypeInfoSource will be asked from XAF to provide the Type members for any class. Therefore, we only need to override the EnumsMembers method of XpoTypeInfoSource to provide our own implementation! Bellow you see a part of this implementation, you can find the rest in the sample at the end of the post.
public class XpandXpoTypeInfoSource : DevExpress.ExpressApp.DC.Xpo.XpoTypeInfoSource, ITypeInfoSource {
void ITypeInfoSource.EnumMembers(TypeInfo info, EnumMembersHandler handler) {
EnumMembers(info, handler);
Type type = info.Type;
if (TypeIsKnown(type)) {
if (type.IsInterface) {
EnumDCInterfaceMembers(info, handler);
}
}
}
Wasn’t this amazingly fast and simple? I always emphasize that XAF has 2 advantages
- It is well architectured –> overridable.
- It is well architectured –> reusable.
Based on the above 2 assumptions you can download and use the DynamicMemberAliasesForDC.zip  .
.
We are happy to read your feedback about this!. Remember that your questions are the best candidates for future posts.
P.S. : eXpandFramework users only need to register the Core modules (see How to use an eXpand module with an existing XAF application)
Until next time, happy XAF’ing!

-
Although I promised to talk about Stephen Manderson’s Dashboard module I will skip and I will provide a discussion on dynamic member aliases. The reason is that cross data source filtering provided by the Dashboard Suite does not permit aliases for our aggregated members. I already touched dynamic members subject at calculated members creation—Pros and Cons. However today we will go in details through all steps involved in creating member aliases through XAF’s Application Model and as usual at the end of the post a sample will be available.
In the following image you can see existing implementations from our community project eXpand as discussed in calculated members creation—Pros and Cons.
![image_thumb[14]](http://community.devexpress.com/blogs/eaf/image_thumb14_thumb_03AD71AD.png)
In this post we are only interested in the RuntimeCalculatedMember entry.,
Extending the model
Following our documentation to the letter (How to: Extend the Application Model) first we need to define and interface that will persist all parameters to the model.
public interface IModelRuntimeCalculatedMember : IModelMember {
[Required]
string AliasExpression { get; set; }
}
The context popup menu
You probably noticed in IModelRuntimeCalculatedMember instead of deriving from IModelNode interface as suggested in our docs we used the IModelMember. This is an already registered interface that describes the model members. So do not need to re extend our Application Model with the IModelRuntimeCalculatedMember. XAF knows how to create the popup menu with the correct entry:

Changing Model Editor’s behavior
AliasExpression
In IModelRuntimeCalculatedMember we marked the AliasExpression property with the RequiredAttribute because an empty alias is not valid. XAF Model Editor will notify that this is a mandatory property with an asterisk icon as shown:

Editable Type at Runtime
Since our IModelRuntimeCalculatedMember derives from IModelMember and not from IModelNode it inherits all its properties. This however, raises a conflict with XAF’s native support for design time custom members. The conflict refers to IModelMember Type property which is by design editable only in design time. As we see in the next image is marked with a ModelReadOnlyAttribute which tells Model Editor what to do.

In XAF everything is overridable! So to change Type property we need to create a new Type property in our IModelRuntimeCalculatedMember and mark it with the new keyword. In addition we need to create and use an AlwaysEditableCalculator instead of the DesignerOnlyCalculator:

Remember the IsCustom functionality
As I already mentioned XAF has native support for runtime members only if Model Editor is at design time. This is done adding a new IModelMember and setting IsCustom to true as shown:


IModelRuntimeCalculatedMember inherits from IModelMember. This means when we create a new IModelRuntimeCalculatedMember XAF will set IsCustom to true as it does for simple IModelMember. ModuleUpdaters that can change Application Model’s values are designed to work only in the “zero” layer and here we need to change the differences made from the Model Editor designer. However XAF is designed to be extensible and our docs to solve the problems Convert Application Model Differences. The solution to this problem is to implement Implement a Node Updater following our docs to the letter:

NodeUpdaters are one more powerful tool provided to us by XAF an is designed to take us out of trouble. As you can see in above image it does it fairly simple.
- We make our module or any class a NodeUpdater by implementing the IModelNodeUpdater<T> interface.
- We register the new NodeUpdater by overriding the AddModelNodeUpdaters or our module.
- Implement our logic inside the the UpdateNode method
The Dessert
The AliasExpression property will hold basic criteria + complex criteria as well as aggregated function. Right now there is no editor associated with the property. However we can easily associate a CriteriaModelEditorControl editor as shown:

As we see the CriteriaModelEditorControl offers great features:

The Coding part
Up to now we modeled a new Application Model member type the IModelRuntimeCalculatedMember. What remains is to write the algorithm to create that member in our TestBO object. Unfortunately we cannot use the standard place for extending our business objects as suggested by our knowledgebase. This is because the Application Model is not fully constructed at that point. However we can use any other place, as far as our algorithm is smart enough to execute just one time without consuming many resources.
private static IEnumerable<IModelRuntimeCalculatedMember> GetCustomFields(IModelApplication model) {
return model.BOModel.SelectMany(modelClass => modelClass.AllMembers).OfType<IModelRuntimeCalculatedMember>();
}
static void AddRuntimeMembers(IModelApplication model) {
foreach (IModelRuntimeCalculatedMember modelRuntimeMember in GetCustomFields(model))
try {
Type classType = modelRuntimeMember.ModelClass.TypeInfo.Type;
XPClassInfo typeInfo = _dictionary.GetClassInfo(classType);
lock (typeInfo) {
if (typeInfo.FindMember(modelRuntimeMember.Name) == null) {
new XpandCalcMemberInfo(typeInfo, modelRuntimeMember.Name, modelRuntimeMember.Type, modelRuntimeMember.AliasExpression);
XafTypesInfo.Instance.RefreshInfo(classType);
}
}
In fact forget about the many resources when using our frameworks, Please search our Support Center, there are answers to almost all common problems you will face! If not shoot the guys they are happy to die for you  !
!
Now let’s touch the unknown XpandCalcMemberInfo class:
- XPO allows non persistent calculated properties with the use of PersistentAliasAttribute.
- To create a dynamic member we simply need to instantiate an XPCustomMemberInfo derivative like the XpandCalcMemberInfo.
public class XpandCalcMemberInfo : XPCustomMemberInfo {
public XpandCalcMemberInfo(XPClassInfo owner, string propertyName, Type propertyType, string aliasExpression)
: base(owner, propertyName, propertyType, null, true, false) {
AddAttribute(new PersistentAliasAttribute(aliasBLOCKED EXPRESSION;
}
public override object GetValue(object theObject) {
var xpBaseObject = ((XPBaseObject)theObject);
return !xpBaseObject.Session.IsObjectsLoading && !xpBaseObject.Session.IsObjectsSaving
? xpBaseObject.EvaluateAlias(Name)
: base.GetValue(theObject);
}
protected override bool CanPersist {
get { return false; }
}
}
Therefore in the constructor we added a PersistentAliasAttribute using the AddAttribute method of the XPCustomMemberInfo. In addition we had to modify the returned value of the member by overriding the GetValue method and using an approach similar with the EvaluateAlias docs,
Best place to create the dynamic members
In my opinion there is no such place and everything depends on our requirements. However I can suggest a solution we used in eXpand for many years without problems. You can do it just after login where the the user model is fully merged.
public sealed partial class DynamicMemberAliasesModule : ModuleBase {
public override void Setup(XafApplication application) {
base.Setup(application);
application.LoggedOn += (sender, args) => RuntimeMemberBuilder.AddFields(application.Model);
}
The check please!
We discussed in detail all the steps needed for dynamic member aliases. In DynamicMemberAliases.zip is a XAF solution to see everything in action.
To implement the rest of the dynamic members (RuntmeNonPersistent, RuntimeOrphanedCollection, RuntimeMember) you either
- Need to use core or ModelDifference module of eXpandFramework (see .
- Copy RuntimeMemberBuilder, all interfaces from IModelRuntimeMember.cs and extend the Application Model with the included IModelMemberEx interface.
That’s all you need, to have a few productive and happy hours with XAF  . I really enjoy working with such a flexible framework and I am sure the XAF team will continue to surprise us in the future!
Remember next post will talk the integration of XAF + Dashboard suite so stay tuned.
We are happy to read your feedback about anything you heard today!. Remember that your questions are the best candidates for future posts .
Until next time, happy XAF’ing!

-
XAF’ security system is really flexible and can easily address complex scenarios. Depending on the nature of our application (e.g. geek level of business users  ) we may want to modify the default design to make it more user friendly! This will be a detailed discussion on all the steps involved in doing so. In addition a sample application is available for download at the end of the post.
The goal is to create a user Role that will be able to Read and Navigate to predefined DashboardDefinition instances (SecurityOperation.ReadOnly). The DashboardDefinition is a simple business object.
If we had to use code we use a ModuleUpdater and the following snippet:
public class Updater : ModuleUpdater {
public Updater(IObjectSpace objectSpace, Version currentDBVersion) : base(objectSpace, currentDBVersion) { }
public override void UpdateDatabaseAfterUpdateSchema() {
base.UpdateDatabaseAfterUpdateSchema();
var role= ObjectSpace.FindObject<SecuritySystemRole>("Name='User'");
var criteria = CriteriaOperator.Parse("Oid=?", "TOO hard to know the key value").ToString();
const string operations = SecurityOperations.ReadOnlyAccess;
role.AddObjectAccessPermission<DashboardDefinition>(criteria,operations);
}
}
The handy AddObjectAccessPermission Role extension method hides the internals which are:
- Searches if a SecuritySystemTypePermissionObject exists for the DashboardDefinition type and creates it accordingly. The SecuritySystemTypePermissionObject is a persistent object with a Type property which is used to relate the permission with business objects. Moreover SecuritySystemTypePermissionObject has a set of properties (AllowRead, AllowNavigate etc.) used by the Security System to determine if permissions are granted for a business object.
- Creates a new SecuritySystemObjectPermissionsObject which holds the Criteria and Operation action and relates it with the SecuritySystemTypePermissionObject from step 1.
Although the AddObjectAccessPermission allows us to write user friendly code there are a few problems:
- This post is about a friendly (non code) way to add permissions and our goal is to modify the default XAF UI.
- It is difficult to construct the Criteria parameter of the AddObjectAccessPermission method (the developer should be aware of the name and value of the key property).
Let’s first see how the above code snippet is translated to a XAF UI and what steps needed from the end user.
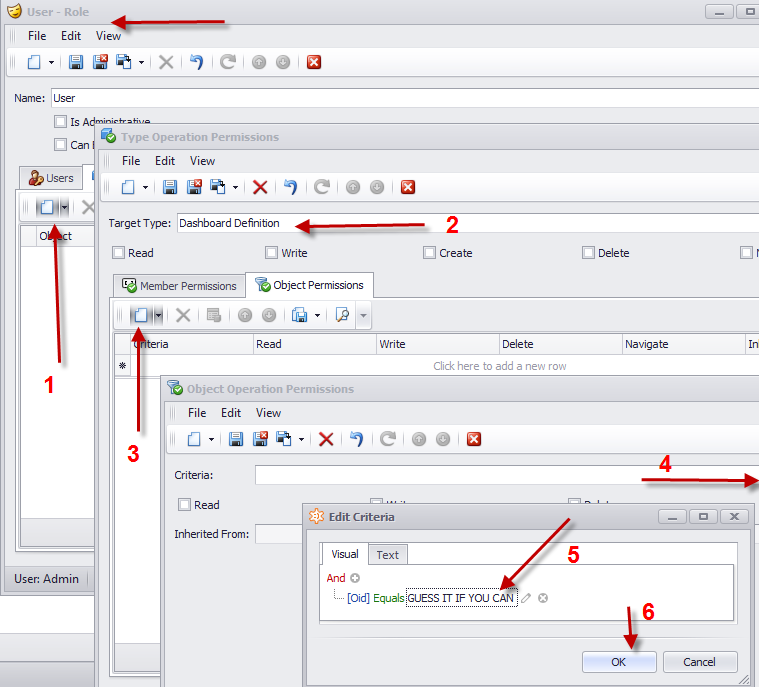
The most difficult step as with the code approach is the Criteria construction. This time is even harder since we are not a developer any more but a business user. This means that even simple stuff like identifying the key property may look like a mountain. In addition the end user needs a huge amount of time for creating permissions for a lot of objects.
The solution to this problem is to modify the default XAF UI and allow the business user to associate a Role with a DashboardDefinition object instance as shown bellow:

The above UI represents a many collection between Roles and DashboardDefintion. We can tell that is an M-M relation because only the link action is available (see left arrow)., The New DashboardDefinition action is hidden and the creation of the intermediate objects is done magically from XAF!
To create the DashboardDefinition collection shown in the above UI, we can use the ProvidedAssociationAttribute as discussed in Modifying Business Objects using Attributes post.

In this step using a simple attribute we guided XAF to create a totally different UI for associating a Role with a DashboardDefintion. What remains is to write code that will automatically create the required permissions by extending the SecuritySystemRole class.
Creating a custom Security Module
Extending the SecuritySystemRole class means that we need to create a custom Role class deriving from the SecuritySystemRole. The process is well documented How to: Implement Custom Security Objects (Users, Roles, Operation Permissions). However since we want a reusable functionality we recommend to create a module to host the custom Role class. XAF follows this recommendation with the Security module, our community project eXpandFrameWork with the XpandSecurityModule.
public class XRole:SecuritySystemRole {
public XRole(Session session) : base(session) {
}
}
Next step is to create an attribute with two parameters:
-
OperationProviderProperty: Is the name of the property that will provide the SecurityOperation which will be applied to the collection of DashboardDefinition of our XRole.
-
CollectionName: Is the name of the dynamically created DashboardDefinition collection member in our XRole.
[AttributeUsage(AttributeTargets.Class, AllowMultiple = true)]
public class SecurityOperationsAttribute : Attribute {
readonly string _collectionName;
readonly string _operationProviderProperty;
public SecurityOperationsAttribute(string collectionName, string operationProviderProperty) {
_collectionName = collectionName;
_operationProviderProperty = operationProviderProperty;
}
public string CollectionName {
get { return _collectionName; }
}
public string OperationProviderProperty {
get { return _operationProviderProperty; }
}
}
Now its time to use this SecurityOperationsAttribute in our DashboardDefintion class which does not live in our custom Security module:

The collectionName parameter (DashboardDefinitions) is the name of the collection created from the ProvidedAssociationAttribute as discussed in the start of the post. The operationProviderProerty (DashboardOperation) does not yet exist in our XRole class and we need to create it in an abstract way since our Security modules has no knowledge of the DashboardDefinition existence. Writing abstract code with XAF is really a piece of cake! Our goal is to enumerate through all PersistentTypes (this includes DashboardDefintion) marked with the SecurityOperationAttribute. Then for each Persistent type we need to create a dynamic member in our XRole class to hold the SecurityOperation. Again note that our module is not even aware of what is the Role type.
public sealed partial class MySecurityModule : ModuleBase {
public override void CustomizeTypesInfo(ITypesInfo typesInfo) {
base.CustomizeTypesInfo(typesInfo);
var roleTypeProvider = Application.Security as IRoleTypeProvider;
if (roleTypeProvider != null) {
foreach (var attribute in SecurityOperationsAttributes(typesInfo)) {
CreateMember(typesInfo, roleTypeProvider, attribute);
}
}
}
void CreateMember(ITypesInfo typesInfo, IRoleTypeProvider roleTypeProvider, SecurityOperationsAttribute attribute) {
var roleTypeInfo = typesInfo.FindTypeInfo(roleTypeProvider.RoleType);
if (roleTypeInfo.FindMember(attribute.OperationProviderProperty) == null) {
var memberInfo = roleTypeInfo.CreateMember(attribute.OperationProviderProperty, typeof (SecurityOperationsEnum));
memberInfo.AddAttribute(new RuleRequiredFieldAttribute());
}
}
IEnumerable<SecurityOperationsAttribute> SecurityOperationsAttributes(ITypesInfo typesInfo) {
var typeInfos = typesInfo.PersistentTypes.Where(info => info.FindAttribute<SecurityOperationsAttribute>() != null);
return typeInfos.SelectMany(info => info.FindAttributes<SecurityOperationsAttribute>());
}
With the above code a new property will be added to the previously XRole UI.

Now we need a method to get the SecurityOperations given an XRole instance and the dynamic collection of DashboardDefinition objects. Note that the name property that provides these values exist in the SecurityOperationsAttribute marking our DashboardDefinition object:
static string GetSecurityOperation(ISecurityRole securityRole, XPMemberInfo memberInfo) {
var typeInfo = XafTypesInfo.Instance.FindTypeInfo(memberInfo.CollectionElementType.ClassType);
var roleTypeInfo = XafTypesInfo.Instance.FindTypeInfo(securityRole.GetType());
var operationsAttribute = typeInfo.FindAttributes<SecurityOperationsAttribute>().FirstOrDefault(attribute => attribute.CollectionName == memberInfo.Name);
return operationsAttribute != null ? Convert(securityRole, roleTypeInfo, operationsAttribute) : null;
}
static string Convert(ISecurityRole securityRole, ITypeInfo roleTypeInfo, SecurityOperationsAttribute operationsAttribute) {
var value = roleTypeInfo.FindMember(operationsAttribute.OperationProviderProperty).GetValue(securityRole);
if (value == null || ReferenceEquals(value, ""))
return null;
var securityOperations = (SecurityOperationsEnum)value;
var fieldInfo = typeof(SecurityOperations).GetField(securityOperations.ToString(), BindingFlags.Public | BindingFlags.Static);
if (fieldInfo != null)
return fieldInfo.GetValue(null).ToString();
throw new NotImplementedException(value.ToString());
}
Having a list of SecurityOperations from the GetSecurityOperation method we can use XAF’s metadata API to create the ObjectOperationPermissions as simple as:
public static IEnumerable<ObjectOperationPermission> ObjectOperationPermissions(this ISecurityRole securityRole, XPMemberInfo member) {
var collection = ((XPBaseCollection)member.GetValue(securityRole)).OfType<object>();
var securityOperation = GetSecurityOperation(securityRole, member);
if (!string.IsNullOrEmpty(securityOperation)) {
foreach (var operation in securityOperation.Split(ServerPermissionRequestProcessor.Delimiters, StringSplitOptions.RemoveEmptyEntries)) {
foreach (var obj in collection) {
yield return ObjectOperationPermissions(member, obj, operation);
}
}
}
}
static ObjectOperationPermission ObjectOperationPermissions(XPMemberInfo member, object obj, string securityOperation) {
return new ObjectOperationPermission(member.CollectionElementType.ClassType, Criteria(obj, member.CollectionElementType), securityOperation);
}
static string Criteria(object obj, XPClassInfo classInfo) {
var keyProperty = classInfo.KeyProperty;
var keyValue = keyProperty.GetValue(obj);
return CriteriaOperator.Parse(keyProperty.Name + "=?", keyValue).ToString();
}
Finally we put all these methods to a class SecuritySystemRoleExtensions and override our custom XRole GetPermissionsCore method as discussed in How to: Implement Custom Security Objects (Users, Roles, Operation Permissions). So, in simple English this can b said: For each collection member in our XRole that his collection element type is marked with a SecurityOperationsAttribute call the above ObjectOperationPermissions extension method to get the permissions and add them to the list of XRole’s permission. XAF’s language does not differ much from English  , so this will be:
public class XRole : SecuritySystemRole {
public XRole(Session session)
: base(session) {
}
protected override IEnumerable<IOperationPermission> GetPermissionsCore() {
var operationPermissions = base.GetPermissionsCore();
return OperationPermissionCollectionMembers().Aggregate(operationPermissions, (current, xpMemberInfo) => current.Union(this.ObjectOperationPermissions(xpMemberInfo).Cast<IOperationPermission>()));
}
IEnumerable<XPMemberInfo> OperationPermissionCollectionMembers() {
return ClassInfo.OwnMembers.Where(info => info.IsAssociationList && info.CollectionElementType.HasAttribute(typeof(SecurityOperationsAttribute)));
}
Today, we discussed how to mix BO’s metadata with instance data using a simple attribute in order to avoid tedious and repetitive work. To summarize when we want to create user friendly ObjectAccessPermissions we can simply mark our BO as shown:

Note that even if DashboardDefintion class may live in a module we do not have source code, XAF will not sweat at all! It is really easy to dynamically replace attributes adjusting to your own preferences (see also How to customize a Business Model at runtime (Example)):
public override void CustomizeTypesInfo(ITypesInfo typesInfo) {
base.CustomizeTypesInfo(typesInfo);
var typeInfo = (TypeInfo) typesInfo.FindTypeInfo(typeof (DashboardDefinition));
var memberInfo = typeInfo.FindMember("Roles");
//replace ProvidedAssociationAttribute in Roles collection
memberInfo.RemoveAttributes<ProvidedAssociationAttribute>();
memberInfo.AddAttribute(new ProvidedAssociationAttribute("DashboardDefinition-Roles","MyDashboardDefintions",RelationType.ManyToMany, null));
//replace SecurityOperationsAttribute
typeInfo.RemoveAttributes<SecurityOperationsAttribute>();
typeInfo.AddAttribute(new SecurityOperationsAttribute("MyDashboardDefintions", "MyDashboardOperation"));
}
The credits for this post go first to XAF with its unbelievable flexible API, second to a great XAFer named Stephen Manderson and third to me that wrote this post  . Moreover Stephen shared with us his Dashboard module which is the most wanted integration of XAF and our new Dashboard tool!
Next post we be all about Stephen’s Dashboard module, in the meantime let us know your thoughts in everything you heard today.
The sample with today’s discussion can be downloaded from here and is build against XAF v12.2.5.
Until next time, Happy XAFing!

-
Very often there is a need to add new members to existing Business objects that live in assemblies that we do not own.
Take the following example: We have a persistent object DashboardDefinition:
public class DashboardDefinition : BaseObject {
public DashboardDefinition(Session session)
: base(session) {
}
[Association("Role-Dashboards")]
public XPCollection<DevExpress.ExpressApp.Security.Strategy.SecuritySystemRole> Roles {
get {
return GetCollection<DevExpress.ExpressApp.Security.Strategy.SecuritySystemRole>("Roles");
}
}
}
We want to create a many to many relation between DashboardDefinition and SecuritySystemRole objects. We already wrote the one part of the association in the DashboardDefinition –>Roles property. However we need to add a new collection of DashboardDefinition to the SecuritySystemRole, so we have 3 alternatives:
-
Change in the source project, add the new property. then recompile then use the new assembly in your project —> Very tedious and hard to support approach.
-
Create a custom class that derives from SecuritySystemRole, add the new property there and use the new class instead of SecuritySystemRole —> This design suffers from flexibility, at some point we will end with a lot of SecuritySystemRoles descendants.
-
Create an ProvidedAssociationAttribute that when decorates a member will result in runtime creation of the other part.
In simple English the problem goes as following:
-
[AttributeUsage(AttributeTargets.Property)]
public class ProvidedAssociationAttribute : Attribute {
readonly string _associationName;
public ProvidedAssociationAttribute(string associationName) {
_associationName = associationName;
}
public string AssociationName {
get { return _associationName; }
}
}
-
public sealed partial class ProvidedAssociationModule : ModuleBase {
public override void CustomizeTypesInfo(ITypesInfo typesInfo) {
base.CustomizeTypesInfo(typesInfo);
}
-
public override void CustomizeTypesInfo(ITypesInfo typesInfo) {
base.CustomizeTypesInfo(typesInfo);
var memberInfos = MemberInfos(typesInfo);
foreach (var memberInfo in memberInfos) {
}
}
IEnumerable<IMemberInfo> MemberInfos(ITypesInfo typesInfo) {
Func<IMemberInfo, bool> hasAttribute = info => info.FindAttribute<ProvidedAssociationAttribute>() != null;
return typesInfo.PersistentTypes.SelectMany(info => info.Members).Where(hasAttribute);
}
-
Create the dynamic collection using metadata taken from the decorated member
foreach (var memberInfo in memberInfos) {
CreateMember(memberInfo);
}
}
void CreateMember(IMemberInfo memberInfo) {
var dictionary = XpoTypesInfoHelper.GetXpoTypeInfoSource().XPDictionary;
var providedAssociationAttribute = memberInfo.FindAttribute<ProvidedAssociationAttribute>();
var customMemberInfo = dictionary.GetClassInfo(memberInfo.ListElementType).CreateMember(memberInfo.Owner.Name + "s", typeof (XPCollection), true);
var associationAttribute = new AssociationAttribute(providedAssociationAttribute.AssociationName,memberInfo.Owner.Type);
customMemberInfo.AddAttribute(associationAttribute);
memberInfo.AddAttribute(new AssociationAttribute(providedAssociationAttribute.AssociationName));
}
-
Decorate Roles of the DashboardDefinition object to dynamically create a DashboardDefinitions collection in the SecuritySystemRole object

The ProvidedAssociationAttribute idea exist in our community project (www.expandframework.com) a few years now and it happens to be a favorite one among eXpand users. Through the years of course we created a real world implementation of it. I decouple all related files in this XAF Solution for everybody to give a quick try or even copy paste it in your solutions!
PS: Although the current implementation is XAF depended is rather easy to replace all XAF related code with XPO and use it to non XAF projects as well.
We are happy to read your feedback about this!. Remember that your questions are the best candidates for future posts

-
To configure our code we can simply use interfaces as parameters. XAF design is based on interfacesrefore it features amazing technologies like the Application Model and Domain Components which make available what no other framework offers (eg multiple inheritance, flexible design, no match in reusability, etc.). The Application Model for example describes all parts of a business application and can be further extended using interfaces. So, our code should simply query the values of these Application Model interfaces and operate accordingly. Let’s name these interfaces Rules and let’s try first to get a taste of existing implementations and then discuss a Pivot control ruling concept. Note here that instead of a Pivot it be any control, our goal is to describe behaviors in XAF’s Application Model, then implement them in a Controller and simply copy paste this controller to any project!
All the code needed for today’s discussion can be found in XVideoRental demo in Common.Win project under the NameSpaces: Common.Win.ModelAdapter, Common.Win.ColumnView.RepositoryItems, Common.Win.PivotGridControl.
Take a look at this ruling concept/idea in action in XAF’s Validation module. In the image bellow we see a set of interfaces that describe validation rules. The Validation Engine simply queries them and validates the objects accordingly.
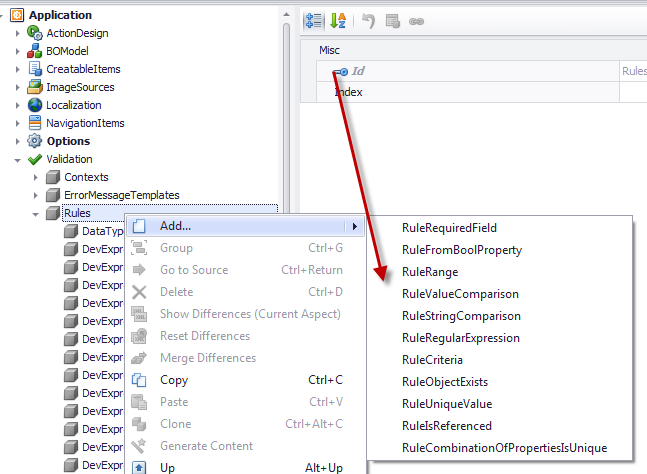
Similar ruling based stuff can be found in our community project eXpandFrameWork, under a whole Logic Architecture concept. A few modules that use this architecture are AdditionalViewControls, ModelArtifact, MasterDetail, ConditionalDetailViews The logic architecture is based in the composition over inheritance principle, meaning that it can make our rules amazingly powerful!. This is because we do not extend the IModelListView rather we add IModelListViews and other model artifacts to root model nodes like the ConditionalControllerState, LogicConditionalActionState we see in the image bellow.

In this post however we will not dive so deep as our community project and we will concentrate to our XVideoRental demo. Take a look at this traditional windows form taken from the legacy VideoRent application of our Windows components suite.

The traditional developer needs to create a multidimensional UI given a collection of ChartPrice objects. One dimension is the type of the price (DVD,Blue-Ray,Video CD). Next one is the day number 1-7, third one is the different type in price double or integer for Default # of Rental Days. As you can see the traditional developer to implement this user interface used 3 tabs, 9x3 controls. Three of them must accept integers only and all other double numbers. This is an acceptable design however not flexible and here are a few reasons:
-
The number of days is fixed, to add more days (eg. up to 10) more controls are needed.
-
User interaction is needed from the end user, if he wants to see prices for Blue-Ray he must click on the assigned tab.
-
The code that implements this works only for a certain windows form.
THE XAF WAY
XAF is a really smart framework, using it is inevitable that we will become equally smart cause we have unparalleled tools to work with. So, to create a multidimensional UI we can simply use the PivotGridListEditor and create rules that we can use to describe what the traditional form does. Since we are talking about rules that will extend our Application Model we already start building an abstract mechanism that can be applied to any view and any object even at runtime with the help of Model Editor. However at this point let’s assign a PivotGridListEditor to the collection of ChartPrice objects to see the starting point and to have a comparing reference.

The PivotGridListEditor is perfect for multidimensional analysis thus our UI is already more flexible than the legacy one. However it is missing a lot of stuff (not editable,row header fromatting, cells formatting, object saving). We will discuss how to build all that stuff the XAF way and make them reusable to all of our projects!
Extending the Application Model to host different rule types
First lets create a collection of abstract rules and extend our Application Model’s IModelListView. To extend the Application Model we can follow this help document with make use of the bellow interfaces.
public interface IModelPivotRules : IModelNode, IModelList<IModelPivotRule> {
}
[ModelAbstractClass]
public interface IModelPivotRule : IModelNodeEnabled {
}
We choose to extend in a deeper level than IModelListView because we want to group the new Rules with the PivotGridListEditor option interfaces which are discussed in Dressing up our classes – Date with a model tonight!. So after extending the model the Model Editor for IModelListView will look like the following image.
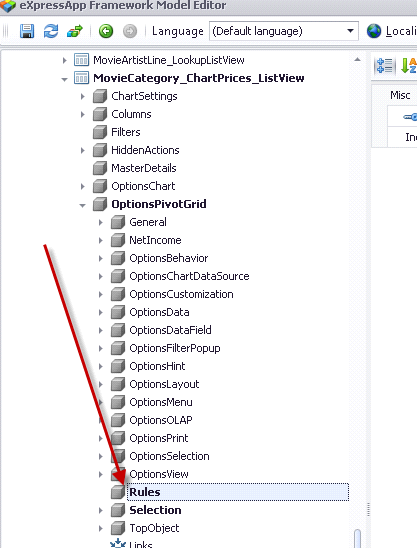 tEd
tEd
Control the range of the cells
Next step is to design an interface that can help us to apply rules to certain Pivot control cells, so we need an interface with two properties Start, End
[ModelAbstractClass]
public interface IModelPivotSelectionRule : IModelPivotRule {
Point Start { get; set; }
Point End { get; set; }
}
No other action is required here, XAF’s TypesInfo system is already aware of IModelPivotSelectionRule since it derives from the already registered IModelPivotRule.
Formating the Pivot Cells
To format the cells of Pivot we need an Interface that:
a) Defines the range of the cells (eg. IModelPivotSelectionRule) .
b) Defines the PivotArea where the cells are located (Row, Column, Data).
c) Allows format configuration.
The interface bellow IModelFormatRule interface fulfills all the above requirements.
public interface IModelPivotArea : IModelNode {
PivotArea PivotArea { get; set; }
}
public interface IModelFormatRule : IModelPivotArea, IModelFormatInfo, IModelPivotSelectionRule {
[RuleValueComparison("IModelFormatRule_PivotArea_not_filter", DefaultContexts.Save, ValueComparisonType.NotEquals, PivotArea.FilterArea)]
[DefaultValue(PivotArea.ColumnArea)]
new PivotArea PivotArea { get; set; }
}
[ModelAbstractClass]
public interface IModelFormatInfo : IModelNode {
string FormatString { get; set; }
FormatType FormatType { get; set; }
}
Again no other action is required here, XAF’s TypesInfo system is already aware of IModelPivotSelectionRule since it derives from the already registered IModelPivotRule. In addition IModelFormatRule is not marked with the ModelAbstractAttribute therefore the Model Editor will automatically add a menu entry as shown,

Now we are ready to create a FormatRule for all row headers to display the info that the legacy windows form displays.

In the image we see that we created a FormatRule for RowArea cells that Start at X=0, Y=1 and End at the last cell X=-1, Y=-1. This rule will instruct a Controller to modify the initial ListView as shown bellow.
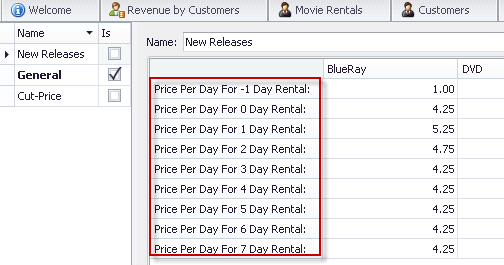
Next we will add one more FormatRule for the first row header.
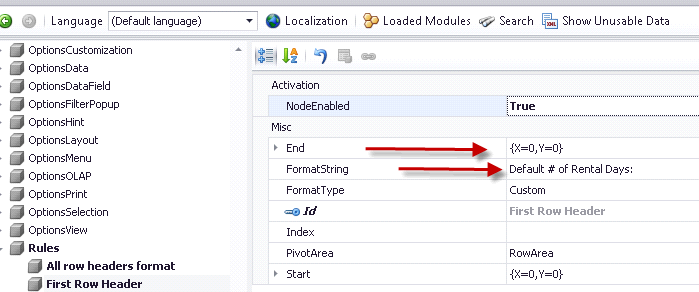
What is different with this FormatRule is the End X=0, Y=0 which points to the first row header and of course the FormatString. So, XAF first will evaluate first the “All row headers format” rule and then the “First Row Header” resulting in the following UI.
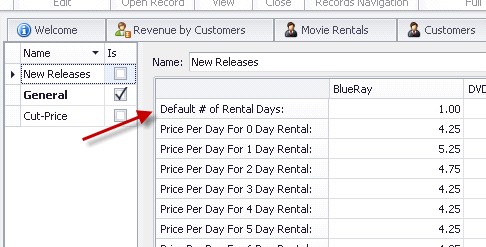 ina
ina
Finally we create a similar FormatRule for the second row header,

that will result in the following UI,
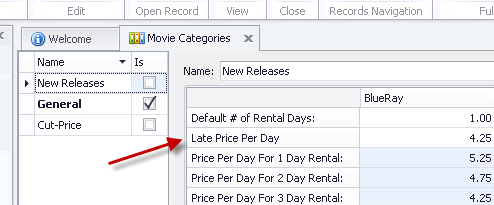
Using a declarative runtime approach we managed to format all row headers, XAF really teaches us amazing stuff!
Next let’s make PivotGridListEditor editable and we finished cloning the legacy functionality following an unbelievable flexible way – the XAF way!
All Pivot cells editable and double
We are now ready to start modeling the legacy windows form behavior. So, we need to make the Pivot cells editable therefore we first query our Support Center to see how this can be done –> E1232. From this example we understand that we can subscribe to certain events and replace the RepositoryItem of a Pivot cell. We already have a range of Pivot cells defined from the IModelPivotSelectionRule above and we are interested only in double and integer based Repositoryitems therefore an interface like bellow is sufficient.
[ModelDisplayName("SpinEdit")]
public interface IModelPivotSpinEditRule : IModelPivotSelectionRule {
IModelRepositoryItemSpinEdit SpinEdit { get; }
}
The above interface derives from IModelPivotSelectionRule so it will provide a range of Pivot cells which their RepositoryItems will be replaced with a RepositoryItemSpinEdit (int, double). The IModelRepositoryItemSpinEdit is an interface that describes all properties of a RepositoryItemSpinEdit and can be created either by hand or automatically as discussed in Dressing up our classes – Date with a model tonight!
Let’s now create the first rule that will make all Pivot cells of the data area editable. Of course we need to write code to query this rule and also save this object as in E1232. However for the sake of simplicity as I already said in the beginning of this post all the code can be found in the Common.Win project of our XVideoRental demo. In this case look for the Common.Win.PivotGridControl.PivotGridController.
 instrcuts
In the image above: End X=-1, Y=-1 instructs our code to include all cells of the data area. Moreover since this is a RepositoryItem replacement rule it assumes that row and column headers are excluded so X=0, Y=0 point to the top left data cell.
With this rule the UI will be editable and accept double numbers as shown bellow,

Last rule will help us to format the edit value of the first row (Default # of Rental Days) to accept integers only as shown bellow, by simply setting the IsFloatValue to false.
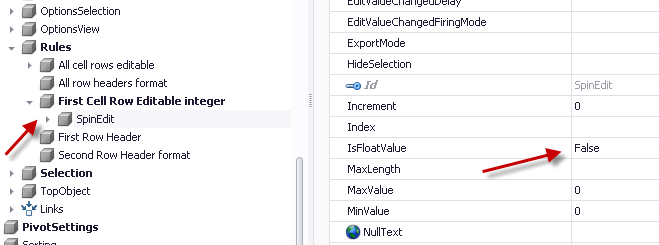
More Rule Types
In XVideoRental we have more Rule types than the ones discussed in this post . It is rather easy to implement more and we would appreciate your ideas and contributions. So please feel free to use our Support Center to share them with the rest of our community. A list of the already implemented Pivot Rules is shown bellow.
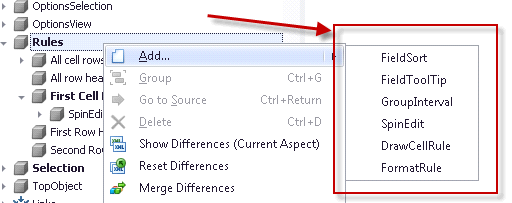
FieldToolTip rule
Tooltips are amazingly powerful and we already discussed them in depth at Tooltips to the max - expressive UI. However there I only posted a screenshot about pivot tooltips but I haven’t explained more since I needed more info that could make that post too hard to follow. Now we do have that extra info and I am talking about the IModelPivotSelectionRule interface which allows us to associate interfaces/rules/classes etc with a range of Pivot cells.
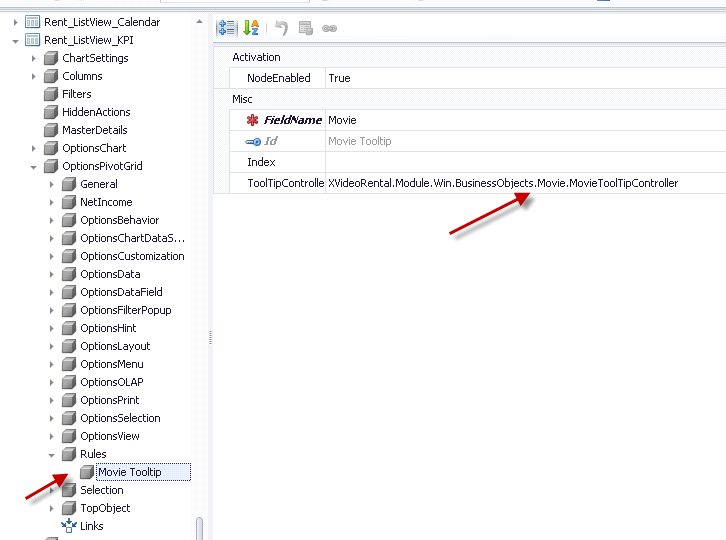
You can learn how to associate a class in this case the MovieToolTipController with an Application Model node at Tooltips to the max - expressive UI. under the TooltipController paragraph.
Try to imagine how expressive can a Pivot control become with different tooltips for different cells!
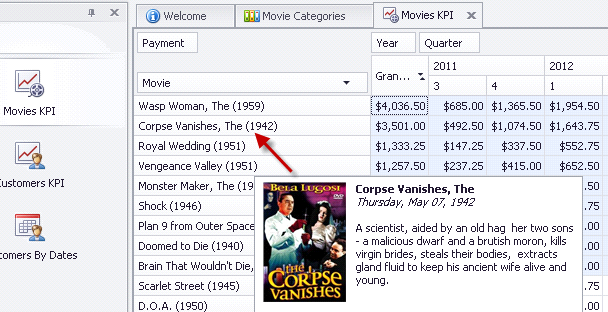
We will discuss the rest of the PivotRules (DrawCellRule, GroupIntervalRule, FieldSort) in a future post.
For now I want again to ask you all for your contributions/ideas regarding everything you see in our posts. Let’s use your real world experience and your XAF skills to improve our framework even more.
Controlling end user selection
As developers we should provide tools to our customers that can make their life easier. Let’s see what this means, PivotGridListEditor contains two components which are a PivotGridControl and a ChartControl hosted inside a LayoutControl. The ChartControl has as datasource the PivotGridControl so when the end user selects a range of cells the ChartControl automatically renders this selection as shown.
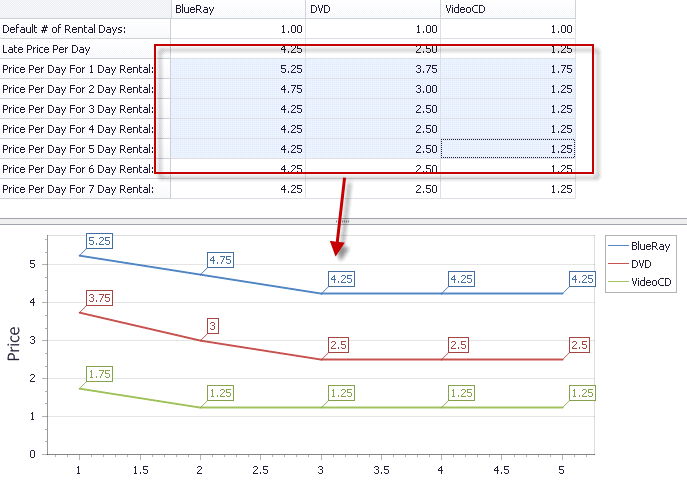
However when we close the view or the application the selection is lost and the end user has do it again. Moreover if we need to preconfigure a selection when the view opens we need to follow a repetitive way, that is search our Support Center for a similar sample eg select pivotgrid cells and then replicate something similar for all projects, views. I really do not like to spend my time doing repetitive tasks. It is much easier an faster to model it in the Application Model once at for all! To implement this we need an interface to extend the Application Model.
public interface IModelPivotGridSelection : IModelNode {
Rectangle Rectangle { get; set; }
[DefaultValue(true)]
bool Synchronize { get; set; }
}
When Synchronise property is true the our code will write back the end user cell selection in the Rectangle property, when Synchronize is false we can use this functionality only for preconfiguring a cell selection when the view opens.

Moreover there are cases where we want to control the cell selection eg when a user selects a cell to auto select all cells in the row sparing his time, or disallow multiple column selection. I am sure it is pretty clear that all we need are a few more properties in the IModelPivotGridSelection interface to create amazing and reusable functionalities.
XVideoRental demo contains a really big number of Application Model Rules and I will probably need a large number of posts to talk about all of them. So I will concentrate in the more important ones. Feel free to explore the demo and shoot us with your questions and ideas!
As always happy XAFing with the smartest framework of all!

-
UI simply depends on the smartness of our components. However the visible UI space is limited and most of the information is hidden behind components (tabs, popup forms etc). Therefore to display this hidden info user interaction is required. Tooltips however do not require any user interaction and our Suite supports tooltips with html formatting even in windows platform. We can already empower the detailed views of our XAF applications with native tooltip support as described in this help document. However when developing in XAF the sky’s the limit and in this post we will discuss ways to create tooltips as demoed in our XVideoRental RWA.
DataOnToolTip
By this we mean that we want to push any data a property of a business object has to a tooltip. Therefore, first we need to create a interface and extend our Application Model columns as described in our documentation,
[ModelAbstractClass]
public interface IModelColumnTooltipData : IModelColumn {
IModelTooltipData TooltipData { get; }
}
public interface IModelTooltipData : IModelNode {
[Category("DataOnToolTip")]
bool DataOnToolTip { get; set; }
[Category("DataOnToolTip")]
int MaxHeight { get; set; }
[Category("DataOnToolTip")]
int MaxWidth { get; set; }
}
public class GridViewImageTextToolTipController : ViewController<ListView>, IModelExtender {
public void ExtendModelInterfaces(ModelInterfaceExtenders extenders) {
extenders.Add<IModelColumn, IModelColumnTooltipData>();
}
The above will extend the Application Model as shown,

Next, we need to implement a method that when DataOnTooltip attribute is set will display the data in a tooltip like,

Of course due to the MVC XAF architecture it is really easy to reuse this functionality in any XAF project without not even one line of code!
ToolTipText
Now, how about a different case? Lets say that we have a complex Advanced Banded ListView and we want to guide end user to double click to a row area to see more info about the record. For this again we need to extend the Application Model with an attribute like,
public interface IModelTooltipData : IModelNode {
[Editor(typeof(MultilineStringEditor), typeof(UITypeEditor))]
string ToolTipText { get; set; }
// ...
Then we can use the Model Editor to assign the text we want in the ToolTipText attribute and XAF will do the rest for us in any project!

ToolTipController
Extending the Application Model in order to be able to associate a class (controller) with any of its nodes can be done easily. First we add one more property to our IModelToolTipData interface like,
public interface IModelTooltipData : IModelNode {
[DataSourceProperty("ToolTipControllers")]
[TypeConverter(typeof(StringToTypeConverterBase))]
Type ToolTipController { get; set; }
[Browsable(false)]
IEnumerable<Type> ToolTipControllers { get; }
The TypeConverter attribute will convert the type to a string so it will be possible for the Model Editor to show it and the DataSourceProperty attribute will populate the Types (Controllers) we want. What's left is to decide which classes will be in that list. This can be done be writing a Domain Logic for the non browsable ToolTipControllers enumeration like the following,
[DomainLogic(typeof(IModelTooltipData))]
public class IModelToolTipControllerDomainLogic {
public static IEnumerable<Type> Get_ToolTipControllers(IModelToolTipController modelToolTipController) {
return FindTypeDescenants(typeof(ObjectToolTipController));
}
protected static IEnumerable<Type> FindTypeDescenants(Type type) {
var typeInfo = XafTypesInfo.Instance.FindTypeInfo(type);
return ReflectionHelper.FindTypeDescendants(typeInfo).Where(info => !info.IsAbstract).Select(info => info.Type);
}
}
We have finished Application Model extension so let’s see how simple yet amazingly powerful is to write and apply such a controller for our Movie business object. So for a very simple ToolTipController like,
public class MovieToolTipController : ObjectToolTipController {
const int MaxPhotoWidth = 120, MaxPhotoHeight = 120;
public MovieToolTipController(Control parent) : base(parent) { }
protected override void InitToolTipItem(ToolTipItem item) {
var movie = ObjectSpace.FindObject<Movie>(CriteriaOperator.Parse("MovieTitle=?", EditObject));
var photo = movie.Photo;
if (photo != null)
item.Image = photo.CreateImage(MaxPhotoWidth, MaxPhotoHeight);
item.Text = GetMovieInfoHtml(movie);
}
public string GetMovieInfoHtml(Movie movie) {
return string.Format("<b>{0}</b>\r\n<i>{2:D}</i>\r\r\n{1}", movie.Title, movie.Plot, movie.ReleaseDate);
}
}
When assign it to a listview column,

XAF will popup an html formatted tooltip,

or we can use a similar approach for PivotGridListEditors

Everything discussed in this post exist in the Common.Win project under the Common.Win.General.ToolTip namespace of our XVideoRental demo.
Let us know if you have questions or subjects we want us to cover. Happy XAFing to everybody!

-
This post will be on how to use the approach described in Fast prototyping requires an initial data import mechanism with Excel as input source. The technic is based on System.Data.DataSet class and can be applied to any type of input source!
Thanks to your reports and of course Slava’s help (XPO guru), XVideoRental importing mechanism has been improved a lot and now is faster, has notification events and is decoupled from XAF’s TypesInfo system. This makes it possible to simply copy the ImportData.cs file found in Common.Win project and use it in non XAF solutions!
In previous version this importing mechanism worked only when matching in types of input and output members. This means that if my output Oid property was a System.Guid then input should be of the same type. Now we have workaround this minor issue. If conversion is possible it will be done automatically without the need of any configuration or extra coding!
To better design, support, extend and describe the importing mechanism I used Mspec a functional testing framework and I open source the specifications in our community project eXpandFramework. These follow bellow,
MemberMapper, When Class Has a flag that includes all members
» should collect all members that belong to the class
» should not collect any base class member
» should create new members for each one of them
MemberMapper, When class does not have a flag that includes all ownmembers
» should not create members for those not marked with the attribute
» should create members and name them according to the attribute data
» should create a key property if not included in the conficuration
MemberMapper, When class attribute has data for base members
» should create and name them according to the attribute data
» should map their attributes
MemberMapper, When class is marked to include all member but member is marked seperately
» should use the member marking
MemberMapper, When mapping a referenced member
» should create a member with a dynamic type ownwer
MemberMapper, When reference type is not includedIN the configuration
» should create non reference member
ClassMapper, When creating dynamic classes
» should Create Classes only for the ones that have a marking attribute
» should name the classes taking data from marking attribute
ClassMapper, When class has many to many collection marked for importing
» should create intermediate classes
» should create an auto genareted key for this class
» should create 2 columns with names taken from the marked attribute
DictionaryMapper, When is mapping a dictionary
» should map all marked objects
InitDataImporter, When importing an object
» should create a new output object
» should assign all mapped properties
InitDataImporter, When input membertype is different than output
» should convert the value when simple type
» should convert the value when reference type
21 passed, 0 failed, 0 skipped, took 1.61 seconds (Machine.Specifications 0.5.2-98b543c).
The above specifications are evaluated with every eXpand build and you can see them in eXpand’s build server. Take a quick look at their code located in github to see how easy it is to write them (http://goo.gl/TNv4d).
Now lets see how to use our magic XPO ORM to import into the real world business domain like the one of our XVideoRental demo,

For the sake of complexity the input source will be a list of excel files and not just a simple Excel file with many sheets.

XPO supports a DataStore provider which is based on DataSet. So, first we fill a DataSet with the excel files and for this I will use some DataSet extension methods I contributed to eXpand (see http://goo.gl/TF26g)
static DataSet DataSet() {
var dataSet = new DataSet();
dataSet.ImportExcelXLS(new[]{
"Customer", "Receipt", "Company", "CompanyType", "Country", "Employee", "Language", "Movie", "MovieArtist",
"MovieArtistLine", "MovieCategory", "MovieCategoryPrice", "MovieCompany", "MovieItem",
"MovieMovies_CountryCountries", "MoviePicture","Person","Artist","ArtistPicture","Rent"
});
return dataSet;
}
Now we are ready to create a UnitOfWork with this DataSet as DataStore like,
var inputUnitOfWork = new UnitOfWork(new SimpleDataLayer(new DataSetDataStore(DataSet(), AutoCreateOption.None)));
and finally call the Import method of the InitDataImporter class as shown bellow
var initDataImporter = new InitDataImporter();
var unitOfWork = OutputUnitOfWork();
var inputUnitOfWork = new UnitOfWork(new SimpleDataLayer(new DataSetDataStore(DataSet(), AutoCreateOption.None)));
initDataImporter.Import(() => new UnitOfWork(unitOfWork.ObjectLayer), () => new UnitOfWork(inputUnitOfWork.ObjectLayer));
This simple, however powerful technic can be applied to any type of input source as long as you are able to fill a DataSet!
You can download a sample project was created with v12.2.5 of our Suite from Importer.Console.
Happy New Year to everybody!

-
XAF knowledge base is really rich and in our Support Center you can find solutions for all common business problems. Moreover our community project www.expandframework.com has tones of reusable solutions, we collected a few of them and applied them to the video rent business. The demo is available with 12.2.4 version of our Suite and can be found in the same folder with the other amazing XAF demos!
XAF is a framework that provides the tools that a developer needs for building business solutions.
- A state of the art multi layered configuration system – The Application Model.
- A robust and flexible Security System that can be used to protect our data and control the auto generation of the UI based on Role permissions
- Its own reflection system (TypesInfo)– with amazingly simple ways to do what .NET does not offer eg. Runtime members, dynamic attributes etc.
- A well designed architecture to guide you where you should put your code. Moreover a very flexible modularization for structuring and further supporting any solution.
- WinForms/ASP.NET integration for a large number of our components
- Rich documentation and a click and run SDK!
XVideoRental is a real world application (RWA). It is designed as a clone of our WinForms VideoRent application and demos only a small part of XAF capabilities. XAF provides the tools/architecture to do extraordinary things so we have followed a (no code)/(design at runtime) approach!. We recommend you to open the legacy Winforms demo and XVideoRental side by side and compare how much faster and richer is XAF development versus the traditional one. Moreover take a look at this help document that extensively compares traditional vs XAF development.
- XVideoRental uses a mechanism to serialize classes into Application Model and control them further from there! Therefore minimizes the learning curve since it is based on your existing component knowledge. (see this blog)
- It is a modeling rather than development technic. In addition allows further modeling at runtime since XAF already provides a runtime model editor.
- Implementations are collected from our usual places (Support Center / Code Central) / www.expandframework.com.
The XVideoRental demo has three projects:
Common.Win
This is a library (not XAF module) and contains 95% of the code needed to model the VideoRental business! As a library can be reused from all domains and not only for video rental business. By extending the model as discussed in Dressing up our classes – Date with a model tonight! it is possible to create an abstract mechanism and control any class/component from there. Since all business operations can be modeled, the library contains controllers like NetIncomeController, TopObjectController that map to the real world meanings and can be applied to any domain. The XAF Application Model serves as an abstraction from technology and business specifics. This module is assembled by collecting the classes/implementations from our Support Center and from our community project www.expandframework.com.
XVideoRental.Module.Win
References Common.Win library and simple initializes the required classes/controllers by deriving from the abstract implementation of Common.Win library. However even if it is possible to “model” any behavior sometimes technical depth must be considered. Therefore in the project you will find a small number of video rental specific classes. In this project you can also find the model differences for this business domain.
XVideoRental.Win
This is the application project and contains no code. Only a few default configurations like module and security registrations.
In the next post we are going to discuss the steps involved in building this application. I remind you again that all code functionality is borrowed from our community, this means that code / ideas really belong to you! We welcome more of your contributions and ideas to build even more wonderful applications. Please explore this demo and we are waiting for your feedback in order to blog more about features that interest you.
A similar version can found in our community project www.expandframework.com. This version has exactly the same functionality as the original demo. However it references directly the eXpand framework so the Common.Win project does not exist nor the initialization of the controllers in the XVideoRental.Module.Win.
We are looking forward for your feedback and contributions in order to make this demo even more powerful! In its current state, a developer can replace before lunch all the business objects with objects of a different business domain then package the application and go to customer and continue development there, at runtime! The final goal as developers is to build such configurable applications that business users can use and modify and shift this weight of our backs. XAF provides all the tools for this and this demo is a proof for this!
Bellow is a short video that shows this demo. You can find about two more dozen of images of this demo in our FB group
PS: A thanks to everybody that already provided feedback and reported issues with this demo. We already provided a newer version with improved performance and you can find it here. For posts related to the XVideoRental demo please subscribe to to the XVideoRental tag
Happy XAFing!

-
Classes are in a sense behavior libraries. To initialize or configure them, we can use their properties. Serialization is a technic that helps distribute the state of our classes. In this post we will discuss how to serialize any class in the multi-layer XAF model! Then we finish with the model synchronizers which will control the class. Having a class or a part of a class serialized in the model makes it possible to continue development there without writing more code (declarative/runtime approach).
Runtime classes
In .NET is super easy to create runtime classes or interfaces. The following snippet will create a assembly with a Dynamic class.
var provider = CodeDomProvider.CreateProvider("c#");
var results = provider.CompileAssemblyFromSource(new CompilerParameters(), new[] { @"public class DynamicClass{}" });
Assembly compiledAssembly = results.CompiledAssembly;
Modeling
XAF’s super advanced and simple model technology is using interfaces for design and further extension. This is well documented How to: Extend Application Model. To serialize any class on the XAF model we simply need to use reflection, extract an interface from the class and extend any part of the model we want with it.
Let’s see a few examples using XAF build-in components.
1) GridListEditor
XAF’s GridListEditor is based on the GridView class which is a very sophisticated component with a lot of properties. Serializing it into the model allow us to control it from there. Using the model it is possible to work at runtime and since we have a lot of properties it is wise to serialize their help as well (see red arrow).

2) ChartListEditor
This is a very useful editor that also needs better control from our model. Note that this model serialization is reusable from all our projects!

This technic can boost our runtime experience and make it possible to work side by side with our customer building really fast. Furthermore it is applicable to any class or component. Let’s a few more interesting examples.
3) Repository Items
XAF’s DX PropertyEditors render DX controls which store their configuration in RepositoryItem classes. We can serialize all ReporitoryItem descendants and extend the IModelColumn. As a result by simply changing a model attribute we can do things at runtime that with a code approach would be very time consuming.

4) The SchedulerListEditor

5) The PivotListEditor
This one uses the same serialization approach however since this is a very useful editor we modeled a few extra behaviors – the pivot rules!. We would probably create a separate post about them.

Furthermore here we need to notice that we can model business meanings such as NetIncome, so for the following model modifications,
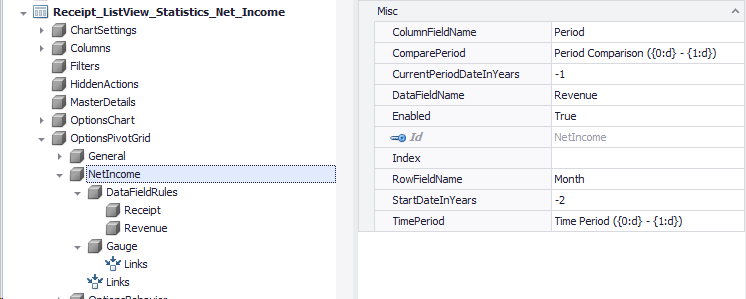
XAF will render the View bellow without any coding or dependency to any object!

Another example, when we talk about the TopObject meaning, we can model it like
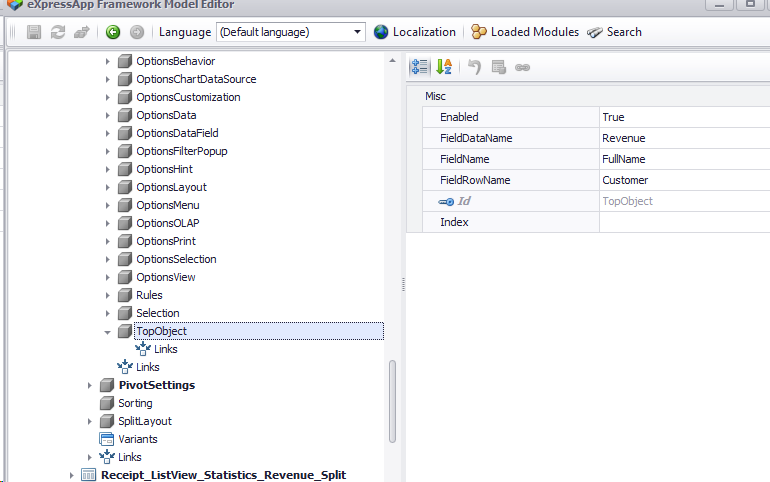
and XAF will give us the following View again without writing not even one line of code (no code==no bugs)
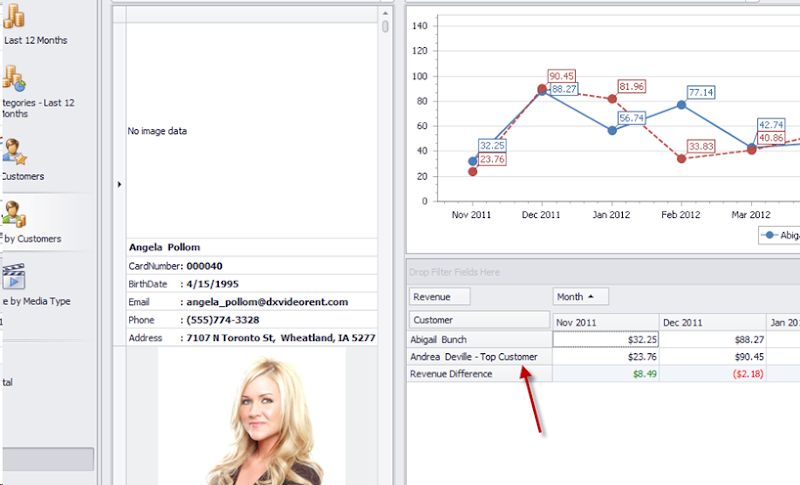
Model synchronization
ModelSynchronizers can be used to:
a) set up an entity according to the configuration stored in the Application Model
b) Persists the configuration of an entity into the Application Model
Model’s nature makes it very abstract so since the attributes of the model are automatically generated from the properties of a class, its rather easy to do the opposite. Therefore we can write an abstract class that will implement IModelSynchronizable interface. The method SynchronizeValues is reading from any class and updates the model. The method ApplyValues is reading the values of the model and synchronize any class that properties match model’s attribute Ids.
protected void SynchronizeValues(ModelNode modelNode, object component, PropertyDescriptorCollection properties) {
foreach (var valueInfo in GetModelValueInfos(modelNode)) {
var propertyDescriptor = properties.Find(valueInfo.Name, false);
if (propertyDescriptor != null) {
var propertyValue = GetPropertyValue(component, propertyDescriptor, valueInfo, modelNode);
var modelValue = GetSynchronizeValuesNodeValue(modelNode, valueInfo, propertyDescriptor, valueInfo.PropertyType.IsNullableType(), component);
if (modelValue != null && !modelValue.Equals(propertyValue)) {
modelNode.SetValue(valueInfo.Name, propertyValue);
}
}
}
}
protected void ApplyValues(ModelNode node, object component, PropertyDescriptorCollection properties) { foreach (var valueInfo in GetModelValueInfos(node)) {
var propertyDescriptor = properties.Find(valueInfo.Name, false);
if (propertyDescriptor != null) {
var nodeValue = GetApplyModelNodeValue(node, valueInfo);
if (nodeValue != null) {
var propertyType = propertyDescriptor.PropertyType;
var propertyValue = propertyDescriptor.GetValue(component);
if ((!IsDefaultCoreValue(nodeValue, propertyType) || (!nodeValue.Equals(propertyValue))) && propertyType.IsValidEnum(nodeValue)) {
if (!nodeValue.Equals(propertyValue))
propertyDescriptor.SetValue(component, nodeValue);
}
}
}
}
}
Finally for each component we want to synchronize we create a descendant of the above implementation. For example,
AdvBandedListEditor
public class AdvBandedViewOptionsSynchronizer : ComponentSynchronizer<DevExpress.XtraGrid.Views.BandedGrid.AdvBandedGridView, IModelOptionsAdvBandedView> {
public AdvBandedViewOptionsSynchronizer(AdvBandedListEditor control)
: base(control.GridView, control.Model.OptionsAdvBandedView, ((IColumnViewEditor)control).OverrideViewDesignMode) {
}
}
ChartControlListEditor
public class ChartControlSynchronizer : ComponentSynchronizer<DevExpress.XtraCharts.ChartControl, IModelOptionsChart> {
readonly XafApplication _application;
We have discussed ways to model components into a distributable layer that describes a XAF. Even more we show how simple would be a model representation of business meanings (eg. NetIncome). It is clear that these tools are reusable from any project. We only need to feed XAF with a business domain and a few model modifications even in runtime to be able to have a working solution! A solution so rich in features that it is impossible to implement using the traditional approach.
The code and screen shots are taken from the XVideoRental application. This demo that can be found along with the other XAF demos in v12.2. Next posts will be about this new demo that really proves how XAF can save our time by lifting the development to the runtime!
P.S. If you are a facebook fun you can support us with a like for our new XAF page.
We are happy to read your feedback about this!. Remember that your questions are the best candidates for future posts.
Happy XAFing!


-
XAF has a great security system which can be used to protect our data either at client or server side. There is also great support for modifying the Security behavior at runtime using a permission matrix. However we need to provide initial before distributing our application. In this post we are going to discuss a way connecting methods that describe permission policies with our domain objects using metadata (Attributes).
For supplying initial data XAF provides a well documented approach through ModuleUpdaters. We can use them and write methods that create initial permissions. There are also many extension methods that can help us write faster code,

Full permission policy
This policy can be applied to any role and give full permission for the related objects. To connect a domain object with a method we need to do the following:
- Define a FullPermissionAttribute as,
[AttributeUsage(AttributeTargets.Class, AllowMultiple = false)]
public class FullPermissionAttribute : Attribute {
}
- Decorate all related objects
[FullPermission]
public class MovieArtist : VideoRentalBaseObject {
[FullPermission]
public class Artist : VideoPerson {
- With the use of XAF’s sub types info metadata API write an abstract algorithm that will enumerate all domain objects and assign full permission to them for a certain role
public static void CreateFullPermissionAttributes(this SecuritySystemRole systemRole, bool defaultAllowValues = true) {
var persistentTypes = XafTypesInfo.Instance.PersistentTypes.Where(info => info.FindAttribute<FullPermissionAttribute>() != null);
foreach (var typeInfo in persistentTypes) {
systemRole.CreateTypePermission(typeInfo.Type, defaultAllowValues);
}
}
public static SecuritySystemTypePermissionObject CreateTypePermission(this SecuritySystemRole systemRole, Type targetType, bool defaultAllowValues = true) {
var permission = systemRole.CreateTypePermission(targetType);
permission.TargetType = targetType;
permission.AllowDelete = defaultAllowValues;
permission.AllowNavigate = defaultAllowValues;
permission.AllowRead = defaultAllowValues;
permission.AllowWrite = defaultAllowValues;
permission.AllowCreate = defaultAllowValues;
return permission;
}
- Invoke the CreateFullPermissionAttributes form the roles you want to apply inside the ModuleUpdater’s
public override void UpdateDatabaseAfterUpdateSchema() {
base.UpdateDatabaseAfterUpdateSchema();
var employersRole = ObjectSpace.GetRole<SecuritySystemRole>("Employers");
employersRole.CreateFullPermissionAttributes();
Permission Behavior policy
A common policy for an application is a “settings” policy. Which really means that for certain roles like the employee role there should be limited access to objects that store “settings” data. To implement this we can follow the follow steps
- Define an attribute to decorate our objects as in previous step. This time we do not know the policy name (settings) so we design this as an Enum parameter in the ctor.
[AttributeUsage(AttributeTargets.Class, AllowMultiple = false)]
public class PermissionBehaviorAttribute : Attribute {
readonly string _name;
public PermissionBehaviorAttribute(object @enum) {
if (!@enum.GetType().IsEnum)
throw new NotImplementedException();
_name = Enum.GetName(@enum.GetType(), @enum);
}
public PermissionBehaviorAttribute(string name) {
_name = name;
}
public string Name {
get { return _name; }
}
}
- Design an enumeration to hold all possible security policies
public enum PermissionBehavior {
Admin,
Settings,
ReadOnlyAccess
}
- Decorate related objects
[PermissionBehavior(PermissionBehavior.ReadOnlyAccess)]
public class Language : VideoRentalBaseObject {
- Create a method to describe the ReadOnlyAccess permission policy inside ModuleUpdater.
public class Updater : ModuleUpdater {
void ReadOnlyAccesPermissionBehaviour(SecuritySystemRole securitySystemRole, ITypeInfo typeInfo) {
securitySystemRole.SetTypePermissions(typeInfo.Type, SecurityOperations.ReadOnlyAccess, SecuritySystemModifier.Allow);
}
- With the use of XAF’s sub types info API write an abstract algorithm that will enumerate all domain objects and invoke a delegate with same parameters as the method in step 4
public static void CreatePermissionBehaviour(this SecuritySystemRole systemRole, Enum behaviourEnum, Action<SecuritySystemRole, ITypeInfo> action) {
var typeInfos = XafTypesInfo.Instance.PersistentTypes.Where(info => {
var permissionBehaviorAttribute = info.FindAttribute<PermissionBehaviorAttribute>();
return permissionBehaviorAttribute != null && permissionBehaviorAttribute.Name.Equals(Enum.GetName(behaviourEnum.GetType(), behaviourEnum));
});
foreach (var typeInfo in typeInfos) {
action.Invoke(systemRole, typeInfo);
}
}
- Invoke the CreatePermissionBehaviour inside the ModulerUpdater feeding it with the ReadOnlyAccesPermissionBehaviour method of step 4
employersRole.CreatePermissionBehaviour(PermissionBehavior.ReadOnlyAccess, ReadOnlyAccesPermissionBehaviour);
In this post we created reusable algorithms from any XAF projects to help us speeding up the configuration of the initial permissions. When of course talking about code reusability we talk about money saving!
P.S. In a real world application the above coding will be converted to a permission matrix UI representation like,

We would appreciate your feedback on this post. Has it been useful to you? Feel free to contact us with any further questions
Next post will be about what else? its model time!
Happy XAFing as always.


-
DashboardView is a type of XAF View that is used to display several Views side-by-side. However XAF by default does not provide any connection between these Views. In this post, with the help of XAF model, we will discuss a few abstract connection mechanisms and possible uses of dashboards.
Cascading ListViews
In a dashboard, in order to connect the ListViews we need first to connect their models. This can be done using the following interfaces,
public interface IModelDashboardViewFilter : IModelNode {
[DataSourceProperty("FilteredColumns")]
IModelColumn FilteredColumn { get; set; }
[DataSourceProperty("DataSourceViews")]
IModelListView DataSourceView { get; set; }
}
[ModelAbstractClass]
public interface IModelDashboardViewItemEx : IModelDashboardViewItem {
IModelDashboardViewFilter Filter { get; }
}
and then extend XAF’s model, see also our documentation on extending the model
public void ExtendModelInterfaces(ModelInterfaceExtenders extenders) {
extenders.Add<IModelDashboardViewItem, IModelDashboardViewItemEx>();
}
This design allows us to use Model Editor to connect our views. In the following image we see that the selected objects of the Customer_ListView_Calendar are going to filter the Calendar list view on the Receipt.Customer field.

Next we see this dashboard view in action, a SchedulerListEditor on the right is filtered by a GridListEditor,

Following we see this technic applied to 3 ListViews. The selected pie section of the left View filters the pivot which in its turn filters a LayoutListEditor!

Cascading views are as well useful for filtering reports, so by selecting objects on the left View we create a report on the right view and everything is inside a Tabbed MDI environment!

Of course we haven’ wrote the code yet but this is the easy part. XAF’s API is so rich and so well designed that is like we speak our native language! The great thing when XAFing is that our code is fully reusable from any project since it has no knowledge of our domain objects.
Let try to form our requirement in English first:
For each ListView in a Dashboard we need to filter another View when the selection is changed
And now in XAF language  :
:
protected override void OnViewControlsCreated() {
base.OnViewControlsCreated();
foreach (var result in View.Items.OfType<DashboardViewItem>()) {
var frame1 = result.Frame;
if (frame1 != null && frame1.View is ListView) {
var listView = ((ListView)frame1.View);
DashboardViewItem result1 = result;
listView.SelectionChanged += (sender, args) => OnSelectionChanged(new SelectionChangedArgs(listView, result1));
}
}
void OnSelectionChanged(SelectionChangedArgs selectionChangedArgs) {
var dataSourceListView = DataSourceListView((IModelListView)selectionChangedArgs.DashboardViewItemModel.View);
if (dataSourceListView != null) {
var dashboardViewItems = View.Items.OfType<DashboardViewItem>();
foreach (var dashboardViewItem in dashboardViewItems) {
var modelDashboardViewItemEx = (IModelDashboardViewItemEx)dashboardViewItem.GetModel(View);
FilteredListView(dataSourceListView, dashboardViewItem, modelDashboardViewItemEx);
}
}
Controlling DashboardViewItem visibility
Cascading views are really powerful and soon we will have the need to hide an intermediate view in the chain but being able to filter other views upon it. Therefore we need to add a Visibility property in our model and handle it from our code.
public interface IModelDashboardViewItemEx : IModelDashboardViewItem {
[DefaultValue(ViewItemVisibility.Show)]
ViewItemVisibility Visibility { get; set; }
and in a reusable from all projects controller implement the required logic.
protected override void OnActivated() {
base.OnActivated();
((ISupportAppearanceCustomization)View.LayoutManager).CustomizeAppearance += LayoutManagerOnCustomizeAppearance;
}
void LayoutManagerOnCustomizeAppearance(object sender, CustomizeAppearanceEventArgs customizeAppearanceEventArgs) {
var modelDashboardViewItem = View.Model.Items.OfType<IModelDashboardViewItemEx>().FirstOrDefault(item => item.Id == customizeAppearanceEventArgs.Name);
if (modelDashboardViewItem != null)
((IAppearanceVisibility)customizeAppearanceEventArgs.Item).Visibility = modelDashboardViewItem.Visibility;
}
Displaying HTML Messages
A DashboardView does not have direct dependency with our domain objects. Therefore we can easily use it, even at runtime, to display static text view items and other controls (ControlDetailItem) or images (StaticImage).

XAF has great support for HTML Formatting so a Static Text like “<u><b>Hello</b></u>” will render the following:

Simulating View inheritance
XAF does not support View inheritance however we can extend our model and support it. Lets take the case that we have a very complex listview and we want to display it in both in MasterDetail and ListViewOnly modes without the need to support two View versions. For this we have to extend again the model, this time by a MasterDetailMode property and implement the logic in a ViewController.
[ModelAbstractClass]
public interface IModelDashboardViewItemEx : IModelDashboardViewItem {
MasterDetailMode? MasterDetailMode { get; set; }
public class DashboardInteractionController : ViewController<DashboardView>, IModelExtender {
protected override void OnViewControlsCreated() {
base.OnViewControlsCreated();
ResetMasterDetailModes();
}
void ResetMasterDetailModes() {
foreach (var masterDetailMode in _masterDetailModes) {
masterDetailMode.Key.MasterDetailMode = masterDetailMode.Value;
}
_masterDetailModes.Clear();
}
protected override void OnActivated() {
base.OnActivated();
foreach (var item in View.GetItems<DashboardViewItem>().Select(item => item.GetModel(View)).OfType<IModelDashboardViewItemEx>()) {
AssignMasterDetailModes(item);
}
}
void AssignMasterDetailModes(IModelDashboardViewItemEx modelDashboardViewItem) {
if (modelDashboardViewItem.MasterDetailMode.HasValue) {
var modelListView = modelDashboardViewItem.View as IModelListView;
if (modelListView != null) {
_masterDetailModes.Add(modelListView, modelListView.MasterDetailMode);
modelListView.MasterDetailMode = modelDashboardViewItem.MasterDetailMode.Value;
}
}
}
Since XAF has a great modularization system the core classes/implementations of the above ideas are included in this zip file. However we will not update the contents of the zip file. For locating up to date versions each file in the zip has an OnlineRepoLocation attribute that points to eXpandFramework’s Github repository.
This post adds a few more tools in our development library that can leverage the XAF power using the Model. When we “model” there are three basic advantages:
- We can use these model tools at runtime. For this XAF already provides a runtime time Model Editor.
- We create robust unbreakable code and since we model instead of developing we mostly have no bugs only wrong configuration!
- Implementations are reusable from all our projects!
Next post we will boost our R&D times even further and discuss a bit about Security system policies.
P.S.: We are preparing detailed samples demonstrating all the above ideas  , stay tuned!
If some of you have invented similar ways to connect your dashboards. You can use our support center and share them with the rest of the community.
Happy XAFing!


-
To improve development time and achieve better results we need to use frameworks like XAF. Moreover with XAF it’s really easy to create applications that are maintainable at runtime! After designing a domain model in VS we are almost ready to go. At this point, however we need a smart and flexible importing mechanism for feeding our domain models with initial data. Customers are impressed when they see real world data! So lets build together this mechanism proving once more the XAF power.
Requirements
- Domain model agnostic.
This really means that our importing algorithms should depend only on object types. Therefore we can implement this as an attribute and decorate our domain objects.
- Database agnostic
XPO that supports all common database engines with its rich metadata API is our answer here.
- Flexible mapping configuration
For this we are going to create the an XPO dictionary on the fly. Querying our domain object attributes we can map this dictionary correctly.
- Inheritance mapping configuration
Take as example an Artist, Customer both inheriting a Person object. The attribute should allow to map different the properties of Person when Artist and when Customer.
Examples
- The following example imports all members that belong to MovieArtist from a table with same name columns (AllOwnMembers=true). In addition it maps the oid column in the table of the importing data store to the Oid property of VideoRentalBaseObject (BaseNMembers=”oid|Oid”). Finally it does lookup data in a data store in a table named vMovieArtist (Name=”vMovieArtist”).
[InitialData(BaseMembers = "oid|Oid", AllOwnMembers = true,Name = "vMovieArtist")]
public class MovieArtist : VideoRentalBaseObject {
Artist artist;
Movie movie;
-
The next one imports from a table named CompanyType only the column named Name (AllOwnMembers=false, BaseMembers=null, only Name property is decorated)
[InitialData()]
public class CompanyType : VideoRentalBaseObject {
[InitialData]
public string Name {
get { return _name; }
set { SetPropertyValue("Name", ref _name, value); }
}
-
By default all object relations are auto imported unless the related object is not included in the configuration. Then only the key value is imported. It is also possible to control the mapping in many to many relations as
public class Movie : VideoRentalBaseObject {
[InitialData(DataProviderTableName = "CountryMovies", DataProviderQueryColumnName = "Movies", DataProviderResultColumnName = "Countries")]
[Association("Movies-Countries")]
public XPCollection<Country> Countries {
get { return GetCollection<Country>("Countries"); }
}
The algorithm
- This is an initial data import mechanism. For such operations XAF provides the ModuleUpdater. We need the XafApplication’s IObjectSpace and one UnitOfWork that connects to an external data source so we can simply design an extension method like,
public static void Import(this IObjectSpace objectSpace, UnitOfWork unitOfWork) {
}
and invoke it inside UpdateDatabaseAfterUpdateSchema as,
public class Updater : ModuleUpdater {
public Updater(IObjectSpace objectSpace, Version currentDBVersion) : base(objectSpace, currentDBVersion) { }
public override void UpdateDatabaseAfterUpdateSchema() {
base.UpdateDatabaseAfterUpdateSchema();
var connectionString = ConfigurationManager.ConnectionStrings["initialdata"].ConnectionString;
ObjectSpace.Import(new UnitOfWork{ConnectionString = connectionString});
- Using XAF’s rich reflection API we can enumerate all our domain objects, search for the InitialData attribute and create an XPO dictionary on the fly! This is rather easy as XPO follows a similar to .NET structure, so we have to create XPClassInfo for Classses and XPMemberInfo for members. A great sample exists in our code central so we can get a fast start with this API (E269). Following are the 2 main methods that implement the import mapping.
public static void ImportCore(this IObjectSpace objectSpace, UnitOfWork unitOfWork) {
var builder = new InitDataDictionaryBuilder(objectSpace);
builder.InitDictionary(unitOfWork);
foreach (var persistentTypeInfo in builder.GetPersistentTypes()) {
Import(objectSpace, builder, unitOfWork, persistentTypeInfo);
}
unitOfWork.CommitChanges();
}
internal class InitDataDictionaryBuilder {
public void InitDictionary(UnitOfWork unitOfWork) {
var persistentTypes = GetPersistentTypes();
CreateMemberInfos(unitOfWork.Dictionary, persistentTypes);
}
A complete and up to date version can be found in expandframework’s github repository.
In this post we improved the already rapid XAF development, by creating the import mechanism from almost any type of data into our domain model. In the next one we will visit another great tool offered by XAF the dashboard views.
We would appreciate your feedback on this post. Has it been useful to you? Feel free to contact us with any further questions.
Happing XAFing as always!


-
In this post we will discuss how straight forward is to provide a solution for this science fiction subject! Our frameworks (XAF and XPO) along with a few smart classes are fully capable of doing all the hard job and spare our resources. At the end we will be able to apply all the XAF tools / modules in any legacy database. The module can connect the database world with powerful tools like the DX grids. In addition we can use use XAF’s main metadata storage (the model), the security system and all XAF’s modules. These tools are are so powerful that are able to produce logic by themselves! Having such great configuration flexibility it is possible to write behavior after distribution thus you enter new markets and ideas! In addition the module allows you to control the logic after generation using Xaf’s meta driven developing model.
Retrieving any database metadata
XPO is the best candidate for this. since it can transparently talk to more than 15 different database systems!
The metadata API used from XPO to describe its supported databases is very simple as shown,

In a nutshell for each supported database, XPO will return a set of DBTable classes. Each DBTable will be associated with one DBPrimaryKey class and a collection of DBColumn and DBForeighKey classes. Next is the code required to get the DBTable classes out of database and with no surprise again is very simple!
var storeSchemaExplorer = ((IDataStoreSchemaExplorer)XpoDefault.GetConnectionProvider("ConnectionString", AutoCreateOption.None));
var storageTables = storeSchemaExplorer.GetStorageTables(storeSchemaExplorer.GetStorageTablesList());
foreach (DBTable dbTable in storageTables) {
foreach (DBColumn dbColumn in dbTable.Columns) {
//now we are ready to do magic!
}}
Connecting at runtime – The magic part
In order to query and create CRUD operations for a database system XPO requires a set of business classes. However, now there is a runtime factor involved. We need to create these business classes dynamically.
XAF’s modularized architecture made this task too easy for us! We already created a dynamic class generation module called WorldCreator in the past. WorldCreator maps the structure of an assembly into persistent classes.

What we need is for each database to create a new PersistentAssemblyInfo, then for each DBTable a new PersistentClassInfo and finally for each DBColumn a new PersistentMemberInfo. In pseudo code this will look like,
var persistentAssemblyInfo = ObjectSpace.CreateObject<PersistentAssemblyInfo>();
foreach (DBTable dbTable in storageTables) {
var persistentClassInfo = ObjectSpace.CreateObject<PersistentClassInfo>();
persistentAssemblyInfo.Name = dbTable.Name;
persistentAssemblyInfo.PersistentClassInfos.Add(persistentClassInfo);
foreach (DBColumn dbColumn in dbTable.Columns) {
var persistentMemberInfo = ObjectSpace.CreateObject<PersistentMemberInfo>();
persistentMemberInfo.Name = dbColumn.Name;
persistentClassInfo.OwnMembers.Add(persistentMemberInfo);
}
}
WorldCreator UI allows further extension of the model as simple as writing .NET code or creating new objects. More ideas and contributions are always welcome.
Up to this point everything was extremely easy for us and almost shocking in terms of productivity! I believe there is no reason to change that feeling so lets move to our final task.
WorldCreator is simply a code generation module. It generates assemblies which include XAF modules and loads them at application startup. However that assembly has no difference at all from the assemblies we create at design time. The persistent classes of this dynamic module belong and point back to main XAF database. What we want here is to redirect the generated sql statements back to the original mapped database.
Once more we have most of the job ready! eXpand already uses a proxy version of ObjectSpaceProvider to support scenarios similar to show Business Classes from several databases in a XAF application. Thus associating a WordCreator assembly (set of business classes) with a database is a rather easy job.
Connecting to any database at runtime at first sounded very complicated. However our frameworks proved once more that they can raise our productivity and make our jobs so simple that even such complex task can fit in a small post like this one.
The new module DBMapper, is already released as part of eXpand framework’s modules collection.
We would appreciate your feedback on this post. Has it been useful to you? Feel free to contact us with any further questions.


