-
Although I promised to talk about Stephen Manderson’s Dashboard module I will skip and I will provide a discussion on dynamic member aliases. The reason is that cross data source filtering provided by the Dashboard Suite does not permit aliases for our aggregated members. I already touched dynamic members subject at calculated members creation—Pros and Cons. However today we will go in details through all steps involved in creating member aliases through XAF’s Application Model and as usual at the end of the post a sample will be available.
In the following image you can see existing implementations from our community project eXpand as discussed in calculated members creation—Pros and Cons.
![image_thumb[14]](http://community.devexpress.com/blogs/eaf/image_thumb14_thumb_03AD71AD.png)
In this post we are only interested in the RuntimeCalculatedMember entry.,
Extending the model
Following our documentation to the letter (How to: Extend the Application Model) first we need to define and interface that will persist all parameters to the model.
public interface IModelRuntimeCalculatedMember : IModelMember {
[Required]
string AliasExpression { get; set; }
}
The context popup menu
You probably noticed in IModelRuntimeCalculatedMember instead of deriving from IModelNode interface as suggested in our docs we used the IModelMember. This is an already registered interface that describes the model members. So do not need to re extend our Application Model with the IModelRuntimeCalculatedMember. XAF knows how to create the popup menu with the correct entry:

Changing Model Editor’s behavior
AliasExpression
In IModelRuntimeCalculatedMember we marked the AliasExpression property with the RequiredAttribute because an empty alias is not valid. XAF Model Editor will notify that this is a mandatory property with an asterisk icon as shown:

Editable Type at Runtime
Since our IModelRuntimeCalculatedMember derives from IModelMember and not from IModelNode it inherits all its properties. This however, raises a conflict with XAF’s native support for design time custom members. The conflict refers to IModelMember Type property which is by design editable only in design time. As we see in the next image is marked with a ModelReadOnlyAttribute which tells Model Editor what to do.

In XAF everything is overridable! So to change Type property we need to create a new Type property in our IModelRuntimeCalculatedMember and mark it with the new keyword. In addition we need to create and use an AlwaysEditableCalculator instead of the DesignerOnlyCalculator:

Remember the IsCustom functionality
As I already mentioned XAF has native support for runtime members only if Model Editor is at design time. This is done adding a new IModelMember and setting IsCustom to true as shown:


IModelRuntimeCalculatedMember inherits from IModelMember. This means when we create a new IModelRuntimeCalculatedMember XAF will set IsCustom to true as it does for simple IModelMember. ModuleUpdaters that can change Application Model’s values are designed to work only in the “zero” layer and here we need to change the differences made from the Model Editor designer. However XAF is designed to be extensible and our docs to solve the problems Convert Application Model Differences. The solution to this problem is to implement Implement a Node Updater following our docs to the letter:

NodeUpdaters are one more powerful tool provided to us by XAF an is designed to take us out of trouble. As you can see in above image it does it fairly simple.
- We make our module or any class a NodeUpdater by implementing the IModelNodeUpdater<T> interface.
- We register the new NodeUpdater by overriding the AddModelNodeUpdaters or our module.
- Implement our logic inside the the UpdateNode method
The Dessert
The AliasExpression property will hold basic criteria + complex criteria as well as aggregated function. Right now there is no editor associated with the property. However we can easily associate a CriteriaModelEditorControl editor as shown:

As we see the CriteriaModelEditorControl offers great features:

The Coding part
Up to now we modeled a new Application Model member type the IModelRuntimeCalculatedMember. What remains is to write the algorithm to create that member in our TestBO object. Unfortunately we cannot use the standard place for extending our business objects as suggested by our knowledgebase. This is because the Application Model is not fully constructed at that point. However we can use any other place, as far as our algorithm is smart enough to execute just one time without consuming many resources.
private static IEnumerable<IModelRuntimeCalculatedMember> GetCustomFields(IModelApplication model) {
return model.BOModel.SelectMany(modelClass => modelClass.AllMembers).OfType<IModelRuntimeCalculatedMember>();
}
static void AddRuntimeMembers(IModelApplication model) {
foreach (IModelRuntimeCalculatedMember modelRuntimeMember in GetCustomFields(model))
try {
Type classType = modelRuntimeMember.ModelClass.TypeInfo.Type;
XPClassInfo typeInfo = _dictionary.GetClassInfo(classType);
lock (typeInfo) {
if (typeInfo.FindMember(modelRuntimeMember.Name) == null) {
new XpandCalcMemberInfo(typeInfo, modelRuntimeMember.Name, modelRuntimeMember.Type, modelRuntimeMember.AliasExpression);
XafTypesInfo.Instance.RefreshInfo(classType);
}
}
In fact forget about the many resources when using our frameworks, Please search our Support Center, there are answers to almost all common problems you will face! If not shoot the guys they are happy to die for you  !
!
Now let’s touch the unknown XpandCalcMemberInfo class:
- XPO allows non persistent calculated properties with the use of PersistentAliasAttribute.
- To create a dynamic member we simply need to instantiate an XPCustomMemberInfo derivative like the XpandCalcMemberInfo.
public class XpandCalcMemberInfo : XPCustomMemberInfo {
public XpandCalcMemberInfo(XPClassInfo owner, string propertyName, Type propertyType, string aliasExpression)
: base(owner, propertyName, propertyType, null, true, false) {
AddAttribute(new PersistentAliasAttribute(aliasBLOCKED EXPRESSION;
}
public override object GetValue(object theObject) {
var xpBaseObject = ((XPBaseObject)theObject);
return !xpBaseObject.Session.IsObjectsLoading && !xpBaseObject.Session.IsObjectsSaving
? xpBaseObject.EvaluateAlias(Name)
: base.GetValue(theObject);
}
protected override bool CanPersist {
get { return false; }
}
}
Therefore in the constructor we added a PersistentAliasAttribute using the AddAttribute method of the XPCustomMemberInfo. In addition we had to modify the returned value of the member by overriding the GetValue method and using an approach similar with the EvaluateAlias docs,
Best place to create the dynamic members
In my opinion there is no such place and everything depends on our requirements. However I can suggest a solution we used in eXpand for many years without problems. You can do it just after login where the the user model is fully merged.
public sealed partial class DynamicMemberAliasesModule : ModuleBase {
public override void Setup(XafApplication application) {
base.Setup(application);
application.LoggedOn += (sender, args) => RuntimeMemberBuilder.AddFields(application.Model);
}
The check please!
We discussed in detail all the steps needed for dynamic member aliases. In DynamicMemberAliases.zip is a XAF solution to see everything in action.
To implement the rest of the dynamic members (RuntmeNonPersistent, RuntimeOrphanedCollection, RuntimeMember) you either
- Need to use core or ModelDifference module of eXpandFramework (see .
- Copy RuntimeMemberBuilder, all interfaces from IModelRuntimeMember.cs and extend the Application Model with the included IModelMemberEx interface.
That’s all you need, to have a few productive and happy hours with XAF  . I really enjoy working with such a flexible framework and I am sure the XAF team will continue to surprise us in the future!
Remember next post will talk the integration of XAF + Dashboard suite so stay tuned.
We are happy to read your feedback about anything you heard today!. Remember that your questions are the best candidates for future posts .
Until next time, happy XAF’ing!

-
XAF’ security system is really flexible and can easily address complex scenarios. Depending on the nature of our application (e.g. geek level of business users  ) we may want to modify the default design to make it more user friendly! This will be a detailed discussion on all the steps involved in doing so. In addition a sample application is available for download at the end of the post.
The goal is to create a user Role that will be able to Read and Navigate to predefined DashboardDefinition instances (SecurityOperation.ReadOnly). The DashboardDefinition is a simple business object.
If we had to use code we use a ModuleUpdater and the following snippet:
public class Updater : ModuleUpdater {
public Updater(IObjectSpace objectSpace, Version currentDBVersion) : base(objectSpace, currentDBVersion) { }
public override void UpdateDatabaseAfterUpdateSchema() {
base.UpdateDatabaseAfterUpdateSchema();
var role= ObjectSpace.FindObject<SecuritySystemRole>("Name='User'");
var criteria = CriteriaOperator.Parse("Oid=?", "TOO hard to know the key value").ToString();
const string operations = SecurityOperations.ReadOnlyAccess;
role.AddObjectAccessPermission<DashboardDefinition>(criteria,operations);
}
}
The handy AddObjectAccessPermission Role extension method hides the internals which are:
- Searches if a SecuritySystemTypePermissionObject exists for the DashboardDefinition type and creates it accordingly. The SecuritySystemTypePermissionObject is a persistent object with a Type property which is used to relate the permission with business objects. Moreover SecuritySystemTypePermissionObject has a set of properties (AllowRead, AllowNavigate etc.) used by the Security System to determine if permissions are granted for a business object.
- Creates a new SecuritySystemObjectPermissionsObject which holds the Criteria and Operation action and relates it with the SecuritySystemTypePermissionObject from step 1.
Although the AddObjectAccessPermission allows us to write user friendly code there are a few problems:
- This post is about a friendly (non code) way to add permissions and our goal is to modify the default XAF UI.
- It is difficult to construct the Criteria parameter of the AddObjectAccessPermission method (the developer should be aware of the name and value of the key property).
Let’s first see how the above code snippet is translated to a XAF UI and what steps needed from the end user.
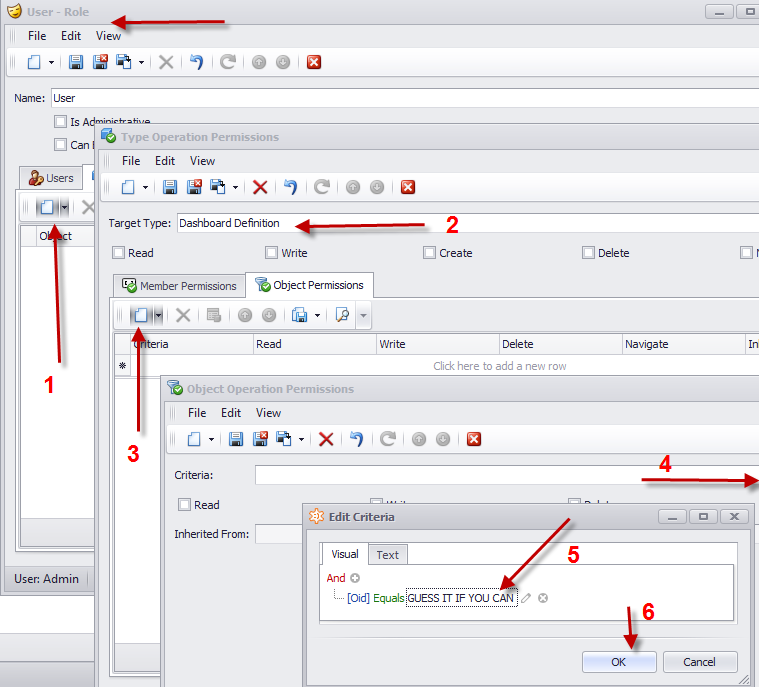
The most difficult step as with the code approach is the Criteria construction. This time is even harder since we are not a developer any more but a business user. This means that even simple stuff like identifying the key property may look like a mountain. In addition the end user needs a huge amount of time for creating permissions for a lot of objects.
The solution to this problem is to modify the default XAF UI and allow the business user to associate a Role with a DashboardDefinition object instance as shown bellow:

The above UI represents a many collection between Roles and DashboardDefintion. We can tell that is an M-M relation because only the link action is available (see left arrow)., The New DashboardDefinition action is hidden and the creation of the intermediate objects is done magically from XAF!
To create the DashboardDefinition collection shown in the above UI, we can use the ProvidedAssociationAttribute as discussed in Modifying Business Objects using Attributes post.

In this step using a simple attribute we guided XAF to create a totally different UI for associating a Role with a DashboardDefintion. What remains is to write code that will automatically create the required permissions by extending the SecuritySystemRole class.
Creating a custom Security Module
Extending the SecuritySystemRole class means that we need to create a custom Role class deriving from the SecuritySystemRole. The process is well documented How to: Implement Custom Security Objects (Users, Roles, Operation Permissions). However since we want a reusable functionality we recommend to create a module to host the custom Role class. XAF follows this recommendation with the Security module, our community project eXpandFrameWork with the XpandSecurityModule.
public class XRole:SecuritySystemRole {
public XRole(Session session) : base(session) {
}
}
Next step is to create an attribute with two parameters:
-
OperationProviderProperty: Is the name of the property that will provide the SecurityOperation which will be applied to the collection of DashboardDefinition of our XRole.
-
CollectionName: Is the name of the dynamically created DashboardDefinition collection member in our XRole.
[AttributeUsage(AttributeTargets.Class, AllowMultiple = true)]
public class SecurityOperationsAttribute : Attribute {
readonly string _collectionName;
readonly string _operationProviderProperty;
public SecurityOperationsAttribute(string collectionName, string operationProviderProperty) {
_collectionName = collectionName;
_operationProviderProperty = operationProviderProperty;
}
public string CollectionName {
get { return _collectionName; }
}
public string OperationProviderProperty {
get { return _operationProviderProperty; }
}
}
Now its time to use this SecurityOperationsAttribute in our DashboardDefintion class which does not live in our custom Security module:

The collectionName parameter (DashboardDefinitions) is the name of the collection created from the ProvidedAssociationAttribute as discussed in the start of the post. The operationProviderProerty (DashboardOperation) does not yet exist in our XRole class and we need to create it in an abstract way since our Security modules has no knowledge of the DashboardDefinition existence. Writing abstract code with XAF is really a piece of cake! Our goal is to enumerate through all PersistentTypes (this includes DashboardDefintion) marked with the SecurityOperationAttribute. Then for each Persistent type we need to create a dynamic member in our XRole class to hold the SecurityOperation. Again note that our module is not even aware of what is the Role type.
public sealed partial class MySecurityModule : ModuleBase {
public override void CustomizeTypesInfo(ITypesInfo typesInfo) {
base.CustomizeTypesInfo(typesInfo);
var roleTypeProvider = Application.Security as IRoleTypeProvider;
if (roleTypeProvider != null) {
foreach (var attribute in SecurityOperationsAttributes(typesInfo)) {
CreateMember(typesInfo, roleTypeProvider, attribute);
}
}
}
void CreateMember(ITypesInfo typesInfo, IRoleTypeProvider roleTypeProvider, SecurityOperationsAttribute attribute) {
var roleTypeInfo = typesInfo.FindTypeInfo(roleTypeProvider.RoleType);
if (roleTypeInfo.FindMember(attribute.OperationProviderProperty) == null) {
var memberInfo = roleTypeInfo.CreateMember(attribute.OperationProviderProperty, typeof (SecurityOperationsEnum));
memberInfo.AddAttribute(new RuleRequiredFieldAttribute());
}
}
IEnumerable<SecurityOperationsAttribute> SecurityOperationsAttributes(ITypesInfo typesInfo) {
var typeInfos = typesInfo.PersistentTypes.Where(info => info.FindAttribute<SecurityOperationsAttribute>() != null);
return typeInfos.SelectMany(info => info.FindAttributes<SecurityOperationsAttribute>());
}
With the above code a new property will be added to the previously XRole UI.

Now we need a method to get the SecurityOperations given an XRole instance and the dynamic collection of DashboardDefinition objects. Note that the name property that provides these values exist in the SecurityOperationsAttribute marking our DashboardDefinition object:
static string GetSecurityOperation(ISecurityRole securityRole, XPMemberInfo memberInfo) {
var typeInfo = XafTypesInfo.Instance.FindTypeInfo(memberInfo.CollectionElementType.ClassType);
var roleTypeInfo = XafTypesInfo.Instance.FindTypeInfo(securityRole.GetType());
var operationsAttribute = typeInfo.FindAttributes<SecurityOperationsAttribute>().FirstOrDefault(attribute => attribute.CollectionName == memberInfo.Name);
return operationsAttribute != null ? Convert(securityRole, roleTypeInfo, operationsAttribute) : null;
}
static string Convert(ISecurityRole securityRole, ITypeInfo roleTypeInfo, SecurityOperationsAttribute operationsAttribute) {
var value = roleTypeInfo.FindMember(operationsAttribute.OperationProviderProperty).GetValue(securityRole);
if (value == null || ReferenceEquals(value, ""))
return null;
var securityOperations = (SecurityOperationsEnum)value;
var fieldInfo = typeof(SecurityOperations).GetField(securityOperations.ToString(), BindingFlags.Public | BindingFlags.Static);
if (fieldInfo != null)
return fieldInfo.GetValue(null).ToString();
throw new NotImplementedException(value.ToString());
}
Having a list of SecurityOperations from the GetSecurityOperation method we can use XAF’s metadata API to create the ObjectOperationPermissions as simple as:
public static IEnumerable<ObjectOperationPermission> ObjectOperationPermissions(this ISecurityRole securityRole, XPMemberInfo member) {
var collection = ((XPBaseCollection)member.GetValue(securityRole)).OfType<object>();
var securityOperation = GetSecurityOperation(securityRole, member);
if (!string.IsNullOrEmpty(securityOperation)) {
foreach (var operation in securityOperation.Split(ServerPermissionRequestProcessor.Delimiters, StringSplitOptions.RemoveEmptyEntries)) {
foreach (var obj in collection) {
yield return ObjectOperationPermissions(member, obj, operation);
}
}
}
}
static ObjectOperationPermission ObjectOperationPermissions(XPMemberInfo member, object obj, string securityOperation) {
return new ObjectOperationPermission(member.CollectionElementType.ClassType, Criteria(obj, member.CollectionElementType), securityOperation);
}
static string Criteria(object obj, XPClassInfo classInfo) {
var keyProperty = classInfo.KeyProperty;
var keyValue = keyProperty.GetValue(obj);
return CriteriaOperator.Parse(keyProperty.Name + "=?", keyValue).ToString();
}
Finally we put all these methods to a class SecuritySystemRoleExtensions and override our custom XRole GetPermissionsCore method as discussed in How to: Implement Custom Security Objects (Users, Roles, Operation Permissions). So, in simple English this can b said: For each collection member in our XRole that his collection element type is marked with a SecurityOperationsAttribute call the above ObjectOperationPermissions extension method to get the permissions and add them to the list of XRole’s permission. XAF’s language does not differ much from English  , so this will be:
public class XRole : SecuritySystemRole {
public XRole(Session session)
: base(session) {
}
protected override IEnumerable<IOperationPermission> GetPermissionsCore() {
var operationPermissions = base.GetPermissionsCore();
return OperationPermissionCollectionMembers().Aggregate(operationPermissions, (current, xpMemberInfo) => current.Union(this.ObjectOperationPermissions(xpMemberInfo).Cast<IOperationPermission>()));
}
IEnumerable<XPMemberInfo> OperationPermissionCollectionMembers() {
return ClassInfo.OwnMembers.Where(info => info.IsAssociationList && info.CollectionElementType.HasAttribute(typeof(SecurityOperationsAttribute)));
}
Today, we discussed how to mix BO’s metadata with instance data using a simple attribute in order to avoid tedious and repetitive work. To summarize when we want to create user friendly ObjectAccessPermissions we can simply mark our BO as shown:

Note that even if DashboardDefintion class may live in a module we do not have source code, XAF will not sweat at all! It is really easy to dynamically replace attributes adjusting to your own preferences (see also How to customize a Business Model at runtime (Example)):
public override void CustomizeTypesInfo(ITypesInfo typesInfo) {
base.CustomizeTypesInfo(typesInfo);
var typeInfo = (TypeInfo) typesInfo.FindTypeInfo(typeof (DashboardDefinition));
var memberInfo = typeInfo.FindMember("Roles");
//replace ProvidedAssociationAttribute in Roles collection
memberInfo.RemoveAttributes<ProvidedAssociationAttribute>();
memberInfo.AddAttribute(new ProvidedAssociationAttribute("DashboardDefinition-Roles","MyDashboardDefintions",RelationType.ManyToMany, null));
//replace SecurityOperationsAttribute
typeInfo.RemoveAttributes<SecurityOperationsAttribute>();
typeInfo.AddAttribute(new SecurityOperationsAttribute("MyDashboardDefintions", "MyDashboardOperation"));
}
The credits for this post go first to XAF with its unbelievable flexible API, second to a great XAFer named Stephen Manderson and third to me that wrote this post  . Moreover Stephen shared with us his Dashboard module which is the most wanted integration of XAF and our new Dashboard tool!
Next post we be all about Stephen’s Dashboard module, in the meantime let us know your thoughts in everything you heard today.
The sample with today’s discussion can be downloaded from here and is build against XAF v12.2.5.
Until next time, Happy XAFing!

-
Very often there is a need to add new members to existing Business objects that live in assemblies that we do not own.
Take the following example: We have a persistent object DashboardDefinition:
public class DashboardDefinition : BaseObject {
public DashboardDefinition(Session session)
: base(session) {
}
[Association("Role-Dashboards")]
public XPCollection<DevExpress.ExpressApp.Security.Strategy.SecuritySystemRole> Roles {
get {
return GetCollection<DevExpress.ExpressApp.Security.Strategy.SecuritySystemRole>("Roles");
}
}
}
We want to create a many to many relation between DashboardDefinition and SecuritySystemRole objects. We already wrote the one part of the association in the DashboardDefinition –>Roles property. However we need to add a new collection of DashboardDefinition to the SecuritySystemRole, so we have 3 alternatives:
-
Change in the source project, add the new property. then recompile then use the new assembly in your project —> Very tedious and hard to support approach.
-
Create a custom class that derives from SecuritySystemRole, add the new property there and use the new class instead of SecuritySystemRole —> This design suffers from flexibility, at some point we will end with a lot of SecuritySystemRoles descendants.
-
Create an ProvidedAssociationAttribute that when decorates a member will result in runtime creation of the other part.
In simple English the problem goes as following:
-
[AttributeUsage(AttributeTargets.Property)]
public class ProvidedAssociationAttribute : Attribute {
readonly string _associationName;
public ProvidedAssociationAttribute(string associationName) {
_associationName = associationName;
}
public string AssociationName {
get { return _associationName; }
}
}
-
public sealed partial class ProvidedAssociationModule : ModuleBase {
public override void CustomizeTypesInfo(ITypesInfo typesInfo) {
base.CustomizeTypesInfo(typesInfo);
}
-
public override void CustomizeTypesInfo(ITypesInfo typesInfo) {
base.CustomizeTypesInfo(typesInfo);
var memberInfos = MemberInfos(typesInfo);
foreach (var memberInfo in memberInfos) {
}
}
IEnumerable<IMemberInfo> MemberInfos(ITypesInfo typesInfo) {
Func<IMemberInfo, bool> hasAttribute = info => info.FindAttribute<ProvidedAssociationAttribute>() != null;
return typesInfo.PersistentTypes.SelectMany(info => info.Members).Where(hasAttribute);
}
-
Create the dynamic collection using metadata taken from the decorated member
foreach (var memberInfo in memberInfos) {
CreateMember(memberInfo);
}
}
void CreateMember(IMemberInfo memberInfo) {
var dictionary = XpoTypesInfoHelper.GetXpoTypeInfoSource().XPDictionary;
var providedAssociationAttribute = memberInfo.FindAttribute<ProvidedAssociationAttribute>();
var customMemberInfo = dictionary.GetClassInfo(memberInfo.ListElementType).CreateMember(memberInfo.Owner.Name + "s", typeof (XPCollection), true);
var associationAttribute = new AssociationAttribute(providedAssociationAttribute.AssociationName,memberInfo.Owner.Type);
customMemberInfo.AddAttribute(associationAttribute);
memberInfo.AddAttribute(new AssociationAttribute(providedAssociationAttribute.AssociationName));
}
-
Decorate Roles of the DashboardDefinition object to dynamically create a DashboardDefinitions collection in the SecuritySystemRole object

The ProvidedAssociationAttribute idea exist in our community project (www.expandframework.com) a few years now and it happens to be a favorite one among eXpand users. Through the years of course we created a real world implementation of it. I decouple all related files in this XAF Solution for everybody to give a quick try or even copy paste it in your solutions!
PS: Although the current implementation is XAF depended is rather easy to replace all XAF related code with XPO and use it to non XAF projects as well.
We are happy to read your feedback about this!. Remember that your questions are the best candidates for future posts

-
To configure our code we can simply use interfaces as parameters. XAF design is based on interfacesrefore it features amazing technologies like the Application Model and Domain Components which make available what no other framework offers (eg multiple inheritance, flexible design, no match in reusability, etc.). The Application Model for example describes all parts of a business application and can be further extended using interfaces. So, our code should simply query the values of these Application Model interfaces and operate accordingly. Let’s name these interfaces Rules and let’s try first to get a taste of existing implementations and then discuss a Pivot control ruling concept. Note here that instead of a Pivot it be any control, our goal is to describe behaviors in XAF’s Application Model, then implement them in a Controller and simply copy paste this controller to any project!
All the code needed for today’s discussion can be found in XVideoRental demo in Common.Win project under the NameSpaces: Common.Win.ModelAdapter, Common.Win.ColumnView.RepositoryItems, Common.Win.PivotGridControl.
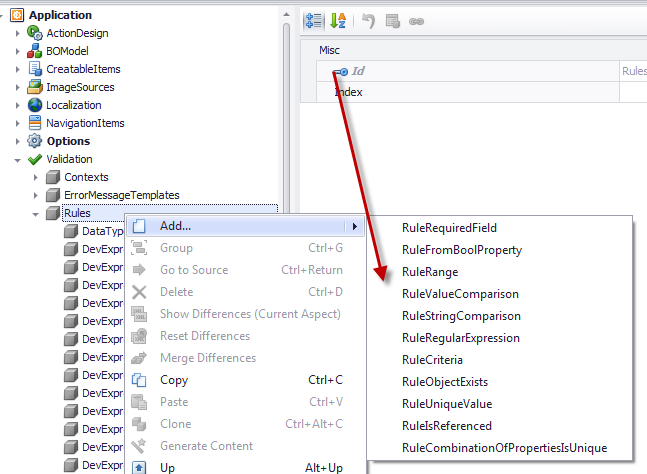
Take a look at this ruling concept/idea in action in XAF’s Validation module. In the image bellow we see a set of interfaces that describe validation rules. The Validation Engine simply queries them and validates the objects accordingly.
Similar ruling based stuff can be found in our community project eXpandFrameWork, under a whole Logic Architecture concept. A few modules that use this architecture are AdditionalViewControls, ModelArtifact, MasterDetail, ConditionalDetailViews The logic architecture is based in the composition over inheritance principle, meaning that it can make our rules amazingly powerful!. This is because we do not extend the IModelListView rather we add IModelListViews and other model artifacts to root model nodes like the ConditionalControllerState, LogicConditionalActionState we see in the image bellow.

In this post however we will not dive so deep as our community project and we will concentrate to our XVideoRental demo. Take a look at this traditional windows form taken from the legacy VideoRent application of our Windows components suite.
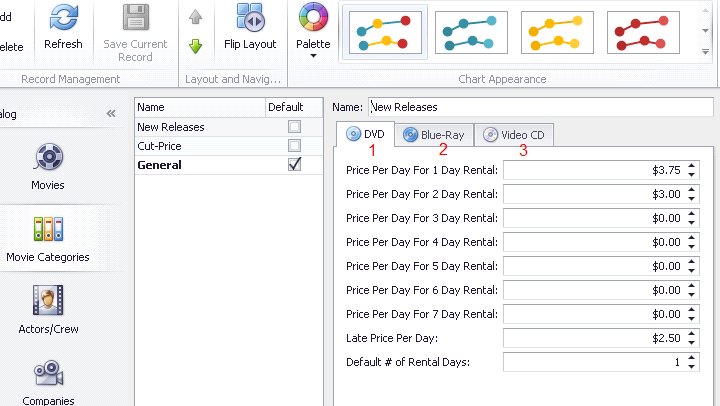
The traditional developer needs to create a multidimensional UI given a collection of ChartPrice objects. One dimension is the type of the price (DVD,Blue-Ray,Video CD). Next one is the day number 1-7, third one is the different type in price double or integer for Default # of Rental Days. As you can see the traditional developer to implement this user interface used 3 tabs, 9x3 controls. Three of them must accept integers only and all other double numbers. This is an acceptable design however not flexible and here are a few reasons:
-
The number of days is fixed, to add more days (eg. up to 10) more controls are needed.
-
User interaction is needed from the end user, if he wants to see prices for Blue-Ray he must click on the assigned tab.
-
The code that implements this works only for a certain windows form.
THE XAF WAY
XAF is a really smart framework, using it is inevitable that we will become equally smart cause we have unparalleled tools to work with. So, to create a multidimensional UI we can simply use the PivotGridListEditor and create rules that we can use to describe what the traditional form does. Since we are talking about rules that will extend our Application Model we already start building an abstract mechanism that can be applied to any view and any object even at runtime with the help of Model Editor. However at this point let’s assign a PivotGridListEditor to the collection of ChartPrice objects to see the starting point and to have a comparing reference.

The PivotGridListEditor is perfect for multidimensional analysis thus our UI is already more flexible than the legacy one. However it is missing a lot of stuff (not editable,row header fromatting, cells formatting, object saving). We will discuss how to build all that stuff the XAF way and make them reusable to all of our projects!
Extending the Application Model to host different rule types
First lets create a collection of abstract rules and extend our Application Model’s IModelListView. To extend the Application Model we can follow this help document with make use of the bellow interfaces.
public interface IModelPivotRules : IModelNode, IModelList<IModelPivotRule> {
}
[ModelAbstractClass]
public interface IModelPivotRule : IModelNodeEnabled {
}
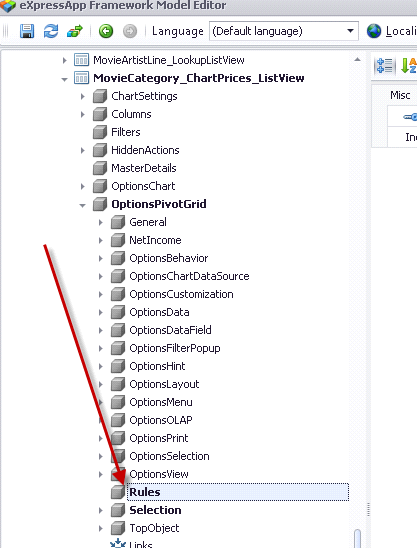
We choose to extend in a deeper level than IModelListView because we want to group the new Rules with the PivotGridListEditor option interfaces which are discussed in Dressing up our classes – Date with a model tonight!. So after extending the model the Model Editor for IModelListView will look like the following image.
 tEd
tEd
Control the range of the cells
Next step is to design an interface that can help us to apply rules to certain Pivot control cells, so we need an interface with two properties Start, End
[ModelAbstractClass]
public interface IModelPivotSelectionRule : IModelPivotRule {
Point Start { get; set; }
Point End { get; set; }
}
No other action is required here, XAF’s TypesInfo system is already aware of IModelPivotSelectionRule since it derives from the already registered IModelPivotRule.
Formating the Pivot Cells
To format the cells of Pivot we need an Interface that:
a) Defines the range of the cells (eg. IModelPivotSelectionRule) .
b) Defines the PivotArea where the cells are located (Row, Column, Data).
c) Allows format configuration.
The interface bellow IModelFormatRule interface fulfills all the above requirements.
public interface IModelPivotArea : IModelNode {
PivotArea PivotArea { get; set; }
}
public interface IModelFormatRule : IModelPivotArea, IModelFormatInfo, IModelPivotSelectionRule {
[RuleValueComparison("IModelFormatRule_PivotArea_not_filter", DefaultContexts.Save, ValueComparisonType.NotEquals, PivotArea.FilterArea)]
[DefaultValue(PivotArea.ColumnArea)]
new PivotArea PivotArea { get; set; }
}
[ModelAbstractClass]
public interface IModelFormatInfo : IModelNode {
string FormatString { get; set; }
FormatType FormatType { get; set; }
}
Again no other action is required here, XAF’s TypesInfo system is already aware of IModelPivotSelectionRule since it derives from the already registered IModelPivotRule. In addition IModelFormatRule is not marked with the ModelAbstractAttribute therefore the Model Editor will automatically add a menu entry as shown,

Now we are ready to create a FormatRule for all row headers to display the info that the legacy windows form displays.

In the image we see that we created a FormatRule for RowArea cells that Start at X=0, Y=1 and End at the last cell X=-1, Y=-1. This rule will instruct a Controller to modify the initial ListView as shown bellow.
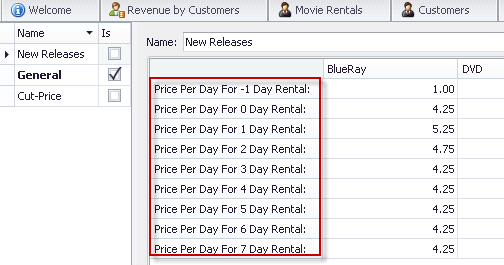
Next we will add one more FormatRule for the first row header.
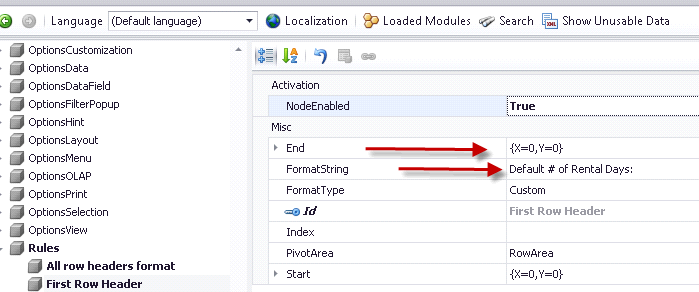
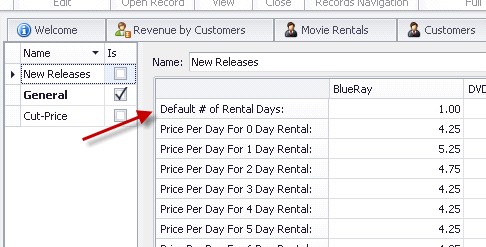
What is different with this FormatRule is the End X=0, Y=0 which points to the first row header and of course the FormatString. So, XAF first will evaluate first the “All row headers format” rule and then the “First Row Header” resulting in the following UI.
 ina
ina
Finally we create a similar FormatRule for the second row header,
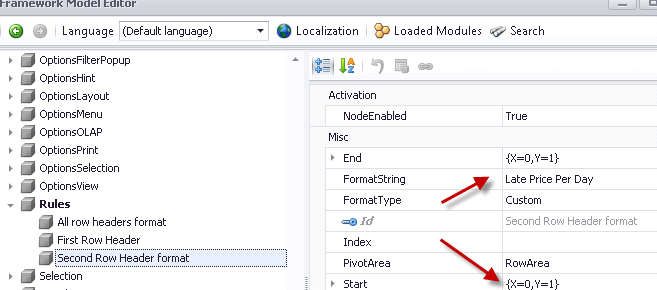
that will result in the following UI,
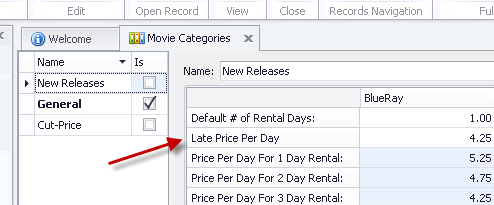
Using a declarative runtime approach we managed to format all row headers, XAF really teaches us amazing stuff!
Next let’s make PivotGridListEditor editable and we finished cloning the legacy functionality following an unbelievable flexible way – the XAF way!
All Pivot cells editable and double
We are now ready to start modeling the legacy windows form behavior. So, we need to make the Pivot cells editable therefore we first query our Support Center to see how this can be done –> E1232. From this example we understand that we can subscribe to certain events and replace the RepositoryItem of a Pivot cell. We already have a range of Pivot cells defined from the IModelPivotSelectionRule above and we are interested only in double and integer based Repositoryitems therefore an interface like bellow is sufficient.
[ModelDisplayName("SpinEdit")]
public interface IModelPivotSpinEditRule : IModelPivotSelectionRule {
IModelRepositoryItemSpinEdit SpinEdit { get; }
}
The above interface derives from IModelPivotSelectionRule so it will provide a range of Pivot cells which their RepositoryItems will be replaced with a RepositoryItemSpinEdit (int, double). The IModelRepositoryItemSpinEdit is an interface that describes all properties of a RepositoryItemSpinEdit and can be created either by hand or automatically as discussed in Dressing up our classes – Date with a model tonight!
Let’s now create the first rule that will make all Pivot cells of the data area editable. Of course we need to write code to query this rule and also save this object as in E1232. However for the sake of simplicity as I already said in the beginning of this post all the code can be found in the Common.Win project of our XVideoRental demo. In this case look for the Common.Win.PivotGridControl.PivotGridController.
 instrcuts
In the image above: End X=-1, Y=-1 instructs our code to include all cells of the data area. Moreover since this is a RepositoryItem replacement rule it assumes that row and column headers are excluded so X=0, Y=0 point to the top left data cell.
With this rule the UI will be editable and accept double numbers as shown bellow,

Last rule will help us to format the edit value of the first row (Default # of Rental Days) to accept integers only as shown bellow, by simply setting the IsFloatValue to false.
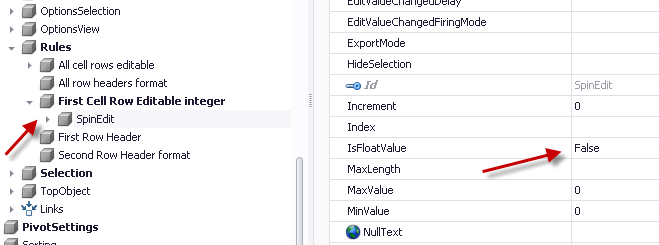
More Rule Types
In XVideoRental we have more Rule types than the ones discussed in this post . It is rather easy to implement more and we would appreciate your ideas and contributions. So please feel free to use our Support Center to share them with the rest of our community. A list of the already implemented Pivot Rules is shown bellow.
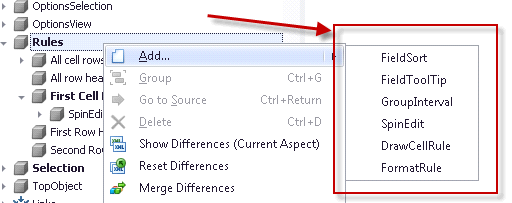
FieldToolTip rule
Tooltips are amazingly powerful and we already discussed them in depth at Tooltips to the max - expressive UI. However there I only posted a screenshot about pivot tooltips but I haven’t explained more since I needed more info that could make that post too hard to follow. Now we do have that extra info and I am talking about the IModelPivotSelectionRule interface which allows us to associate interfaces/rules/classes etc with a range of Pivot cells.
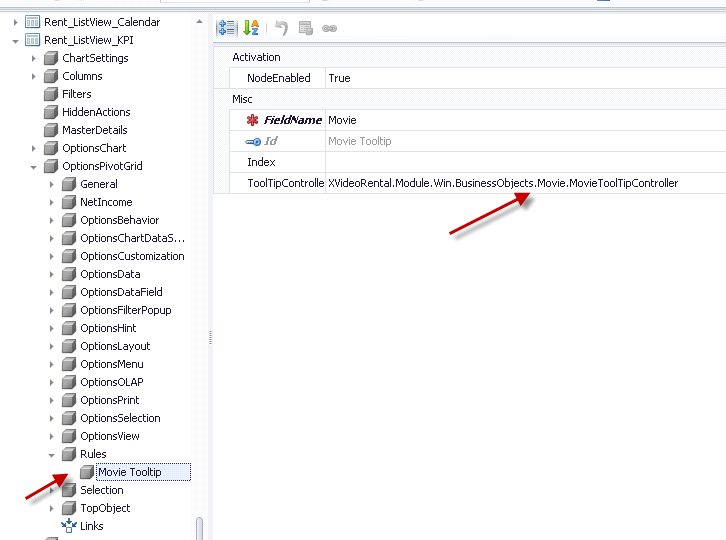
You can learn how to associate a class in this case the MovieToolTipController with an Application Model node at Tooltips to the max - expressive UI. under the TooltipController paragraph.
Try to imagine how expressive can a Pivot control become with different tooltips for different cells!
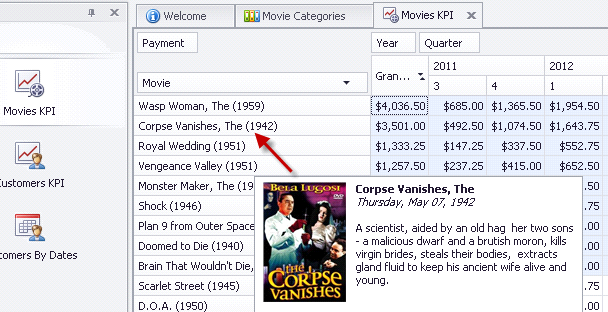
We will discuss the rest of the PivotRules (DrawCellRule, GroupIntervalRule, FieldSort) in a future post.
For now I want again to ask you all for your contributions/ideas regarding everything you see in our posts. Let’s use your real world experience and your XAF skills to improve our framework even more.
Controlling end user selection
As developers we should provide tools to our customers that can make their life easier. Let’s see what this means, PivotGridListEditor contains two components which are a PivotGridControl and a ChartControl hosted inside a LayoutControl. The ChartControl has as datasource the PivotGridControl so when the end user selects a range of cells the ChartControl automatically renders this selection as shown.
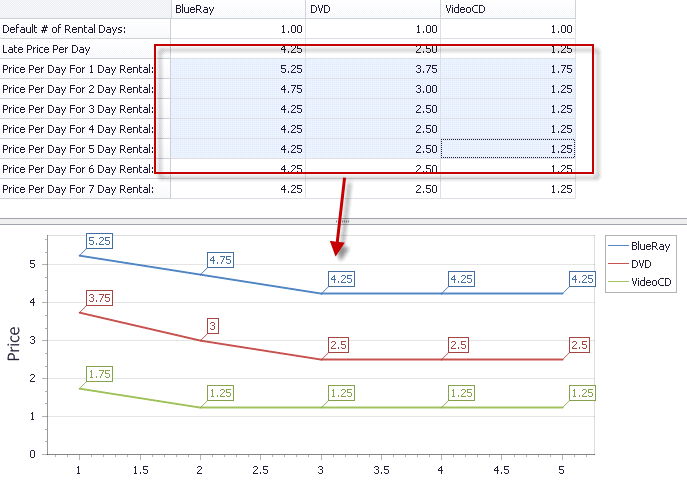
However when we close the view or the application the selection is lost and the end user has do it again. Moreover if we need to preconfigure a selection when the view opens we need to follow a repetitive way, that is search our Support Center for a similar sample eg select pivotgrid cells and then replicate something similar for all projects, views. I really do not like to spend my time doing repetitive tasks. It is much easier an faster to model it in the Application Model once at for all! To implement this we need an interface to extend the Application Model.
public interface IModelPivotGridSelection : IModelNode {
Rectangle Rectangle { get; set; }
[DefaultValue(true)]
bool Synchronize { get; set; }
}
When Synchronise property is true the our code will write back the end user cell selection in the Rectangle property, when Synchronize is false we can use this functionality only for preconfiguring a cell selection when the view opens.

Moreover there are cases where we want to control the cell selection eg when a user selects a cell to auto select all cells in the row sparing his time, or disallow multiple column selection. I am sure it is pretty clear that all we need are a few more properties in the IModelPivotGridSelection interface to create amazing and reusable functionalities.
XVideoRental demo contains a really big number of Application Model Rules and I will probably need a large number of posts to talk about all of them. So I will concentrate in the more important ones. Feel free to explore the demo and shoot us with your questions and ideas!
As always happy XAFing with the smartest framework of all!

-
UI simply depends on the smartness of our components. However the visible UI space is limited and most of the information is hidden behind components (tabs, popup forms etc). Therefore to display this hidden info user interaction is required. Tooltips however do not require any user interaction and our Suite supports tooltips with html formatting even in windows platform. We can already empower the detailed views of our XAF applications with native tooltip support as described in this help document. However when developing in XAF the sky’s the limit and in this post we will discuss ways to create tooltips as demoed in our XVideoRental RWA.
DataOnToolTip
By this we mean that we want to push any data a property of a business object has to a tooltip. Therefore, first we need to create a interface and extend our Application Model columns as described in our documentation,
[ModelAbstractClass]
public interface IModelColumnTooltipData : IModelColumn {
IModelTooltipData TooltipData { get; }
}
public interface IModelTooltipData : IModelNode {
[Category("DataOnToolTip")]
bool DataOnToolTip { get; set; }
[Category("DataOnToolTip")]
int MaxHeight { get; set; }
[Category("DataOnToolTip")]
int MaxWidth { get; set; }
}
public class GridViewImageTextToolTipController : ViewController<ListView>, IModelExtender {
public void ExtendModelInterfaces(ModelInterfaceExtenders extenders) {
extenders.Add<IModelColumn, IModelColumnTooltipData>();
}
The above will extend the Application Model as shown,

Next, we need to implement a method that when DataOnTooltip attribute is set will display the data in a tooltip like,

Of course due to the MVC XAF architecture it is really easy to reuse this functionality in any XAF project without not even one line of code!
ToolTipText
Now, how about a different case? Lets say that we have a complex Advanced Banded ListView and we want to guide end user to double click to a row area to see more info about the record. For this again we need to extend the Application Model with an attribute like,
public interface IModelTooltipData : IModelNode {
[Editor(typeof(MultilineStringEditor), typeof(UITypeEditor))]
string ToolTipText { get; set; }
// ...
Then we can use the Model Editor to assign the text we want in the ToolTipText attribute and XAF will do the rest for us in any project!

ToolTipController
Extending the Application Model in order to be able to associate a class (controller) with any of its nodes can be done easily. First we add one more property to our IModelToolTipData interface like,
public interface IModelTooltipData : IModelNode {
[DataSourceProperty("ToolTipControllers")]
[TypeConverter(typeof(StringToTypeConverterBase))]
Type ToolTipController { get; set; }
[Browsable(false)]
IEnumerable<Type> ToolTipControllers { get; }
The TypeConverter attribute will convert the type to a string so it will be possible for the Model Editor to show it and the DataSourceProperty attribute will populate the Types (Controllers) we want. What's left is to decide which classes will be in that list. This can be done be writing a Domain Logic for the non browsable ToolTipControllers enumeration like the following,
[DomainLogic(typeof(IModelTooltipData))]
public class IModelToolTipControllerDomainLogic {
public static IEnumerable<Type> Get_ToolTipControllers(IModelToolTipController modelToolTipController) {
return FindTypeDescenants(typeof(ObjectToolTipController));
}
protected static IEnumerable<Type> FindTypeDescenants(Type type) {
var typeInfo = XafTypesInfo.Instance.FindTypeInfo(type);
return ReflectionHelper.FindTypeDescendants(typeInfo).Where(info => !info.IsAbstract).Select(info => info.Type);
}
}
We have finished Application Model extension so let’s see how simple yet amazingly powerful is to write and apply such a controller for our Movie business object. So for a very simple ToolTipController like,
public class MovieToolTipController : ObjectToolTipController {
const int MaxPhotoWidth = 120, MaxPhotoHeight = 120;
public MovieToolTipController(Control parent) : base(parent) { }
protected override void InitToolTipItem(ToolTipItem item) {
var movie = ObjectSpace.FindObject<Movie>(CriteriaOperator.Parse("MovieTitle=?", EditObject));
var photo = movie.Photo;
if (photo != null)
item.Image = photo.CreateImage(MaxPhotoWidth, MaxPhotoHeight);
item.Text = GetMovieInfoHtml(movie);
}
public string GetMovieInfoHtml(Movie movie) {
return string.Format("<b>{0}</b>\r\n<i>{2:D}</i>\r\r\n{1}", movie.Title, movie.Plot, movie.ReleaseDate);
}
}
When assign it to a listview column,

XAF will popup an html formatted tooltip,

or we can use a similar approach for PivotGridListEditors

Everything discussed in this post exist in the Common.Win project under the Common.Win.General.ToolTip namespace of our XVideoRental demo.
Let us know if you have questions or subjects we want us to cover. Happy XAFing to everybody!
