-
Do you have a project, where you use Azure pipelines to build it? How do you get the referenced DevExpress assemblies? In this post I will discuss how we go for it in eXpandFramework. The process however is applicable in all other projects.
After executing the next 4 lines your solution should compile:
Install-Module XpandPosh
Register-PackageSource –ProviderName Nuget –Name DX_private –Location https://nuget.devexpress.com/YOURTOKEN
Install-DX -binPath YOURBIN -dxSources $(Get-PackageSourceLocations -join ";") -sourcePath YOURSOURCESPATH -dxVersion 18.2.5
Update-HintPath –OutputPath YOURBIN –SourcesPath YOURSOURCESPATH
For feedback drop an issue at https://github.com/eXpandFramework/DevExpress.PackageContent

-
Today we will discuss another common case, how to create a progress bar to notify our web users about the state of their long running tasks. For this discussion we will work with DevExpress XAF Business Application Framework. We will develop ONE SMALL CLASS, we can then copy paste to any XAF project.
It is a good idea before starting any work to search the Support Center for ideas and ask the DevExpress support guys. Doing so we found many tickets with ready to work solutions. Some of them are good candidates e.g How to start a long running operation in ASP.NET application using the ThreadPool.QueueUserWorkItem method and show its progress in a browser using a WebService method.
The problem with the previous sample , is that uses a WebService to periodically call back in a Controller. I wanted to create a reusable implementation inside a library and a WebService cannot live in a library.
But I got the idea on how to proceed. I just need to create a ViewItem to host a ASPxProgressBar and with periodic call-backs I will inject JavaScript code to SetPosition on the client side ASPxClientProgressbar
Step 1
First we need a sample project so let’s use the XAF New Solution Wizard to create a new Web Project. We do not need any extra modules or security, just create it as simple as possible. After the solution is created add a very simple Domain Object so XAF can generate a web View for it.
    [DefaultClassOptions]
    public class MyObject : BaseObject {
        public MyObject(Session session) : base(session) { }
    }
Step 2
In addition we need create a sequence of Tasks that will return the state of our work. You can use any technology you prefer e.g. webservices, TPL tasksetc. as long as it returns asynchronously it fits our case. For this discussion I will use the System.Reactive library. To create the sequence the next line will be enough.
Observable
    .Interval(TimeSpan.FromMilliseconds(1000))
    .Subscribe(l =>  Console.WriteLine($"Task {l} completed on Thread:Environment.CurrentManagedThreadId}"));
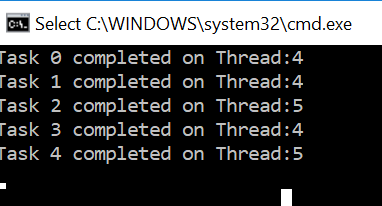
If you want to test how it behaves add it in a console app and you should see the following output.
Step 3
In XAF we use Controllers to communicate with our Views so let’s create a very simple Controller and add our sequence and later connect the progress bar.
    public class MyController : ViewController<DetailView> {
        public MyController() {
            var action = new SimpleAction(this, "StartLongOperation", PredefinedCategory.Tools);
            action.Execute += action_Execute;
        }

        void action_Execute(object sender, SimpleActionExecuteEventArgs e) {
            Observable.Interval(TimeSpan.FromMilliseconds(1000)).Subscribe();
        }
    }
This controller declares an StartLongOperation Action and starts our sequence, exactly as described on XAF docs.
Currently XAF already generated the web UI and actions. Here how the DetailView of MyObject looks like.

Step 4
Now its time to create the progress bar container. For this scenario we do not need to alter the state of MyObject so we will follow the XAF docs on how to create a ViewItem rather than a PropertyEditor. (How to implement a ViewItem). Our starting ViewItem comes next:
    public interface IModelProgressViewItem : IModelViewItem {
    }

    [ViewItem(typeof(IModelProgressViewItem))]
    public class ProgresViewItem : ViewItem {
        public ASPxProgressBar ProgressBar{ get; private set; }

        public ProgresViewItem(IModelProgressViewItem info, Type classType)
            : base(classType, info.Id){
        }

        protected override object CreateControlCore() {
            ProgressBar = new ASPxProgressBar();
            return ProgressBar;
        }

    }
We override the CreateControlCore method and just return an ASPxProgressBar component included in DevExpress suite.
Step 5
As I mentioned before this sample (How to start a long running operation in ASP.NET application using the ThreadPool.QueueUserWorkItem method and show its progress in a browser using a WebService method) use a Javascript Timer to periodically call a WebService which communicates with a XAF Controller.
Our scenario is very similar but we need to remove the dependency to the WebService because we need to push the implementation to our ExcelImporter module that is part of the eXpandFramework and is very hard to host a WebService in a library so it can be reusable and with friction-less installation.
So let’s introduce the Javascript timer in our ProgressViewItem and use Callbacks to notify the server instead of the WebService used in the SC sample. This is as always well document in the XAF docs (How to: Raise XAF Callbacks from Client-Side Events and Process these Callbacks on Server).
        private XafCallbackManager CallbackManager => ((ICallbackManagerHolder)WebWindow.CurrentRequestPage).CallbackManager;
        public int PollingInterval{ get; set; }
        public void Start(int maximum){
            var script = CallbackManager.GetScript(_handlerId, $"'{ProgressBar.ClientInstanceName}'","",false);
            ProgressBar.ClientSideEvents.Init =
                $@"function(s,e) {{
                        if(window.timer) window.clearInterval(window.timer);
                        var controlToUpdate = s;
                        window.timer = window.setInterval(function(){{
                        var previous = startProgress;startProgress = function () {{ }}; //this line disables the Loading Panel see Q427477 in SC
                        {script}startProgress = previous;}},
            {PollingInterval});}}";
        }
In short the Start method use the build-in XAF CallBackManager to generate a script with one parameter the ProgressBar.ClientInstance name. We pass this parameter because we may want to use multiple progress-bars in the same view. Next the timer calls this script every PollingInterval.
Whats left is to implement the IXafCallbackHandler as shown.
        public long Position{ get; set; }
        public void ProcessAction(string parameter){
            var script = $"{parameter}.SetPosition('{Position}')";
            WebWindow.CurrentRequestWindow.RegisterStartupScript(_handlerId,script,true);
        }
Here we just created a script that uses the client side ASPxProgressBar API to SetPosition based on the new ProgressViewItem Position property.
Step 6
To consume the ProgressViewItem we modify the MyController defined in Step 3 like:
        void action_Execute(object sender, SimpleActionExecuteEventArgs e) {
            var progresViewItem = View.GetItems<ProgresViewItem>().First();
            progresViewItem.Start(maximum:100);//Start the timer
            Observable
                .Interval(TimeSpan.FromMilliseconds(1000))
                .Subscribe(l => progresViewItem.Position=l );//Update the position for each Task
        }
Step 7
Finally let's add our ProgressViewItem to the a View. We will use the Model editor to create it and drag & drop to the Layout.
Below you can see how the ProgressViewItem works in runtime in our sample solution.
I wrote this post as a proof of concept rather than a complete implementation, so I am not posting any samples. However you can download the the complete ProgressViewItem used if you wish from this gist.
Below you can verify that it works fine in a real world complex module like the ExcelImporter.
XAF can do Mobile and Windows as well, a Mobile implementation for this scenario does not make much sense but have a look how it looks in the Windows platform.

-
Today I will detail about implementing Scheduled Long running tasks in an abstract and reusable way.
The Requirement
Usually, I have a business objects that store time depended data e.g. Exceptions, Logs etc. There is a need to periodically clean up those tables.
The parameters
First we need to identify the problem parameters so we can create a model interface. Parameterizing the problem in a model interface is very useful, because the end user can switch it off if something goes wrong.
Parameters will be: the business object type which we want to clear its records, the criterion to filter the objects and the time to execute this action. The interface along with its registration for this is bellow.
using System;
using System.ComponentModel;
using DevExpress.ExpressApp;
using DevExpress.ExpressApp.Model;
using DevExpress.ExpressApp.Model.Core;

namespace PurgingRule.Module.Controllers{
    //rules container
    public interface IModelClassPurgingRules:IModelClass{
        IModelPurgingRules PurgingRules{ get; }
    }

    [ModelNodesGenerator(typeof (PurgingRulesModelNodesGenerator))]
    public interface IModelPurgingRules : IModelNode, IModelList<IModelPurgingRule>{
    }

    public interface IModelPurgingRule:IModelNode{
        string Criteria{ get; set; }
        bool ExecuteOnApplicationStart{ get; set; }
        TimeSpan TimeSpan{ get; set; }
        [DefaultValue(500)]
        int ChunkSize{ get; set; }
    }

    //will help us generated more rules if needed
    public class PurgingRulesModelNodesGenerator:ModelNodesGeneratorBase{
        protected override void GenerateNodesCore(ModelNode node){

        }
    }

    public class PurgingController:Controller,IModelExtender{

        //model interface registration
        public void ExtendModelInterfaces(ModelInterfaceExtenders extenders){
            extenders.Add<IModelClass,IModelClassPurgingRules>();
        }
    }
}
Now, it is possible to use the Model Editor to configure in which object we want to apply our rules.

That's nice!
but I like to use an Editor to write the Criteria and need to add a few more bits for this to happen. For this we need to use the CriteriaOptions and Editor attributes as shown:
    public interface IModelPurgingRule:IModelNode{
        [Editor("DevExpress.ExpressApp.Win.Core.ModelEditor.CriteriaModelEditorControl, DevExpress.ExpressApp.Win" + XafAssemblyInfo.VersionSuffix + XafAssemblyInfo.AssemblyNamePostfix, typeof(UITypeEditor))]
        [CriteriaOptions("TypeInfo")]
        string Criteria{ get; set; }
        [Browsable(false)]
        [ModelValueCalculator("((IModelClass) Parent.Parent).TypeInfo")]
        ITypeInfo TypeInfo { get; }
Now it should be straight forward to construct any criterion with the help of this build-in editor.
Making Thread Safe Database calls
Working in a multi threaded environment (long running tasks) is build-in in XAF's XPO ORM so we go for it. Just make sure you enable the switch as bellow.
        protected override void CreateDefaultObjectSpaceProvider(CreateCustomObjectSpaceProviderEventArgs args) {
            var threadSafe = true //enable threadsafe;
            args.ObjectSpaceProviders.Add(new XPObjectSpaceProvider(XPObjectSpaceProvider.GetDataStoreProvider(args.ConnectionString, args.Connection, true), threadSafe));
            args.ObjectSpaceProviders.Add(new NonPersistentObjectSpaceProvider(TypesInfo, null));
        }
Scheduling the long running tasks
We will use the StartNewPeriodic extension method and will follow the next steps in our code.
- Execute once at application startup .
- Collect the model rules to execute.
- Calculate the next execution time. For this we need to store the last execution time so I used the RuleScheduleStorage BO class found at the end of the next snippet
- Periodically schedule parallel calls to the PurgeObjects method for each rule.
    public class PurgingController:Controller,IModelExtender{
        protected override void OnFrameAssigned(){
            base.OnFrameAssigned();
            //1.execute once at application startup .
            if (Frame.Context == TemplateContext.ApplicationWindow){
                //2.collect the model rules to execute.
                var purgingRules = Application.Model.BOModel.Cast<IModelClassPurgingRules>().SelectMany(rules => rules.PurgingRules ).ToArray();
                IEnumerable<(IModelPurgingRule rule, DateTime executed)> ruleExecutionTimes;
                //create an objectspace to query the last execution time from the database
                using (var objectSpace = Application.CreateObjectSpace(typeof(RuleScheduleStorage))){

                    DeleteObsoleteRules(objectSpace, purgingRules);
                    var rulesToSchedule = purgingRules.Where(rule =>rule.Interval!=TimeSpan.MinValue);
                    //get an enumerable of (IModelPurgingRule rule, DateTime executed)
                    ruleExecutionTimes = CalculateExecutionTimes(rulesToSchedule, objectSpace);
                }

                foreach (var ruleExecutionTime in ruleExecutionTimes){
                    var timeSinceLastExecution = DateTime.Now.Subtract(ruleExecutionTime.executed);
                    //calculate if periodic task should start with a delay based time passed since last execution
                    int delay=timeSinceLastExecution<ruleExecutionTime.rule.Interval?(int) ruleExecutionTime.rule.Interval.Subtract(timeSinceLastExecution).TotalMilliseconds:0;
                    //starts the task periodically
                    Task.Factory.StartNewPeriodic(() => PurgeObjects(ruleExecutionTime.rule),
                        interval: (int) ruleExecutionTime.rule.Interval.TotalMilliseconds, delay: delay);
                }
            }
        }

        private static IEnumerable<(IModelPurgingRule rule, DateTime executed)> CalculateExecutionTimes(IEnumerable<IModelPurgingRule> rulesToSchedule, IObjectSpace objectSpace){
            return rulesToSchedule.Select(rule => {
                var ruleScheduleStorage = objectSpace.GetObjectsQuery<RuleScheduleStorage>()
                                              .FirstOrDefault(storage =>storage.RuleScheduleType == RuleScheduleType.Purging && storage.RuleId ==((ModelNode) rule).Id);
                return (rule:rule,executed:ruleScheduleStorage?.Executed ?? DateTime.MinValue);
            });
        }

        private void DeleteObsoleteRules(IObjectSpace objectSpace, IModelPurgingRule[] purgingRules){
            var ids = purgingRules.Cast<ModelNode>().Select(node => node.Id).ToArray();
            var rulesToDelete = objectSpace.GetObjectsQuery<RuleScheduleStorage>().Where(storage =>
                storage.RuleScheduleType == RuleScheduleType.Purging && !ids.Contains(storage.RuleId)).ToArray();
            objectSpace.Delete(rulesToDelete);
            objectSpace.CommitChanges();
        }
You might wonder why I inherit from a controller and used the OnFrameAssigned method as start signal and not simply write my code at Application.SetupComplete.Event. The reason for this is that I like to keep my implementation in separate files and not pollute the Module.cs.
The Long Running PurgeObjects method:
- Stores last execution time in the database.
- Deletes filtered objects in chunks.
        private void PurgeObjects(IModelPurgingRule purgingRule){
            try{
                Tracing.Tracer.LogVerboseText($"Purging {purgingRule}");
                var objectsCount = 0;
                using (var objectSpace = Application.CreateObjectSpace(purgingRule.TypeInfo.Type)){
                    StoreExecutionTime(purgingRule, objectSpace);
                    var criteriaOperator = objectSpace.ParseCriteria(purgingRule.Criteria);
                    var objects = objectSpace.GetObjects(purgingRule.TypeInfo.Type, criteriaOperator);
                    objectSpace.SetTopReturnedObjectsCount(objects, purgingRule.ChunkSize);
                    while (objects.Count > 0){
                        objectsCount += objects.Count;
                        objectSpace.Delete(objects);
                        objectSpace.CommitChanges();
                        objectSpace.ReloadCollection(objects);
                    }
                }
                Tracing.Tracer.LogVerboseText($"Purged {purgingRule}-{objectsCount}");
            }
            catch (Exception e){
                Tracing.Tracer.LogError(e);
            }
        }
        private static void StoreExecutionTime(IModelPurgingRule purgingRule, IObjectSpace objectSpace){
            var ruleId = ((ModelNode) purgingRule).Id;
            var ruleScheduleStorage =objectSpace.GetObjectsQuery<RuleScheduleStorage>().FirstOrDefault(storage =>
                    storage.RuleScheduleType == RuleScheduleType.Purging && storage.RuleId == ruleId) ?? objectSpace.CreateObject<RuleScheduleStorage>();
            ruleScheduleStorage.RuleScheduleType = RuleScheduleType.Purging;
            ruleScheduleStorage.RuleId = ((ModelNode) purgingRule).Id;
            ruleScheduleStorage.Executed = DateTime.Now;
            objectSpace.CommitChanges();
        }
Last minute feature
I am happy with the PurgingRules, but I would be more happy if I could invalidate them based on a CSharp expression. For example I want to have some rules on my dev machine only.
The PurgingRules already have a criterion so we could create a Custom Function to evaluate CSharp expressions.
I want to use this code in eXpandFramework which there is a <=.NET4 dependency so for evaluating CSharp expressions I chose compile on the fly + caching the from ExpressionEvaluator.Eval method.
    public class EvaluateExpressionOperator:ICustomFunctionOperator{
        public List<string> Usings=new List<string>();

        public const string OperatorName = "EvaluateExpression";

        public static EvaluateExpressionOperator Instance{ get; } = new EvaluateExpressionOperator();

        public Type ResultType(params Type[] operands){
            return typeof(object);
        }

        public object Evaluate(params object[] operands){
            var csCode = string.Join("",operands);
            var usings = string.Join(Environment.NewLine,Usings);
            var eval = ExpressionEvaluator.Eval(csCode, usings);
            return eval;
        }

        public string Name => OperatorName;
    }

Working with such rich libraries like DevExpress XAF suite you make serious stuff in no time!

-
This will be a discussion of a possible solution with the requirement to query a large number of web services and selectively project the responses in UI and in a database.
- For the UI I chose the XAF application framework from DevExpress, because I wanted the tools to validate, secure, display and persist my data while I spent my time designing the service layer.
- For sending the web requests I introduced a service layer in my solution where I used the HttpClient class and I serialized the responses with Utf8Json.
Here I want to draw your attention to the bad design of the HttpClient. This class implements IDisposable which makes you think that you can use it in a multithreaded environment and simply dispose it. However the case as it turns out is different, designed to be re-used for multiple calls, and there is a lot of buzz around (Link1, Link2, Link3). In short if you try to dispose the HttpClient when the request is done you will end with endless debugging hours. In the previous posts there are a few alternatives which to my bad luck did not work well from me. I found my solution at the corefx site issues.
Uft8Json is a super fast Json serializer, it is build from neuecc the father of ZeroFormatter and uses the same architecture which is to do the work on the byte level, thus minimizing memory allocation. In a high back-pressure environment you need to minimize the allocated memory as much as possible because GC work is very expensive.
For the same reason
a) I used structures instead of classes.
b) Installed the Heap allocator plugin so to get notified while I code in case I miss some expensive boxing operation.
c) Try to guess the size of my collections and initiate before hand and reused the objects instead of creating new.
d) Prefer StringBuilder instead of interpolation or concat.
e) Prefer for instead of foreach and LINQ for my hot paths.
I think you get the idea up to know you can find a lot of way if you google on the optimization subject.
To test and design the service layer I used xUnit.net and AutoFixture frameworks. Following is a compact version of a response deserialization test for each of my web requests.
Short description for the above code: The Test_Request method is testing the SendAsync method passing the service urls, an HttpHandlerType which is responsible to parameterize the requests per service and a converter to deserialize the responses.
- For handling the exceptions I needed to use another framework as the web-requests are fragile and tend to throw for many reasons. One great framework for such cases is The Polly Project. I created a few strategies like the basic worth retrying found at Polly github readme and refactor the SendAsync method like.
- For scheduling the work asynchronously Reactive Extensions (RX) from Microsoft was used. The result was a composable observable sequence of objects. Here is what I mean by this:
First I created an array with parameters to be used from the SendAsync method, then I converted to an observable using the extension methods of the RX framework. Having an observable I can now apply any Reactive operator I like to this sequence. In this case I used the SelectMany to execute my SendAsync tasks and flatten their responses into one sequence for further processing as we will discuss later.
Note: An observable sequence has certain similarities with an enumerable like in IEnumerable<T> if you do not enumerate no work is done, similar in IObservable<T> if you not subscribe no work is done. For example we could subscribe to the above sequence and to persist each item arrived.
- Rate limiting the work with RX this was just a matter of applying another operator the Window and the Distinc in this case to check for duplicate parameters. A pseudo code implementation follows:
In the production code there is combination of multiple rate limiters as per scenario in the same query.
- For persisting the responses although XAF fully supports Entity Framework, I feel more confident with XPO. I think is much easier to use and has build-in features I wanted to use. As for the database server SQLServer was my choice because XPO is really well tested against it.
So, moving from the service layer into the data layer I needed to have a super fast data layer as the number of incoming requests was large. For this I made the following choices.
a) I declared my objects with a long primary key as opposed to the default GUID type.
b) Instead of using an XPObjectSpace which is a heavy object used from XAF I went for a FastUnitOfWork.
c) I disabled optimistic locking only for this level by modifying the FastUnitOfWork properties.
d) Although I could instruct RX to send all requests to the same thread, I wanted to use all my processors and I chose initialize the FastUnitOfWork over a Lazy<ThreadSafeDalayer> with a CachedDataStoreProvider
e) I buffered the responses for 2 sec creating larger commit batches and less locks from the ThreadSafeDatalayer.
Finally I Subscribed to the products observable build in previous steps and persist my objects.
- For getting statistics I subscribed again to the products observable, this time using some custom made reactive operators.
Responses:50/sec Objects:14000/sec-->Those are IMPRESSIVE RESULTS for all XPO, RX, SqlServer.
- For the application datalayer at the beginning I thought since I have a thread safe cached datalayer already doing my persistence to use it. Further testing though show that the UI hiccup with unresponsiveness so I ended up initializing a separated data layer exactly as suggested by default from XAF. This layer was to cover all CRUD operation of other objects in the solution, but for displaying the fast coming objects from the observable stream I aim to go for a NonPersistentObjectSpace which is a lighter object than the XPObjectSpace.
Note here that XAF does not fully support nested non-persistent listviews however that is not a problem we can easily extend it to support and test how it works. To do so I created a controller and attached to XafApplication CreateCustomPropertyCollectionSource event which allowed me to replace the default PropertyCollectionSource with a custom one which behaved as I wanted to.
and for my case since this controller already exists in the eXpandframework I didn't need the above code I just had to enable the functionality from the model editor.
![nonpersistent nonpersistent]()
The NonPersistentObjectSpace I enabled though does not know how to get the data to display. Since we are nested we are going to use the MasterObjectViewController for lets say our Company-Product relation. Once you derive from that abstract controller the first method is implemented is the UpdateMasterObject which is called when the master object, the Company in our case, changes. Here the code of what I just explained.
This method is the appropriate place to subscribe to the NonPersistentObjectSpace ObjectGetting event which is used to feed the object space. Also we need to keep track of created datasource so to display it again when the end user returns to the same company. Doing so the controller changes to
Next we need to subscribe again to our service layer observable sequence of products to filter(Where), throttle(Buffer, SampleResponsive) and display them in the UI(ObserveOn).
The this.LockListEditorUpdates method is an extension method that comes from eXpandFramework LockListEditorDataUpdatesController and as the name implies locks the editor from update while massive data updates and is design so to be used from the platform agnostic modules as well.
At the point the UI does not feel any back-pressure but still there is a small improvement missing. The solution uses a MDI Tabbed environment which means that the user may open multiple views and the application will start subscribing to multiple sequences. To kill each subscription when a document page is deactivate we can use the ActiveDocumentViewController and modify the previous controller as follows.
- Revisiting Exceptions: Remember the Polly project at step 2 where we use it to hardcode a strategy inside our SendAsync method? Good news the Polly allows wrapping multiple policies together so we can use XAF to map the IPolicy objects and allow the end user to configure the strategies from there making the solution super flexible. Here is what I mean.
![polly polly]()
- Monitor system health: Remember the statistics we collected at step 7 wouldn't it be very useful to display them in the UI allowing user to validate the system's health?. For this we can use the same exact query but this time observe in the UI thread.
Having my stats handy on the bottom left corner of my app exactly as described in How to: Customize Window Status Messages (WinForms) I would like to share them once more and close this long but I hope very interesting post.
Threads: 207, CPU:20% Disk:10% Web-Responses:2700/min Persisting objects:700hyyhuh000/min

-
I am happy to announce the new ExcelIMporter module for both Windows and Web. Released with eXpandFramework v17.2.6.3.
Importing is a complex task, each scenario has difference requirements. So, first off, a short brief on the existing importing solutions found in eXpandFramework.
The ImportWizard module
This module was contributed to eXpandFramework a few years ago from a community member.

Pros
- Beautiful UI as it is build with the same DevExpress components that XAF uses.
- Well integrated, with localization support and skinning.
- Imports in batches on a background thread.
- Visualization of the Excel Sheet for configuring the import.
Cons
- It is not a native XAF implementation but a Windows Forms integration into XAF, which makes it really hard to support and harder to EasyTest.
- Import configuration cannot be reused.
- Does not support the Web.
- Poor notification of importing errors.
- Can only import *.xlsx files.
The IO module
This module was designed to help move objects graphs in the form of XML out of XAF and again in, using the same domain schema. Below you see the objects generation Graph.


Pros
- Its a native XAF solution.
- The export configuration can be reused as it is stored in the database.
- Supports both Win and Web.
- The module is EasyTested from these tests.
Cons
- It only works for the same BO domain.
- It only export in a predefined XML schema.
- Poor notification of import/export errors.
In addition in the IO module you can find:
The InitDataImporter
This class uses XPO to import from any XPO supported datastore, into different XPO domain model. This is accomplished with the InitialDataAttribute. You can see how to apply it in an XPO object in the XVideoRental demo which ships with DevExpress sources. For example look how it is applied to the Customer class and how it is instantiated for the whole domain. The XVideoRental demo can also be found in eXpandFramework sources so feel free to explore it.
The StorageMapper
This class requires a source and a target objectspace and it will copy a collection of objects and their graphs from one objectspace to the other.
The ExcelImporter module
The new ExcelImporter module integrates the ExcelDataReader project. It follows the same architecture with the rest of the eXpandFramework modules. There are three assemblies you have to use Xpand.ExpressApp.ExcelImporter.dll, Xpand.ExpressApp.ExcelImporter.Win.dll and Xpand.ExpressApp.ExcelImporter.Web.dll or you can use the related nugget packages.
Next are screenshots of the main view.


Pros
- It is a native XAF solution.
- It supports both Win and Web.
- The configuration is stored in the database and can be reused.
- It can import all the formats supported from the ExcelDataReader project.
- It is EasyTested from these tests.
- It notifies if errors before commit.
Cons
- This release does not commit in batches.
I hope this new module will be a great help for many of you. For feedback, questions etc. as always please use the online forums.

-
XAF offers mobile support long time and the XAF team is constantly adding new features and modules, I guess the out of CTP mode is close enough. So its about time to support the mobile platform from our community project (eXpandFramework).
Long story short: eXpandFramework up to now only recognized two contexts (Win, Web), this will change from v17.1.5.2 where a Mobile context is introduced.
What this means for you?
At the moment there are no new mobile modules released, however you are now able to use eXpandFramework your agnostic modules that reference eXpandFramwork in the mobile platform.
p.s.: All easytests for the Win, Web platform still pass on every release, but at the moment there are no tests for the mobile. but its on schedule.
Looking forward for your feedback at http://www.expandframework.com/forum/
-
Those of you that use Remote Desktop connection you probably noticed that some key combinations like CTRL+ALT+UpArrow are not passed to the client.
I looked everywhere but I could;t locate a ready solution so in invented one with the use of AutoHotKey.
Install AutoHotKey on both machines and create a Autohotkey script (a file with ahk extension) for the host machine and enter:
*^LAlt::^AppsKey
This will replace all key strokes that use the left alt key with the Control + AppsKey(the one that opens the context menu when right click).
and for the client machine similarly to switch back you need a second script with the following command
*^AppsKey::^LAlt
I am using this workaround for a week now with no issues, hope it helps some of you.
p.s. : if you have a better way, please post in comments
enjoy!

-
DevExpress released in v15.2.9 an ASP.NET Dashboard Designer (Online Demo). Following eXpandFramework with v15.2.9.3 releases an update to the existing integration of the dashboard suite.
Windows
In the existing windows implementation the end user can use the UI to create a DashboardDefinition, assign a few Business object types as datasources and execute the Edit Dashboard action to run the Designer.

Web
Similarly the end user need to perform the same actions to run the ASP.NET dashboard designer and create dashboard over the existing Business Object domain.

As you can see from the images above the eXpandFramework Dashboard module utilize security and syntax highlight editors integrations. The highlight for the win platform is done with the help of DevExpress XtraRichEdit control and for the web with the help of ACE cloud9 editor.
For those of you interested in the XtraDashboardTester solution you can find and run the related Easytests for the module. Basically the ASP.NET dashboard designer implementation uses a DashboardDesignerPropertyEditor and a DashboardDesignerController.
As always your feedback/question are welcome in our forums.

-
In this post I will go through the process of debugging eXpandFramework for each of the distribution channel.
The sources
If you download the sources either from GitHub or our download page or our build server you need to run the buildall64.cmd file located in the root folder. The batch will generate the symbol files (pdb) and will register the assemblies in the GAC. Debugging is enabled by default since symbols and sources are in place.
The Nuget packages
eXpandFramework is distributed through Nuget and since version 14.1.4.8 and with the excellent GitHubLink project provides frictionless debug experience as long as Symbol Server support is enabled under your VS/Options/Debugging settings. The symbols are in the same package as the dll so expect the package size to be at least double in size. We will consider a better implementation if there are requests. GitHubLink patches the symbols so to request the assembly sources from the online GitHub repo so there is not need to have the sources in place.
The Binaries / The Installer
Either way you choose you will end up with a folder containing the eXpandFramework assemblies + the patched symbols. So, debugging is enabled by default and sources will be queried from the online GitHub repo as long as Symbol Server support is enabled under your VS/Options/Debugging settings
PS: In the installer case you can also find the sources under the Sources folder in your installation directory.

-
With smart frameworks like XAF it is inevitable that you will create applications one would except they developed by a whole team and not from just one person. A side effect of rich/large applications is that it is impossible to determine if all parts of the application function unless you have tests.
Enter AutoTest from EasyTest
XAF comes together with EasyTest a functional testing framework. EasyTest has an undocumented command the AutoTest. In short the AutoTest command will go through all your Navigation Items and for all related views will execute the New action if available and open/close the related detailview.
So, lets talk by example. In eXpandFramework there are 38 Demos with a large number of views, each one demonstrating certain features. By using the AutoTest command we can automate the opening of all views therefore we can expect a code coverage larger than 80%.
Following is the RunEasyTests target used in eXpandFramework build script (Xpand.build).
  <Target Name="RunEasyTests" >
    <MSBuild Projects="@(EasyProjects)" Targets="Build" Properties="Configuration=EasyTest" />
    <CallTarget Targets="EasyTestUpdateDBTimeout" />
    <Delete Files="@EasyTestLogs"/>
    <CreateItem Include="@(EasyTestReqs)" AdditionalMetadata="CopiedToDir=%(EasyTests.RelativeDir);" >
      <Output ItemName="EasyTestReqsToDelete" TaskParameter="Include"/>
    </CreateItem>
    <Copy SourceFiles="@(EasytestReqs)" DestinationFolder="%(EasyTests.RelativeDir)"/>
    <Exec ContinueOnError="true"
          WorkingDirectory="%(EasyTests.RelativeDir)"
          Command='%(EasyTests.RelativeDir)\ProcessAsUser.exe $(TestExecutorName) %(EasyTests.Filename).ets'>
      <Output TaskParameter="ExitCode" PropertyName="ErrorCode"/>
    </Exec>
    <Delete Files="%(EasyTestReqsToDelete.CopiedToDir)%(EasyTestReqsToDelete.Filename)%(EasyTestReqsToDelete.Extension)"/>
    <Error Text="Login failed" Condition="'$(ErrorCode)' == '255'" />
    <CallTarget Targets='PrintEasyTestLogs' ></CallTarget>
  </Target>
Next we will discuss in detail each line of the RunEasyTests target.
<MSBuild Projects="@(EasyProjects)" Targets="Build" Properties="Configuration=EasyTest" />
First we need to build all demos under the EasyTest configuration where the required EasyTest components are functional.
<CallTarget Targets="EasyTestUpdateDBTimeout" />
In the above line we call the EasyTestUpdateDBTimeout target that will run DBUpdater for all demos that have long operations in their ModuleUpdaters. We need to explicitly execute the DBUpdater because there is a threshold in time between each EasyTest command so the Login action may fail if moduleupdater takes more than 25sec to complete.
<Delete Files="@EasyTestLogs"/>
This command will delete all EasyTest logs to make sure that our build script will not pick up any previous failed tests.
<Copy SourceFiles="@(EasytestReqs)" DestinationFolder="%(EasyTests.RelativeDir)"/>
This will copy a set of required files for EasyTest like the TestExecutor, XpandTestAdapters etc in the same path as the test. In the build server assemblies are not in the GAC so by putting them in the same path we minimize assembly binding errors due to version conflicts.
<Exec ContinueOnError="true" WorkingDirectory="%(EasyTests.RelativeDir)" Command='%(EasyTests.RelativeDir)\ProcessAsUser.exe $(TestExecutorName) %(EasyTests.Filename).ets'>
This line executes the TestExecutor for all EasyTests, It uses the ProcessAsUser.exe because the build script is actually executed from our build server service using the System Account which has no windows session therefore useful EasyTest features like screenshots are not available. In general we do not want to mess with the system account in order to make our tests run. So the ProcessAsUser reads a username and password from a registry key and by using an RDC connection (Windows Server) creates a new session and executes the tests there under the specified user security privileges. Finally because we are interested to execute all tests without failing the build to fail we set ContinueOnError to true.
<Delete Files="%(EasyTestReqsToDelete.CopiedToDir)%(EasyTestReqsToDelete.Filename)%(EasyTestReqsToDelete.Extension)"/>
This line will delete all EasyTest required files copied in previous steps
<Error Text="Login failed" Condition="'$(ErrorCode)' == '255'" />
If the ProcessAsUser returns 255 then we fail the build with the Login failed message.
<CallTarget Targets='PrintEasyTestLogs' ></CallTarget>
The PrintEasyTestLogs target will go through all EasyTest logs and for any entry with non passed Result it will fail the build with the related error message from the EasyTest xml log.
  <Target Name="PrintEasyTestLogs" >
    <MSBuild.ExtensionPack.Xml.XmlFile
      TaskAction="ReadElements" File="%(EasyTestLogs.FullPath)" Condition="'@(EasyTestLogs->Count())'!='0'"
      XPath="/Tests/Test[@Result='Warning' or @Result='Failed']" ReadChildrenToMetadata="true">
      <Output TaskParameter="Elements" ItemName="Test"/>
    </MSBuild.ExtensionPack.Xml.XmlFile>
    <Error Text="%0D%0AApplicationName: %(Test.ApplicationName)%0D%0AError: %(Test.Error)" Condition="'@(Test->Count())'!='0'"  ContinueOnError="True"></Error>
  </Target>
A big thanks this time to the AutoTest command that provided 80% code coverage for our community framework. I am sure AutoTest will be extended to provide even smarter automated tested in future versions. If you got into that trouble and have interesting ideas to share or contribute for AutoTestV2 please use our community framework forums.

-
DevExpress offers a great installer for their components and frameworks. But if you work in a continuous integration environment or have to deal with different versions of the components NuGet packages are the better way to deploy and version-control dependencies. This project contains .nuspec files for DevExpress WinForms, Web and XAF assemblies. It is not an official release and it is not supported by DevExpress.
This is the description of the DX-Nuspec files, open sourced from Sergej Derjabkin a casual community contributor! The files are available in https://github.com/derjabkin/DX-Nuspec and of course they will be distributed as a submodule from eXpandFramework v13.2.9.1.

-
13.2 was a great release and many of you already upgraded your applications. For everyone else I am here to help you make that decision sooner and easier, by reminding you what our reviewers had to say, when they upgraded their apps to our latest major release.
These are real world feedback without any kind of interaction from us.
Gustavo Marzioni
Making Business Applications Easier
Gustavo is a veteran programmer (20 years+) with a great presence in our community (most active user in eXpandFramework). He posted a very complete review of all new XAF features and a few other interesting things we released with 13.2 as part of our DXperience subscription. In addition you can find a performance comparison for our new ReportsV2 module.
Mario Blataric
Dungeons of XAF and Magic 13.2
Mario reviews v13.2 and explains how XAF helps him to fight monsters in today’s modern dungeon of dev technologies and platforms. His XAF app has more than 1500 reports so he focuses on the ReportsV2 module.
Martynas Dauciunas
Devexpress 13.2 Review - why bother upgrading ?
Martynas known from his very useful Excel Import Wizard module wrote an extensive review of all new features and problems encountered when he updated his 12.x ERP/CMMS application to v13.2.
Manuel Gunder
DevExpress 13.2 Review Part 1
DevExpress 13.2 Review Part 2
DevExpress 13.2 Review Part 3
Manuel has already contributed many solutions. This time he wrote a great review for all new XAF features. He also reviewed components not integrated with XAF like the new TaskBarAssistant and as a bonus in part 3 he wrote how to create a module that integrated this component with XAF. This module will soon be integrated into our community project eXpandFramework.
Robert Anderson
DevExpress 13.2 Review - Part 1
DevExpress 13.2 Review - Part 2
Robert is a casual blogger and community contributor. He wrote about all new 13.2 features along with a few more tricks and thoughts which cannot be found in our official posts.
Until next time,
Happy New Year to all!

-
Yesterday, I had a few interesting suggestions from an eXpandFramework user (Sheldmandu), about a few real world State Machine enhasements. Since XAF makes development amazingly fast, today we can discuss a bit about the implementaion released with (v13.1.8.22).
The full discussion can be found at this thread.
In sort Sheldmandu suggested.
- Allow certain roles to bypass State machine transition validation and make transitions without any restriction in order to correct mistakes.
This implemented by adding an extra tab in the State Machine detailview so the end user can associate it with the admin roles as illustrated in the next image.

- Support more efficient transitions by changing directly the property value without the need of executing the ChangeStateAction
For this a new property “EnableFilteredProperty” introduced in the State Machine attribute to make the life of our real worlds easier.

Most useful suggestions Sheldmandu! Many thanks form all and keep them coming.
We also looking forward for such great suggestions from the rest of the XAF world  .
.
Until next time,
Happy XAF’ing!

-
Our next major release (13.2), updates our Validation Module with more features that come with different behavior rules, such as Warnings and Information. These can be applied to your existing validation rules using code or the Model Editor.
The XAF validation module is a mature and flexible validation system, which allows you to create rules that can validate any business problem, For more information, check out the module documentation.
Suppose we have a Business Object that disallows saving a Customer if the Name property is blank. If this attempted the UI should respond with a “Everybody has a name!” message.
[DefaultClassOptions]
public class Customer : BaseObject {
public Customer(Session session) : base(session) { }
[RuleRequiredField("Customer_Name_Required", DefaultContexts.Save, "Everybody has a name!")]
public string Name { get; set; }
public string City { get; set; }
public int Age { get; set; }
}
When an end user tries to save the Customer without a name, XAF will show the Validation Error listview and consequently abort.

Creating a warning rule
A common requirement for our Customer class is to warn the end user that, if possible, he/she should provide the Customer’s city. To do this, we need to mark the City property with a RuleRequiredField. However, this time we have to set the ResultType to Warning as illustrated below.
[DefaultClassOptions]
public class Customer : BaseObject {
public Customer(Session session) : base(session) { }
[RuleRequiredField("Customer_Name_Required", DefaultContexts.Save, "Everybody has a name!")]
public string Name { get; set; }
[RuleRequiredField("Customer_City_Warning", DefaultContexts.Save, "Provide the City if possible",
ResultType = ValidationResultType.Warning)]
public string City { get; set; }
public int Age { get; set; }
}
When the end user saves the Customer (in runtime) providing a Name and not a City, XAF will again show the Validation Error listview however, this time there will be an extra Ignore action.

If the end user executes the Close action, the object will not be saved however if he executes the Ignore action it will be saved. In both cases in the detailview there will be a warning action by the City textbox to draw the end user’s attention.

Creating an Information rule
XAF allows you to create validation rules even at runtime using the Model Editor. So let’s say we want to just inform the end user, if he enters a Customer Age not between 10 and 60. This means that we need to use a RuleRangeField rule as illustrated in the next two images.


When the end user saves a Customer (in runtime) with an invalid Age range, XAF will not display the Validation Error listview at all. However, it will display an Information icon to draw his/her attention to the Age property.

Where to see more examples?
You may explore our FeatureCenter application located in your C:\Users\Public\Documents\DXperience 13.2 Demos\eXpressApp Framework\FeatureCenter\CS folder to see a few rules in action.
What about the web?
The validation module as a platform agnostic module works similarly for the web.

The soft validation is in its first release (CTP), thus we look forward to your feedback as we get it ready for it’s official release. Let me know what you think.

-
It has been almost a week since the XAF beta 1 and I hope you already tried the 13.2 bits of XAF. I am happy to announce that in our build servers you can find the 13.2 beta 1 of eXpandFramework.
I am also happy to tell you that even if eXpand has a huge code base the 13.2 migration was lighting fast. Thanks to the great job from the XAF team. So, I am pretty sure that the 13.2 migration will not affect your code bases or time either.
To get your hands in the XAF beta1 login to your account in the DevExpress site and download the release in red.

To get your hand in the eXpandFramework bits login to our build servers and download the latest 13.2.3.x bit.

p.s.: eXpandFramework as a community project is based on your feedback in order to be stable so for those of you that want to report issues and suggestions I opened a beta only forum.

Note: You cannot have both 13.1 and 13.2 eXpand assemblies in the GAC. It is however totally possible to work using different version as long as you reference the assemblies directly from their locations.

-
A few months ago eXpandFramework released the first version of View inheritance(see http://goo.gl/3YhTa9). In the latest version of the framework (13.1.8.12) it is possible filter the nodes that participate in the inheritance strategy.
The MergedDifference Strategy
To inherit a model view configuration from another view you can use the Model Editor and add a new record in the MergedDifferences collection as illustrated below.

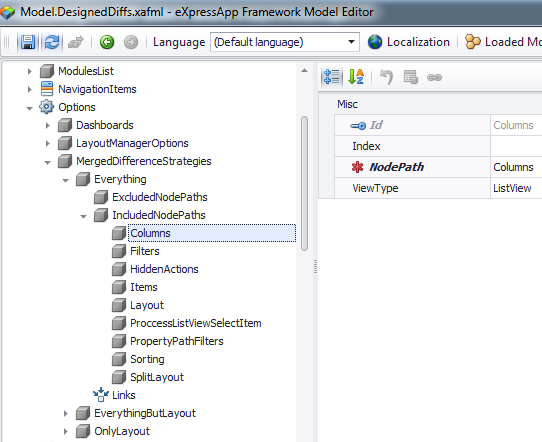
Now the great thing is that the Strategy attribute if fully configurable from Application/Options/MergedDifferencesStrategies. By default there are three common strategies Everything, EverythingButLayout, OnlyLayout.
In the above image we see how the Everything strategy is defined. It contains all root nodes of both DetailView and ListView nodes.
As you might have guessed the inheritance scenarios are limited only from your imagination. For example in the next image we see the OnlyLayout strategy however what defines the layout may vary so it is possible to inherit from the GridViewOptions node by simply adding a new record in the OnlyLayout strategy (bold).
Are there any working examples?
Yes in eXpandFramework source code there are many examples and yes eXpandFramework eats its own food.
The LogicOperationPermissionData
From the LogicOperationPermissionData class starts a deep inheritance tree that defines the Permissions used from all Logic Module depended modules as shown in the next image.

Below we see the layout of the base view (LogicRuleOperationPermissionData class).

In the next image the next class in the inheritance tree where we note that everything is the same as the base view and we also added the AdditionalViewControls extra tab.

The ModelDifferenceObject
In the ModelDifference module you can find the next inheritance tree.

The base view.

Next is the Role descendant layout, where everything is the same as the base view and we also added the Roles extra tab.

The XpandLogonParameters
XpandLogonParameters lives in the Xpand Security module and inherits from the AuthenticationStandardLogonParameters which is an XAF class and lives in the XAF Security module.
Bellow we see the layout of the AuthenticationStandardLogonParameters inside the XAF Security module.

Now inside the Xpand Security module we have modified the previous layout of the AuthenticationStandardLogonParameters as in next image.

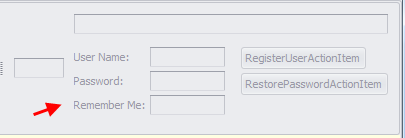
Next, we inherited that layout from the XpandLogonParameters class and added the extra Remember Me item as illustrated below.
A cross view custom Merged Strategy
In both model DetailView and ListView nodes you can find the HiddenActions node which can be used to hide actions for a view.
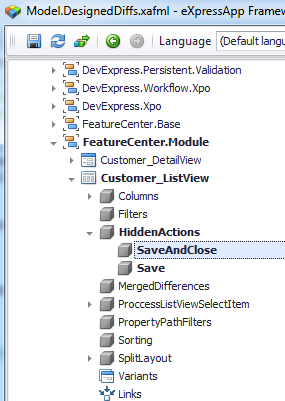
Let’s say we want to create a custom merged strategy to distribute the above list of hidden actions (Save, SaveAndClose).
Step 1: Create a View container
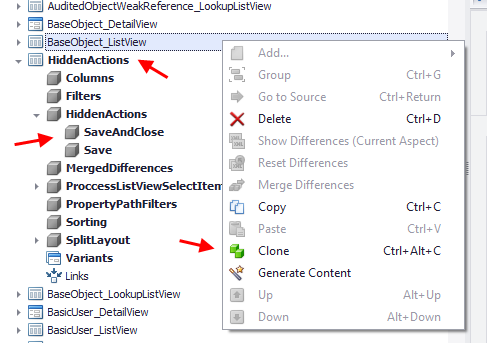
We first create a clone of the BaseObject_ListView, name it HiddenActions and add the actions we want to distribute in the HiddenActions collection. I chose the BaseObject_ListView because it can be inherited from all objects.
Step 2: Create a Merged Strategy
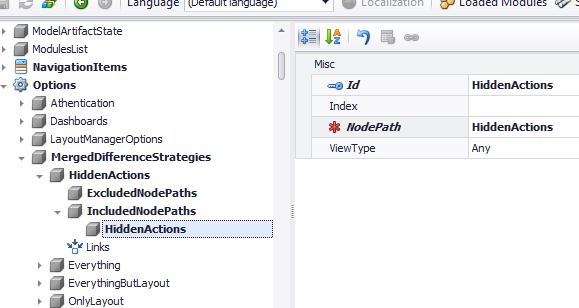
For this we have to set the NodePath to the HiddenActions node and the ViewType to Any so we can distribute to both DetailViews and ListViews.
Step 3: Inherit from the HiddenActions view
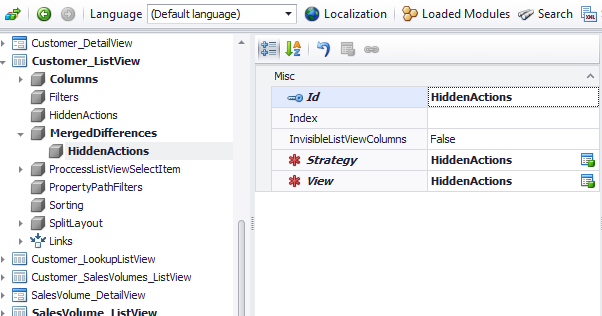
Go to the view that you want to inherit the HiddenActions view differences and create a MergedDifference record as the one below.
Step 4: Close and open again the Model Editor in order to see the inherited HiddenActions
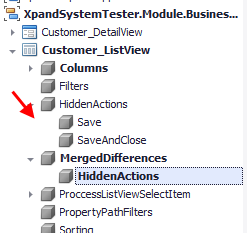
Big thanks to everybody that helped making this feature so powerful and even bigger thanks to the XAF developers that work hard to create that wonderful Application Model API.

-
With our next major release (13.2), we have simplified the manner in which you are able to add custom and computed fields to existing business models. The functionality is available to both developers and end-users.
Once beta 1 is released, you can explore this new custom member functionality by exploring the FeatureCenter solution located in the C:\Users\Public\Documents\DXperience 13.2 Demos\eXpressApp Framework\FeatureCenter\CS folder.
Design time
As you know, XAF already offered the ability to create non-calculated persistent fields at design time using the Model Editor. In 13.2, we’ve extended the Application Model with an Expression attribute as illustrated in the image below.

When the Expression attribute has a value, XAF will create a calculated member or it will default to the creation of a persistent member. Additionally, you can create a complex expression such as the Sum of another custom field as illustrated below.

By design, XAF will not display these custom fields in any view since they were created manually after the Application Model was generated.
Runtime
The great thing is that in 13.2, end-users can use the runtime version of the Model Editor to create custom members and extend the business domain as discussed in the previous section.
The image below illustrates where to locate the custom member in the Windows version of our FeatureCenter (same location for the web).

To invoke the runtime Model Editor, end-users can execute the Edit Model action.

You may also want to restrict Application Model modification to certain user groups. You can do that as illustrated below.
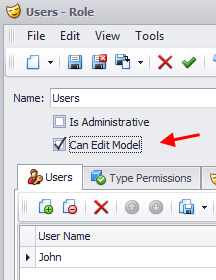
Developers can restrict end-users from creating custom members at runtime by setting the static ModelMemberRequiredCalculator.AllowPersistentCustomProperties to false.
The Web Runtime
To create a custom member for the web, you can use the Standalone Model Editor and edit the Model.xafml file located in the root of the web-site.
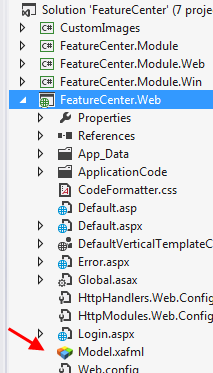
Custom members are in their first release (CTP) so we look forward to your feedback as we get it ready for the official release. Let me know what you think.

-
XAF includes the EasyTest functional test framework which as all DevExpress tools is an extensible beast. To learn more about EasyTest I suggest you go through our documentation. So, it was just about time to include a few projects in eXpandFramework to host custom commands and extensions contributed by our community.
Starting from next eXpandFramework version 13.1.10 in the root of our repository you will find three extra projects which contain:
- The FillDataTimeValue command as described in How to: Implement a Custom EasyTest Command.
- The custom database operations to support Drop & Restore for SQLite, ASA, LocalDB contributed by Markus Dütting!
The Drop and Restore Preprocessor Directives are already supported for Access, MSSql databases and to learn how to use them together with other commands look at EasyTest Script Reference.
Following are some notes from Markus.
- SQLite: just deletes the file DBSourceLocation (DropDB) or copys the file (RestoreDB) specified by Backupfilename to DBSourceLocation. Tested with System.Data.SQLite 1.0.88.0.
- LocalDB: uses the "DROP DATABASE" (DropDB) and "RESTORE DATABASE" (RestoreDB) command. DropDB or more exactly empty database creation doesn't correctly work with the MSSQL XPO Provider in 13.1.7 with LocalDB. It seems LocalDB's "CREATE DATABASE" command returns before the database is "connectable". Therefore only RestoreDB works, as i added code which tries to connect to the restored or new database in a loop up to 10 seconds. If you omit Backupfilename than RestoreDB creates an empty database. Tested with LocalDB v11.0 which comes with VS 2012.
- SAP SQL Anywhere: uses the "DROP DATABASE" (DropDB) command from the Utility Database that deletes the database file specified by DBSourceLocation and stops it before if it is running. RestoreDB does a DropDB just in case before it creates an empty database if Backupfilename is not specified, otherwise it copies the database and log file if specified by Backupfilename or restores them from the therein specified archive. After that it starts the database. Tested with SA16.
In addition, to spare our time, Markus contributed a sample config which can be found at http://goo.gl/1h4IMV.
Big thanks to Markus Dütting and we look forward for more EasyTest command and extensions from all XAFers our there. If you interested to share your own work you can find me at apostolisb at devexpress.

-
With the upcoming release of the eXpressApp Framework (version 13.2), we’re introducing a new way in which to create reports for your XAF powered application. Simply said, you’ll now be able to create your report using XtraReports within Visual Studio and effortlessly integrate them into your XAF applications.
This is an introductory post for the ReportsV2 module and I’ll describe it in more detail once we release. For now, please keep in mind that this will ship as a beta. We are looking forward to your feedback so we can continue to improve the module to meet your specific requirements.
To start using ReportV2, I’ll select it from the toolbox…

Because ReportsV2 integrates XtraReports at design time, you can use all the examples and documentation form our Reports Team. As you might imagine, when creating reports with this new module, you’ll be writing code and creating your own custom template within Visual Studio using your language of choice (C#, VB.Net). XAF will allow you to preview and print these new templates at runtime much like the existing Reports module. Since the design time report is a template, it is not editable at runtime, however, it is possible to clone it, make an editable copy and continue designing at runtime. In addition to native integration, ReportsV2 should make it easier for you to work with Stored Procedures, SubReports and hosting of custom components (this will be the subject of a dedicated blog post)..
To integrate XtraReports at design time, our team introduced two new components: the CollectionDataSource and the ViewDataSource. In the first beta release, you will need to add them to your toolbox manually.

The CollectionDataSource component
Drag and drop the component from the VS toolbox to the designer template of an XtraReport class. To create the XtraReports class, use existing XtraReports documentation. After setting up the ObjectTypeName to one of your domain objects the CollectionDataSource will load all objects properties as is.
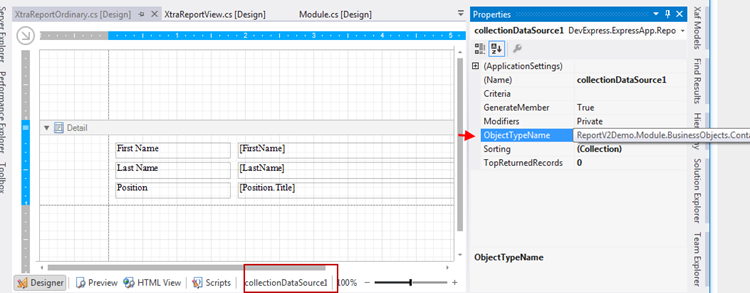
The ViewDataSource component
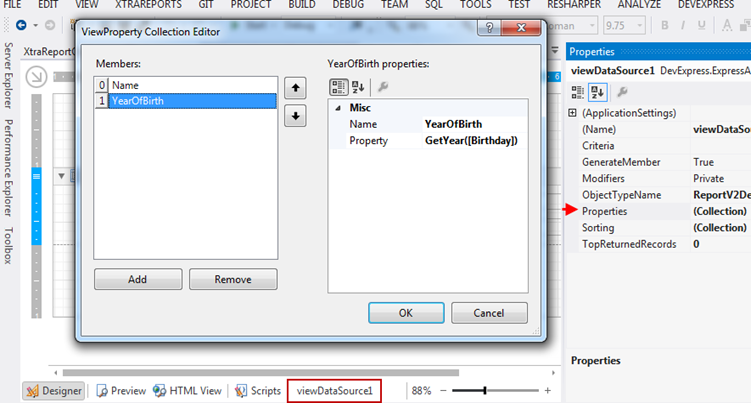
Much like CollectionDataSource, you will need to set the ObjectTypeName property. Note that the ViewDataSource component is designed to load only required plain data properties or aggregated calculations instead of the entire object hierarchy. As a result, you will get better performance and less memory consumption when you are dealing with thousands of records and complex data models. To configure the properties or expressions that will be used as a datasource, you can use the Properties collection as illustrated below.
Runtime integration
To load the report you created at design time with the new module, we provide a ModuleUpdater subclass -PredefinedReportsUpdater - which can be used as shown in the snippet below.
public override IEnumerable<ModuleUpdater> GetModuleUpdaters(IObjectSpace objectSpace, Version versionFromDB) {
ModuleUpdater updater = new DatabaseUpdate.Updater(objectSpace, versionFromDB);
PredefinedReportsUpdater predefinedReportsUpdater = new PredefinedReportsUpdater(Application, objectSpace, versionFromDB);
predefinedReportsUpdater.AddPredefinedReport<XtraReportOrdinary>("Inplace Report", typeof(Contact), isInplaceReport: true);
predefinedReportsUpdater.AddPredefinedReport<XtraReportView>("Report with ViewDataSource", null);
return new ModuleUpdater[] { updater, predefinedReportsUpdater };
}
We’ve created a specific demo for the ReportsV2 module. It is located in your C:\Users\Public\Documents\DXperience 13.2 Demos\eXpressApp Framework\ReportsV2Demo folder.
Because ReportsV2 will ship as a beta, we do not recommend its use in production code. We do want to hear your thoughts on ReportsV2 and are looking forward to incorporate your feedback…so please let us know what you think…
!

-
A few weeks ago, the eXpandFramework released registration support as discussed in How to manage users (register a new user, restore a password, etc.) from the logon form. While users could register, the implementation process was still incomplete it was missing email notification. Thus, this post will discuss the new EmailModule which was made available beginning version 13.1.8.2.
The module was designed following the workflow discussed in Declarative data auditing. In this post I will demonstrate how to install the module along with the registration functionality discussed in How to manage users (register a new user, restore a password, etc.) from the logon form in order to create three mail rules (
1) When new user is registered.
2) When the password is forgotten.
3) When a new customer is created.
In addition I will discuss how to restrict the EmailModue to sending emails only when a specific user role is logged in.
1) Installation
To complete installation, drag & drop the EmailModule from the toolbox into the module designer.

2) Enabling Registration
To use the registration process, the XpandSecurityWinModule & XpandSecurityWebModule must be installed just as we did with the EmailModule in step 1. Drag & drop these two modules from the toolbox into the module desinger. In addition, use the XpandLogonParemeters as the LogonParametersType of our authentication as illustrated in the following image.

The final step is to configure the model as shown below.

When the application starts, the logon form will have two extra actions. See below.

When the end user executes the top action, the XpandSecurity module will create a new view from the non-persistent RegisterUserParameters class.

Let’s stop here and configure the rule that will actually send an email..
4) Sending an email when a user is registered
The EmailModule will extend the Application model with an extra node

The first step towards sending an email is to setup the SmtpClient. See below.

Next we need to create an EmailContext that will instruct the EmailModule on how to locate the email template used for this type of notification.

Now it’s time to create the actual EmailTemplate. The EmailModule uses the Razor engine and provides an EmailTemplate persistent object for this. Thus, the code snippet inside a ModuleUpdater bellow can do the job!

And of course, XAF can do its usual magic in terms of the UI, allowing the end user to fully design the template at runtime in both windows and web!

The next stop is to create the rule that will send an email based on the template created when a new user registers. This is illustrated below.
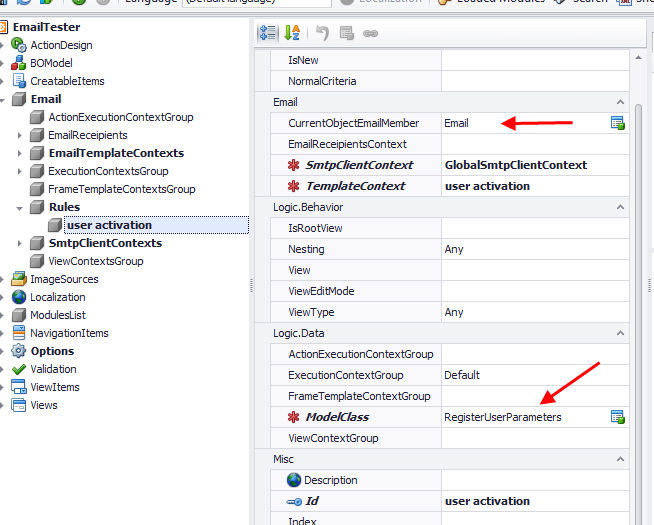
and the mail is send!
5) Sending an email for a forgotten password
As you might have guessed, the process is awfully similar here. We create a different EmailTemplate persistent object for this type of a notification and then create a new model EmailTemplateContent.
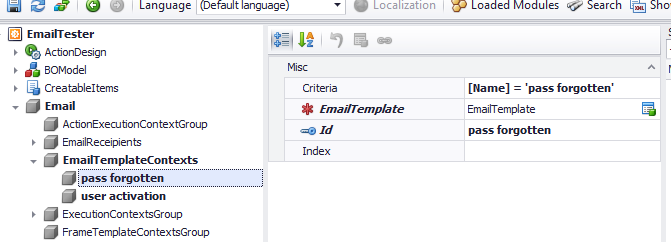
Then we form a rule, which instead of using the RegisterUserParameters class will use the RestorePasswordParameter and the “pass forgotten Template” context.
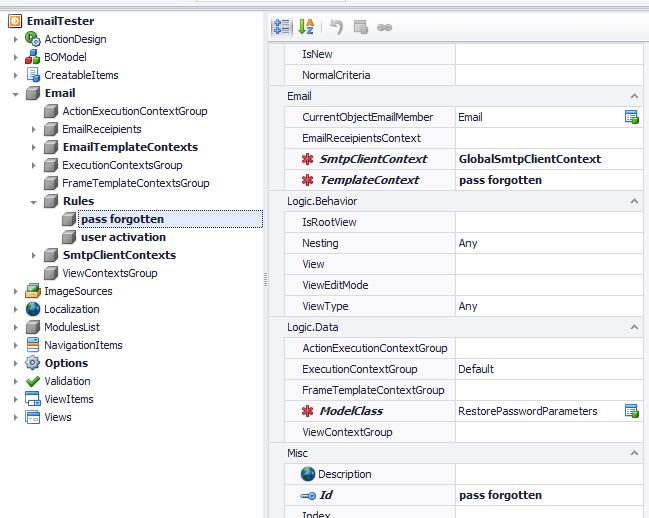
6) Sending an email to all admins when a new customer is created
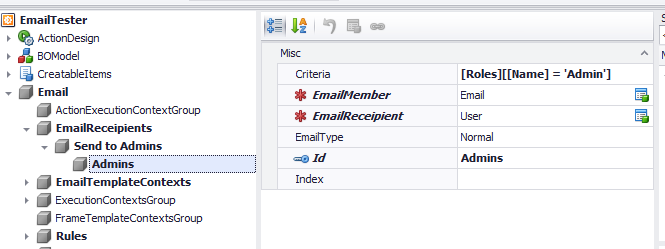
The procedure is pretty similar to the steps in the previous section. The difference is that in this case we will not set the CurrentObjectEmailMember attribute, since we want to send the email to all the admins and not to the customer. This is why we will need to create an EmailRecipient context as the image below illustrates.
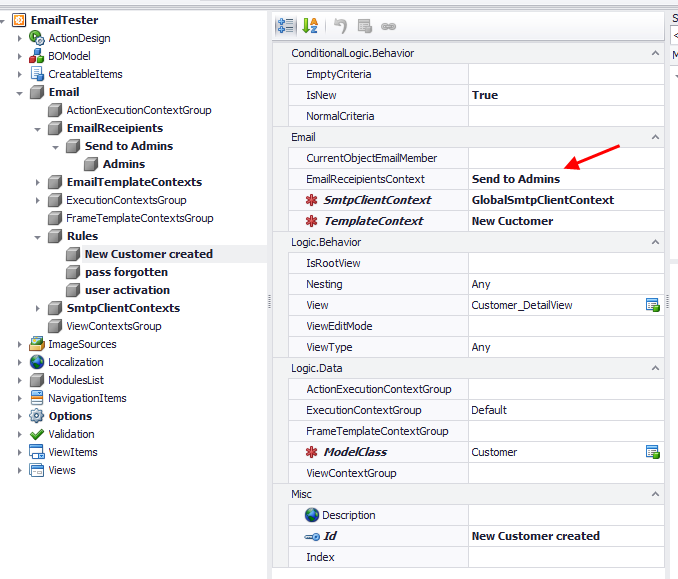
After, we must create the actual rule where we will set the EmailReceipientContext attribute..
7) Sending emails only when a specific user role is logged in
If you already read the Declarative data auditing post you probably know that all modules that use the Logic module can create rules using three different ways.Code Attributes decorating a class, using the Application Model or using permissions as you see bellow.

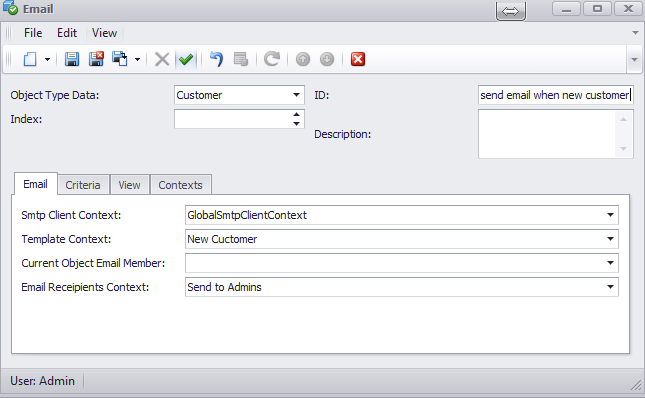
Note that the above layout is inherited from the Logic module using the technique discussed in the Model View inheritance version post.
An alternative approach is to use the Model Application modifications discussed in this post and using the ModelDifference module apply them to a Role Model and assign that model to the roles you want. For more information on this approach, see Changing your web Model at runtime with Model Editor and no IIS reset.
Feel free to explore what I discussed in this post in the eXpand source code under Demos/Modules/Email/EmailTester.sln
As always feel free to use the eXpand forums for your feedback and questions.
Happy XAF’ing to all!

-
I am happy to announce one more contribution from the known to you Stephen Manderson the creator of Dashboard module and not only!
Installation
The reminders can be found in eXpand Scheduler module in version 13.1.7.12 and currently is available only for the windows platform (Stephen is working on the Web version as well!). So you only need to drag & drop the XpandSchedulerWindowsFormsModule into the module designer.

Usage
To enable reminders decorate a business object that implements IEVent with the Xpand.ExpressApp.Scheduler.Reminders.SupportsReminderAttribute. For example in the snippet we enable reminders for the TestEvent and only when the criteria match.
[SupportsReminder(Criteria = "Customer is not null")]
public class TestEvent : Event {
public TestEvent(Session session) : base(session) {
}
// Fields...
Customer _customer;
[Association("Customer-TestEvents")]
public Customer Customer {
get { return _customer; }
set { SetPropertyValue("Customer", ref _customer, value); }
}
}
The SupportsReminderAttribute will extend your Application Model with an extra member.

It is also possible to use directly the model to create this extra member.

The end user to enable reminder for the TestEvent he has to check the enable reminder and setup an interval as shown below.

Then he can continue work with his XAF application and when the interval pass a reminder will popup!

You can test this functionality using the SchedulerTester solution found with eXpand sources unders Demos/Modules/Scheduler folder!
Thanks again to Stephen for this one and we all wait for the web version!
As always feel free to post your feedback question at eXpand forums.
Happy XAF’ing to all!

-
I will provide a short discussion on how to extend XAF StateMachine module as per subject.
By design when creating a new State the it is possible to restrict the transition to that State using Criteria. For example in the below image we see that the transition to the Completed state is allowed only to Administrators.

When you try to make the transition to the Completed state a handled exception will be raised however our goal is to hide all transitions that criteria do not fit.
So given the above requirement we need to write a controller that will go though all data hosted in the ChangeStateAction expose an event that will provide the state from external sources.
You can explore the controller that describes this requirement at
https://github.com/expand/eXpand/blob/master/Xpand/Xpand.ExpressApp.Modules/StateMachine/Controllers/ChangeStateActionController.cs
The next step is to subscribe to RequestActiveState event of the above ChangeStateActionController and provide the Active state logic. Below is illustrated a possible implementation.
public class CriteriaActionStateController:ViewController<ObjectView> {
private const string HideIfCriteriaDoNotFit = "HideIfCriteriaDoNotFit";
ChangeStateActionController _changeStateActionController;
protected override void OnActivated() {
base.OnActivated();
_changeStateActionController = Frame.GetController<ChangeStateActionController>();
_changeStateActionController.RequestActiveState+=ChangeStateActionControllerOnRequestActiveStateAction;
}
public override void CustomizeTypesInfo(DevExpress.ExpressApp.DC.ITypesInfo typesInfo) {
base.CustomizeTypesInfo(typesInfo);
var typeInfo = typesInfo.FindTypeInfo(typeof (XpoState));
typeInfo.CreateMember(HideIfCriteriaDoNotFit, typeof (bool));
}
protected override void OnDeactivated() {
base.OnDeactivated();
_changeStateActionController.RequestActiveState-=ChangeStateActionControllerOnRequestActiveStateAction;
}
void ChangeStateActionControllerOnRequestActiveStateAction(object sender, ChoiceActionItemArgs choiceActionItemArgs) {
var key = typeof(CriteriaActionStateController).Name;
choiceActionItemArgs.Active[key] = IsActive(choiceActionItemArgs.Transition);
}
bool IsActive(XpoTransition xpoTransition) {
var hideIfCriteriaDoNotFit = xpoTransition.TargetState.GetMemberValue(HideIfCriteriaDoNotFit) as bool?;
if (hideIfCriteriaDoNotFit.HasValue&&hideIfCriteriaDoNotFit.Value) {
var stateMachineLogic = new StateMachineLogic(ObjectSpace);
var ruleSetValidationResult = RuleSetValidationResult(xpoTransition, stateMachineLogic);
return ruleSetValidationResult.State != ValidationState.Invalid;
}
return true;
}
[Obsolete("in 13.2 the ValidateTransition will be public")]
RuleSetValidationResult RuleSetValidationResult(XpoTransition xpoTransition, StateMachineLogic stateMachineLogic) {
var methodInfo = stateMachineLogic.GetType().GetMethod("ValidateTransition");
return (RuleSetValidationResult) methodInfo.Invoke(stateMachineLogic, new[]{xpoTransition.TargetState, View.CurrentObject});
}
}
In the above controller (also available in eXpandFramework online repo) we also see that override the CustomisedTypesInfo to create a new member that will allow the end user to decide if he wants to hide the transition or use the by design behavior.

As always let us know your feedback using eXpand forums or for this functionality only you can post your feedback at this issue at DevExpress Support Center.
P.S. This implementation is available with the StateMachine module of eXpandFramework 13.1.7.10 and is also possible to do the same with permissions (see http://goo.gl/T0ZinL)! Also note that is totally possible to just grab the discussed controllers and add them in your projects without the eXpandFramework.

-
Last week I had the privilege to join many of our customers at Oliver’s XAF Training Class in Germany. I wanted to take the time and share with you what happened at the event – as it was an amazing week and highly recommend it to all XAF users.
The location
The hotel is located high in the mountains and the above an amazing landscape…a simply beautiful location.

The agenda
Day 1:
The organizers (Oliver and John) did a great job with course content. You can see all the XAF courseware below.

Day 1 started with XPO and how it works independent of XAF. Oliver is an XPO legend so the introduction was amazing and even I learned some new stuff. Oliver then took the time to describe XAF Domain Components and other data layer related subjects.
The day continued with a number of hands on labs so everyone can learn by actually doing.
To help get relaxed after a busy day of learning, we spent some time on the golf course.

Day 2:
The day started with instruction on editing and maintaining the model as well as standard functionality available through it. Actions, controller extensions binding business logic was also on the menu.
Oliver is an experienced instructor and did great job in this topic area as well. Like day 1, hands on labs were on day 2’s agenda.
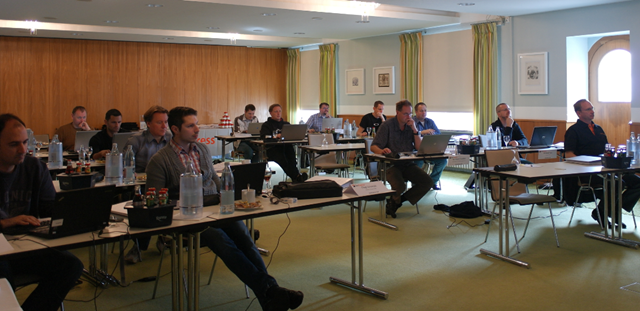
The day ended with time at the spa and a great dinner.
Day 3:
This day involved learning about the built-in modules in XAF and so Oliver spoke to us about Security, Validation, Printing, Reporting, Auditing, State Machines. We covered all simple modules with a few hours of hands on labs.
To blow off steam, John and Oliver organized an evening at the mini-car race track. Many of us gave it our best shot to win….

Unfortunately only one person can win…  .
.

Day 4
With spirits high, Oliver moved onto more advanced modules like XAF’s Scheduler, KPI, WorkFlow and of course a few hours of hands on labs. He also took the time to go further into more difficult topics such as extending and working outside the XAF framework.
The class insisted so I also did a presentation on eXpandFramework where I described how you can use all that extended functionality in our community project.
Day 4’s final event involved alcohol, so I’m not going to post any pictures here  .
.
Day 5
Unfortunately I had a early flight on the last day and couldn’t attend however I can share the daily agenda.
• Modularizing your own functionality
• Testing
• Deployment / Update / ALM / Security Considerations
• Q&A
Way to go to John, Oliver and DevExpress for this amazing XAF training week!
Until next time, Happy XAF’ing to all!

-
If you need to customize the default templates consider going through the instructions posted by Michael Lang in our Support center.
The issue I am talking about can be found at B234907. Just download the pdf and follow the very detailed instructions.
Big thanks to Michael! for this sharing this, let us know your questions/feedback by replying on the same issue.

-
I am happy to announce web support for the module discussed in Dashboards in the real world – A Scotland strike! Big thanks to Stephen Manderson for this additional contribution!.
Installation
Drag & drop from the VS toolbox.

End Result

Please use eXpand forums for your feedback and questions!
p.s. : the module is released with eXpandFrameowork v13.1.7.6.
